count-file-lines

命令行统计文件行数

Linux 统计代码行数

在 Linux 下这是一件很简单的事情:

1
2
3
find . -name "*.py" | wc -l

find ./ -name "*.py" |xargs cat|grep -v ^$|wc -l

这行语句就可以很简单地统计出当前目录下所有py后缀文件的行数了。

javamelody

JavaMelody : monitoring of JavaEE applications

image.png

spring-boot

Spring Boot

Spring Boot makes it easy to create Spring-powered, production-grade applications and
services with absolute minimum fuss. It takes an opinionated view of the Spring platform
so that new and existing users can quickly get to the bits they need.

You can use Spring Boot to create stand-alone Java applications that can be started using
java -jar or more traditional WAR deployments. We also provide a command line tool
that runs spring scripts.

country

国家和地区

国家是阶级统治的工具。

国家(States、Countries)是由领土、人民(民族,居民)、文化和政府四个要素组成的,国家也是政治地理学名词。从广义的角度,国家是指拥有共同的语言、文化、种族、血统、领土、政府或者历史的社会群体。从狭义的角度,国家是一定范围内的人群所形成的共同体形式。

在社会科学和人文地理范畴,国家是指被人民、文化、语言、地理区别出来的领土;被政治自治权区别出来的一块领地;一个领地或者邦国的人民;跟特定的人有关联的地区。

Suffix-expression

后缀表达式

后缀表达式,又称逆波兰式,指的是不包含括号,运算符放在两个运算对象的后面,所有的计算按运算符出现的顺序,严格从左向右进行(不再考虑运算符的优先规则)。

后缀表达式计算:
后缀表达式计算与前缀表达式类似,只是顺序是从左至右,具体过程如下:
从左至右扫描表达式,遇到数字时,将数字压入堆栈,遇到运算符时,弹出栈顶的两个数,用运算符对它们做相应的计算(次顶元素 op 栈顶元素),并将结果入栈;重复上述过程直到表达式最右端,最后运算得出的值即为表达式的结果

md5-info

MD5

MD5信息摘要算法(英语:MD5 Message-Digest Algorithm),一种被广泛使用的密码散列函数,可以产生出一个128位(16字节)的散列值(hash value),用于确保信息传输完整一致。MD5由美国密码学家罗纳德·李维斯特(Ronald Linn Rivest)设计,于1992年公开,用以取代MD4算法。这套算法的程序在 RFC 1321 标准中被加以规范。1996年后该算法被证实存在弱点,可以被加以破解,对于需要高度安全性的数据,专家一般建议改用其他算法,如SHA-2。2004年,证实MD5算法无法防止碰撞(collision),因此不适用于安全性认证,如SSL公开密钥认证或是数字签名等用途。
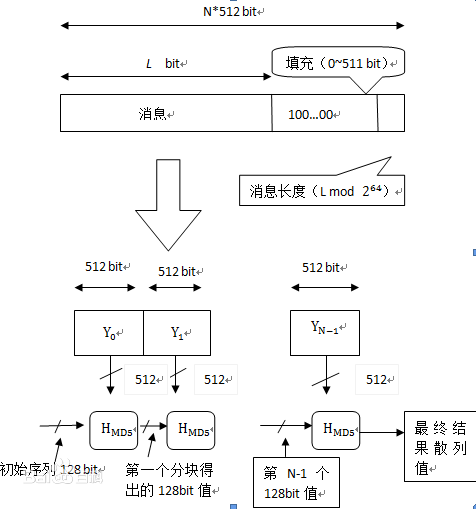
image.png

C++实现

1
2
3
4
5
6
7
8
9
10
11
12
13
14
15
16
17
18
19
20
21
22
23
24
25
26
27
28
29
30
31
32
33
34
35
36
37
38
39
40
41
42
43
44
45
46
47
48
49
50
51
52
53
54
55
56
57
58
59
60
61
62
63
64
65
66
67
68
69
70
71
72
73
74
75
76
77
78
79
80
81
82
83
84
85
86
87
88
89
90
91
92
93
94
95
96
97
98
99
100
101
102
103
104
105
106
107
108
109
110
111
112
113
114
115
116
117
118
119
120
121
122
123
124
125
126
127
128
129
130
131
132
133
134
135
136
137
138
139
140
#include<iostream>
#include<string>
using namespace std;
#define shift(x, n) (((x) << (n)) | ((x) >> (32-(n))))//右移的时候,高位一定要补零,而不是补充符号位
#define F(x, y, z) (((x) & (y)) | ((~x) & (z)))
#define G(x, y, z) (((x) & (z)) | ((y) & (~z)))
#define H(x, y, z) ((x) ^ (y) ^ (z))
#define I(x, y, z) ((y) ^ ((x) | (~z)))
#define A 0x67452301
#define B 0xefcdab89
#define C 0x98badcfe
#define D 0x10325476
//strBaye的长度
unsigned int strlength;
//A,B,C,D的临时变量
unsigned int atemp;
unsigned int btemp;
unsigned int ctemp;
unsigned int dtemp;
//常量ti unsigned int(abs(sin(i+1))*(2pow32))
const unsigned int k[]={
0xd76aa478,0xe8c7b756,0x242070db,0xc1bdceee,
0xf57c0faf,0x4787c62a,0xa8304613,0xfd469501,0x698098d8,
0x8b44f7af,0xffff5bb1,0x895cd7be,0x6b901122,0xfd987193,
0xa679438e,0x49b40821,0xf61e2562,0xc040b340,0x265e5a51,
0xe9b6c7aa,0xd62f105d,0x02441453,0xd8a1e681,0xe7d3fbc8,
0x21e1cde6,0xc33707d6,0xf4d50d87,0x455a14ed,0xa9e3e905,
0xfcefa3f8,0x676f02d9,0x8d2a4c8a,0xfffa3942,0x8771f681,
0x6d9d6122,0xfde5380c,0xa4beea44,0x4bdecfa9,0xf6bb4b60,
0xbebfbc70,0x289b7ec6,0xeaa127fa,0xd4ef3085,0x04881d05,
0xd9d4d039,0xe6db99e5,0x1fa27cf8,0xc4ac5665,0xf4292244,
0x432aff97,0xab9423a7,0xfc93a039,0x655b59c3,0x8f0ccc92,
0xffeff47d,0x85845dd1,0x6fa87e4f,0xfe2ce6e0,0xa3014314,
0x4e0811a1,0xf7537e82,0xbd3af235,0x2ad7d2bb,0xeb86d391};
//向左位移数
const unsigned int s[]={7,12,17,22,7,12,17,22,7,12,17,22,7,
12,17,22,5,9,14,20,5,9,14,20,5,9,14,20,5,9,14,20,
4,11,16,23,4,11,16,23,4,11,16,23,4,11,16,23,6,10,
15,21,6,10,15,21,6,10,15,21,6,10,15,21};
const char str16[]="0123456789abcdef";
void mainLoop(unsigned int M[])
{
unsigned int f,g;
unsigned int a=atemp;
unsigned int b=btemp;
unsigned int c=ctemp;
unsigned int d=dtemp;
for (unsigned int i = 0; i < 64; i++)
{
if(i<16){
f=F(b,c,d);
g=i;
}else if (i<32)
{
f=G(b,c,d);
g=(5*i+1)%16;
}else if(i<48){
f=H(b,c,d);
g=(3*i+5)%16;
}else{
f=I(b,c,d);
g=(7*i)%16;
}
unsigned int tmp=d;
d=c;
c=b;
b=b+shift((a+f+k[i]+M[g]),s[i]);
a=tmp;
}
atemp=a+atemp;
btemp=b+btemp;
ctemp=c+ctemp;
dtemp=d+dtemp;
}
/*
*填充函数
*处理后应满足bits≡448(mod512),字节就是bytes≡56(mode64)
*填充方式为先加一个1,其它位补零
*最后加上64位的原来长度
*/
unsigned int* add(string str)
{
unsigned int num=((str.length()+8)/64)+1;//以512位,64个字节为一组
unsigned int *strByte=new unsigned int[num*16]; //64/4=16,所以有16个整数
strlength=num*16;
for (unsigned int i = 0; i < num*16; i++)
strByte[i]=0;
for (unsigned int i=0; i <str.length(); i++)
{
strByte[i>>2]|=(str[i])<<((i%4)*8);//一个整数存储四个字节,i>>2表示i/4 一个unsigned int对应4个字节,保存4个字符信息
}
strByte[str.length()>>2]|=0x80<<(((str.length()%4))*8);//尾部添加1 一个unsigned int保存4个字符信息,所以用128左移
/*
*添加原长度,长度指位的长度,所以要乘8,然后是小端序,所以放在倒数第二个,这里长度只用了32位
*/
strByte[num*16-2]=str.length()*8;
return strByte;
}
string changeHex(int a)
{
int b;
string str1;
string str="";
for(int i=0;i<4;i++)
{
str1="";
b=((a>>i*8)%(1<<8))&0xff; //逆序处理每个字节
for (int j = 0; j < 2; j++)
{
str1.insert(0,1,str16[b%16]);
b=b/16;
}
str+=str1;
}
return str;
}
string getMD5(string source)
{
atemp=A; //初始化
btemp=B;
ctemp=C;
dtemp=D;
unsigned int *strByte=add(source);
for(unsigned int i=0;i<strlength/16;i++)
{
unsigned int num[16];
for(unsigned int j=0;j<16;j++)
num[j]=strByte[i*16+j];
mainLoop(num);
}
return changeHex(atemp).append(changeHex(btemp)).append(changeHex(ctemp)).append(changeHex(dtemp));
}
unsigned int main()
{
string ss;
// cin>>ss;
string s=getMD5("abc");
cout<<s;
return 0;
}

b-tree

B-Tree

B-Tree 与 B+Tree

在数据结构与算法/查找树 https://url.wx-coder.cn/9PnzG 一节中我们介绍了 B-Tree 的基本概念与实现,这里我们继续来分析下为何 B-Tree 相较于红黑树等二叉查找树会更适合于作为数据库索引的实现。一般来说,索引本身也很大,不可能全部存储在内存中,因此索引往往以索引文件的形式存储的磁盘上。这样的话,索引查找过程中就要产生磁盘 I/O 消耗,相对于内存存取,I/O 存取的消耗要高几个数量级,所以评价一个数据结构作为索引的优劣最重要的指标就是在查找过程中磁盘 I/O 操作次数的渐进复杂度。换句话说,索引的结构组织要尽量减少查找过程中磁盘 I/O 的存取次数。
根据 B-Tree 的定义,可知检索一次最多需要访问 h 个节点。数据库系统的设计者巧妙利用了磁盘预读原理,将一个节点的大小设为等于一个页,这样每个节点只需要一次 I/O 就可以完全载入。每次新建节点时,直接申请一个页的空间,这样就保证一个节点物理上也存储在一个页里,加之计算机存储分配都是按页对齐的,就实现了一个节点只需一次 I/O。而检索的时候,一次检索最多需要 h-1 次 I/O(根节点常驻内存),其渐进复杂度为 ,实际应用中,出度 d 是非常大的数字,通常超过 100,因此 h 非常小(通常不超过 3)。而红黑树这种结构,h 明显要深的多。由于逻辑上很近的节点(父子)物理上可能很远,无法利用局部性,所以红黑树的 I/O 渐进复杂度也为 O(h),效率明显比 B-Tree 差很多。

B+Tree 是 的变种,有着比 B-Tree 更高的查询性能,其相较于 B-Tree 有了如下的变化:
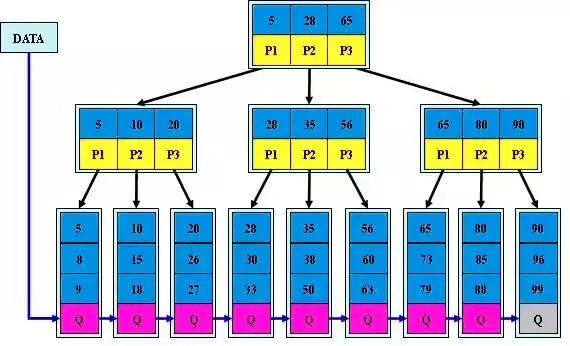
  • 有 m 个子树的节点包含有 m 个元素(B-Tree 中是 m-1)。
  • 根节点和分支节点中不保存数据,只用于索引,所有数据都保存在叶子节点中。
  • 所有分支节点和根节点都同时存在于子节点中,在子节点元素中是最大或者最小的元素。
  • 叶子节点会包含所有的关键字,以及指向数据记录的指针,并且叶子节点本身是根据关键字的大小从小到大顺序链接。

image.png

一般在数据库系统或文件系统中使用的 B+Tree 结构都在经典 B+Tree 的基础上进行了优化,增加了顺序访问指针:

如上图所示,在 B+Tree 的每个叶子节点增加一个指向相邻叶子节点的指针,就形成了带有顺序访问指针的 B+Tree。做这个优化的目的是为了提高区间访问的性能,例如下图中如果要查询 key 为从 3 到 8 的所有数据记录,当找到 3 后,只需顺着节点和指针顺序遍历就可以一次性访问到所有数据节点,极大提到了区间查询效率。
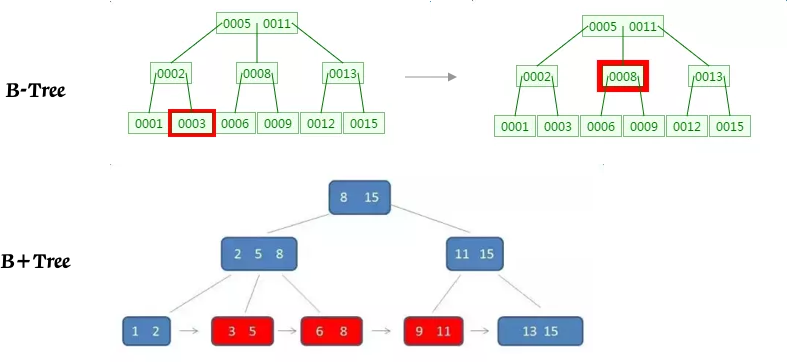
image.png

索引顺序

B-Tree 索引可以很好地用于单行、范围或者前缀扫描,他们只有在查找使用了索引的最左前缀(Leftmost Prefix)的时候才有用。不过 B-Tree 索引存在一些限制:

  • 如果查找不从索引列的最左边开始,索引就无法使用;同样,不能查找字符串结尾;
  • 不能跳过索引中的列;
  • 不能使用任何在第一个范围条件右边的列作为条件;

因此 B-Tree 的列顺序非常重要,上述使用规则都和列顺序有关。对于实际的应用,一般要根据具体的需求,创建不同列和不同列顺序的索引。假设有索引 Index(A,B,C):

1
2
3
4
5
6
7
8
9
10
11
12
13
# 使用索引
A>5 AND A<10 - 最左前缀匹配
A=5 AND B>6 - 最左前缀匹配
A=5 AND B=6 AND C=7 - 全列匹配
A=5 AND B IN (2,3) AND C>5 - 最左前缀匹配,填坑

# 不能使用索引
B>5 - 没有包含最左前缀
B=6 AND C=7 - 没有包含最左前缀

# 使用部分索引
A>5 AND B=2 - 使用索引 A 列
A=5 AND B>6 AND C=2 - 使用索引的 A 和 B 列

复制代码使用索引对结果进行排序,需要索引的顺序和 ORDER BY 子句中的顺序一致,并且所有列的升降序一致(ASC/DESC)。如果查询连接了多个表,只有在 ORDER BY 的列引用的是第一个表才可以(需要按序 JOIN)。

1
2
3
4
5
6
7
8
9
10
11
12
# 使用索引排序
ORDER BY A - 最左前缀匹配
WHERE A=5 ORDER BY B,C - 最左前缀匹配
WHERE A=5 ORDER BY B DESC - 最左前缀匹配
WHERE A>5 ORDER BY A,B - 最左前缀匹配

# 不能使用索引排序
WHERE A=5 ORDER BY B DESC,C ASC - 升降序不一致
WHERE A=5 ORDER BY B,D - D 不在索引中
WHERE A=5 ORDER BY C - 没有包含最左前缀
WHERE A>5 ORDER BY B,C - 第一列是范围条件,无法使用 BC 排序
WHERE A=5 AND B IN(1, 2) ORDER BY C - B 也是范围条件,无法用 C 排序

rsa-info

RSA算法详解

image.png

前言
总括: 本文详细讲述了RSA算法详解,包括内部使用数学原理以及产生的过程。

原文博客地址:RSA算法详解

知乎专栏&&简书专题:前端进击者(知乎)&&前端进击者(简书)

博主博客地址:Damonare的个人博客

相濡以沫。到底需要爱淡如水。

正文
之前写过一篇文章SSL协议之数据加密过程,里面详细讲述了数据加密的过程以及需要的算法。SSL协议很巧妙的利用对称加密和非对称加密两种算法来对数据进行加密。这篇文章主要是针对一种最常见的非对称加密算法——RSA算法进行讲解。其实也就是对私钥和公钥产生的一种方式进行描述。首先先来了解下这个算法的历史:

RSA算法的历史

RSA是1977年由罗纳德·李维斯特(Ron Rivest)、阿迪·萨莫尔(Adi Shamir)和伦纳德·阿德曼(Leonard Adleman)一起提出的。当时他们三人都在麻省理工学院工作。RSA就是他们三人姓氏开头字母拼在一起组成的。

但实际上,在1973年,在英国政府通讯总部工作的数学家克利福德·柯克斯(Clifford Cocks)在一个内部文件中提出了一个相同的算法,但他的发现被列入机密,一直到1997年才被发表。

所以谁是RSA算法的发明人呢?不好说,就好像贝尔并不是第一个发明电话的人但大家都记住的是贝尔一样,这个地方我们作为旁观者倒不用较真,重要的是这个算法的内容:

RSA算法的过程

RSA算法用到的数学知识特别多,所以在中间介绍这个算法生成私钥和公钥的过程中会穿插一些数学知识。生成步骤如下:

  1. 寻找两个不相同的质数
    随意选择两个大的质数p和q,p不等于q,计算N=p*q;

什么是质数?我想可能会有一部分人已经忘记了,定义如下:

除了1和该数自身外,无法被其他自然数整除的数(也可定义为只有1该数本身两个正因数]的数)。

比如2,3,5,7这些都是质数,9就不是了,因为3*3=9了

  1. 根据欧拉函数获取r
    r = φ(N) = φ(p)φ(q) = (p-1)(q-1)。

这里的数学概念就是什么是欧拉函数了,什么是欧拉函数呢?

欧拉函数的定义:

欧拉函数 φ(n)是小于或等于n的正整数中与n互质的数的数目。

互质的定义:

如果两个或两个以上的整数的最大公约数是 1,则称它们为互质

例如:φ(8) = 4,因为1,3,5,7均和8互质。

推导欧拉函数:

(1)如果n = 1, φ(1) = 1;(小于等于1的正整数中唯一和1互质的数就是1本身);

(2)如果n为质数,φ(n) = n - 1;因为质数和每一个比它小的数字都互质。比如5,比它小的正整数1,2,3,4都和他互质;

(3) 如果n是a的k次幂,则 φ(n) = φ(a^k) = a^k - a^(k-1) = (a-1)a^(k-1);

(4) 若m,n互质,则φ(mn) = φ(m)φ(n)

证明:设A, B, C是跟m, n, mn互质的数的集,据中国剩余定理(经常看数学典故的童鞋应该了解,剩余定理又叫韩信点兵,也叫孙子定理),A*B和C可建立双射一一对应)的关系。(或者也可以从初等代数角度给出欧拉函数积性的简单证明) 因此的φ(n)值使用算术基本定理便知。(来自维基百科)

  1. 选择一个小于r并与r互质的整数e
    选择一个小于r并与r互质的整数e,求得e关于r的模反元素,命名为d(ed = 1(mod r)模反元素存在,当且仅当e与r互质),e我们通常取65537。

模反元素:

如果两个正整数a和n互质,那么一定可以找到整数b,使得 ab-1 被n整除,或者说ab被n除的余数是1。

比如3和5互质,3关于5的模反元素就可能是2,因为32-1=5可以被5整除。所以很明显模反元素不止一个,2加减5的整数倍都是3关于5的模反元素{…-3, 2,7,12…}* 放在公式里就是3*2 = 1 (mod 5)

上面所提到的欧拉函数用处实际上在于欧拉定理:

欧拉定理:

如果两个正整数a和n互质,则n的欧拉函数 φ(n) 可以让下面的等式成立:

a^φ(n) = 1(mod n)

由此可得:a的φ(n - 1)次方肯定是a关于n的模反元素。

欧拉定理就可以用来证明模反元素必然存在。

由模反元素的定义和欧拉定理我们知道,a的φ(n)次方减去1,可以被n整除。比如,3和5互质,而5的欧拉函数φ(5)等于4,所以3的4次方(81)减去1,可以被5整除(80/5=16)。

小费马定理:

假设正整数a与质数p互质,因为质数p的φ(p)等于p-1,则欧拉定理可以写成

a^(p-1) = 1 (mod p)

这其实是欧拉定理的一个特例。

  1. 销毁p和q
    此时我们的(N , e)是公钥,(N, d)为私钥,爱丽丝会把公钥(N, e)传给鲍勃,然后将(N, d)自己藏起来。一对公钥和私钥就产生了,然后具体的使用方法呢?请看:SSL协议之数据加密过程详解

RSA算法的安全性

我们知道像RSA这种非对称加密算法很安全,那么到底为啥子安全呢? 我们来看看上面这几个过程产生的几个数字:

p,q:我们随机挑选的两个大质数;
N:是由两个大质数p和q相乘得到的。N = p * q;
r:由欧拉函数得到的N的值,r = φ(N) = φ(p)φ(q) = (p-1)(q-1)。
e:随机选择和和r互质的数字,实际中通常选择65537;
d: d是以欧拉定理为基础求得的e关于r的模反元素,ed = 1 (mod r);
N和e我们都会公开使用,最为重要的就是私钥中的d,d一旦泄露,加密也就失去了意义。那么得到d的过程是如何的呢?如下:

比如知道e和r,因为d是e关于r的模反元素;r是φ(N) 的值
而φ(N)=(p-1)(q-1),所以知道p和q我们就能得到d;
N = pq,从公开的数据中我们只知道N和e,所以问题的关键就是对N做因式分解能不能得出p和q
所以得出了在上篇博客说到的结论,非对称加密的原理:

将a和b相乘得出乘积c很容易,但要是想要通过乘积c推导出a和b极难。即对一个大数进行因式分解极难

目前公开破译的位数是768位,实际使用一般是1024位或是2048位,所以理论上特别的安全。

后记
RSA算法的核心就是欧拉定理,根据它我们才能得到私钥,从而保证整个通信的安全。

openssl

OpenSSL下载安装

1、下载OpenSSL

OpenSSL下载地址:https://oomake.com/download/openssl

这个链接有Windows版和源码版最新版下载地址,可以满足Windows、LInux、Mac OS系统使用。

2、Windows系统安装OpenSSL

到上面的链接下载OpenSSL Windows版本,注意32位和64位是不同的安装包,

下载之后是exe文件,双击按照提示一步步安装就可以了。

3、 Linux系统安装OpenSSL

3.1 安装OpenSSL:

1
2
3
4
5
6
7
8
9
10
11
# tar -xzf openssl-1.0.2f.tar.gz

# cd openssl-1.0.2f

# mkdir /usr/local/openssl

# ./config --prefix=/usr/local/openssl

# make

# make install

这样就安装完成了,接下来一些辅助步骤。

3.2 创建软连接

1
2
3
# which openssl

/usr/local/openssl/bin/openssl

为了使用方便,以及以后版本更新方便,可以创建软连接,如下:

1
# ln -s /usr/local/openssl/bin/openssl /usr/bin/openssl

3.3 执行以下命令

1
2
3
4
5
6
7
8
9
10
11
12
13
14
15
16
17
# cd /usr/local/openssl

# ldd /usr/local/openssl/bin/openssl

    linux-vdso.so.1 =>  (0x00007ffc63975000)

    libssl.so.1.1 => not found

    libcrypto.so.1.1 => not found

    libdl.so.2 => /lib64/libdl.so.2 (0x00007f8d9da0f000)

    libpthread.so.0 => /lib64/libpthread.so.0 (0x00007f8d9d7f3000)

    libc.so.6 => /lib64/libc.so.6 (0x00007f8d9d431000)

    /lib64/ld-linux-x86-64.so.2 (0x00007f8d9dc28000)

安装OK

3.4 查看版本

1
2
3
# openssl version

/usr/local/openssl/bin/openssl: error while loading shared libraries: libssl.so.1.1: cannot open shared object file: No such file or directory

找不到动态库libssl.so.1.1,小问题,执行如下命令:

1
# vim /etc/ld.so.conf

在最后追加一行:

1
/usr/local/openssl/lib

然后执行:

1
2
3
4
5
6
7
# ldconfig /etc/ld.so.conf

# openssl version

OpenSSL 1.1.0f  25 May 2017

Done.

android-fingerprint-security

Android Fingerprint Security

安全性一直是移动开发的关键部分,正确实现它绝非易事。智能手机最初使用4位PIN码进行破解,最多需要10,000次破解。然后是锁定模式,尽管基本的人性极大地降低了这个数字,但锁定模式却将标准提高到了惊人的389112种不同的模式。 与PIN和锁定模式不同,指纹身份验证要提前数年。一个人的指纹确实是独一无二的,无法猜测。这项技术在消费类设备上正变得越来越流行,并且使用棉花糖,比以往任何时候都更容易在您的应用程序中实现它。

多年来的Android安全性,PIN锁定,滑动锁定模式和指纹

然后

除了我们已经写过的 iOS Touch ID之外,Android上指纹扫描的早期实现还不够。每个供应商都有其独特的方法来确保流程的安全性和实施,最重要的是,如何存储用户的私有数据。

现在

随着棉花糖的到来,人们期待已久的通过标准API对指纹认证的本机支持。最终,Android开发人员被允许对解锁设备,Play Store和Android Pay购买的产品实施基于指纹的身份验证,并在移动银行等安全性高的应用程序中提供自定义身份验证。

Google首次在Nexus 5X和Nexus 6P上推出,并推出了快速安全的Nexus Imprint指纹传感器,该技术还带来了Android 6.0棉花糖指纹传感器API的首个实现。可以在不到600毫秒的时间内识别出指纹,从而提供快速舒适的用户体验。

指纹存储安全

Android上的大多数存储策略都是不安全的,尤其是考虑到root用户访问权限的可能性时。但是Google已通过将所有打印数据操作移至可信执行环境 (TEE)并为制造商必须遵循的指纹数据存储提供了严格的指导方针,朝着正确的方向迈出了显着的一步。

三通

TEE是智能手机主处理器的安全区域。它保证了内部加载的代码和数据的机密性和完整性。这种分离可实现安全性和保护,免受黑客,恶意软件和root用户访问。
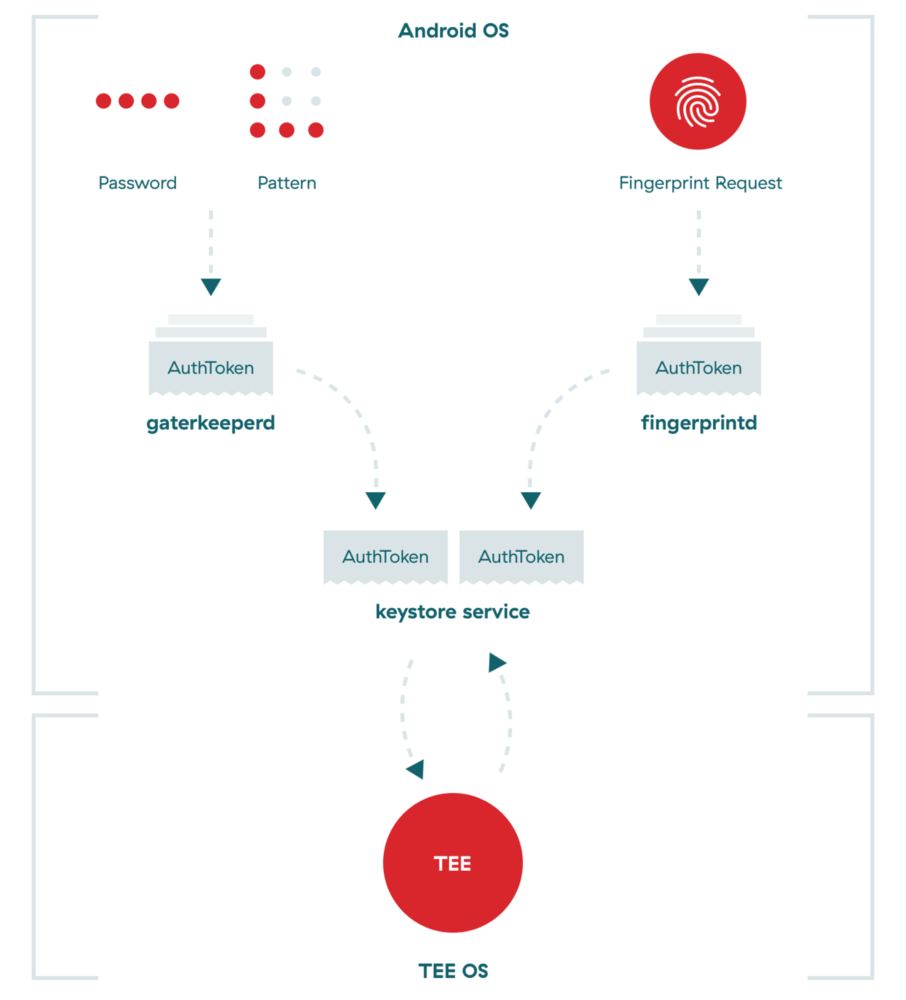
Android OS上的TEE通信过程

  • 所有指纹数据操作均在TEE中执行
  • 必须将所有指纹数据保护在传感器硬件或受信任的内存中,以便无法访问指纹图像
  • 指纹数据只能以加密形式存储在文件系统上,而不管文件系统本身是否已加密
  • 删除用户必须导致删除用户现有的指纹数据
  • 根访问不得破坏指纹数据

指纹模板

指纹模板是原始指纹数据的已处理版本。为了遵守准则,必须对它们进行密码认证。这意味着必须使用专用于设备的私钥和足够的其他数据(绝对文件系统路径,finger ID和组)对它们进行签名,以明确定义它们的绑定关系。结果,如果将这些模板复制到另一个设备或另一个用户尝试使用它们,则这些模板将变得无用。

最后,指纹数据不会备份到用户的计算机或Google的服务器上。它不会被设备上的任何其他应用程序同步,共享或使用,也不会离开设备。应用程序收到的唯一信息是指纹是否已通过验证。这也意味着用户必须在每个新设备上设置指纹认证。

听起来不错,该如何实施?

指纹认证无非就是数据加密。它涉及一个密钥,一个执行加密的密码以及一个处理整个过程的指纹管理器。从开发人员的角度来看,该过程有些广泛,但它包含相对简单的步骤。

  1. 在项目AndroidManifest文件中请求指纹身份验证权限。

  2. 启用任何锁定屏幕安全机制(PIN,图案或密码)。

  3. 在设备上注册至少一个指纹。

  4. 创建的实例FingerprintManager。

  5. 使用Keystore实例来访问Android Keystore容器。

  6. 使用KeyGenerator该类生成加密密钥,并将其存储在Keystore容器中。

  7. Cipher使用先前生成的加密密钥初始化该类的实例。

  8. 使用Cipher实例创建一个CryptoObject并将其分配给实例化FingerprintManager。

  9. 调用实例的authenticate()方法FingerprintManager。

  10. 成功完成身份验证后处理回调,从而提供对受保护的内容或功能的访问。

Google提供了全面的指纹认证示例,并且在线提供了一些教程,可以助您一臂之力。

Android的指纹认证和支持实现的设计和执行非常好。将其用作任何形式的多因素身份验证的拥有元素,已足以为您提供快速,可靠和安全的身份验证体验。

您可以在科罗拉多州丹佛市举行的360andev会议上听到我们谈论指纹安全性和应用程序安全性最佳实践的信息

那有什么收获呢?

各种物品上的指纹

只有一个,并且其他所有方法都具有相同的缺陷。指纹认证只有一个故障点。就像用手指来解锁设备一样吸引人,您到处都是手指。潜在的攻击者可以毫不费力地举起您的指纹,然后使用它来控制您的设备和应用程序。

不幸的是,与密码不同,您的指纹显然是无法更改的。

传送门

cutter

Cutter logo

Cutter

Cutter is a free and open-source reverse engineering framework powered by radare2 . Its goal is making an advanced, customizable and FOSS reverse-engineering platform while keeping the user experience at mind. Cutter is created by reverse engineers for reverse engineers.
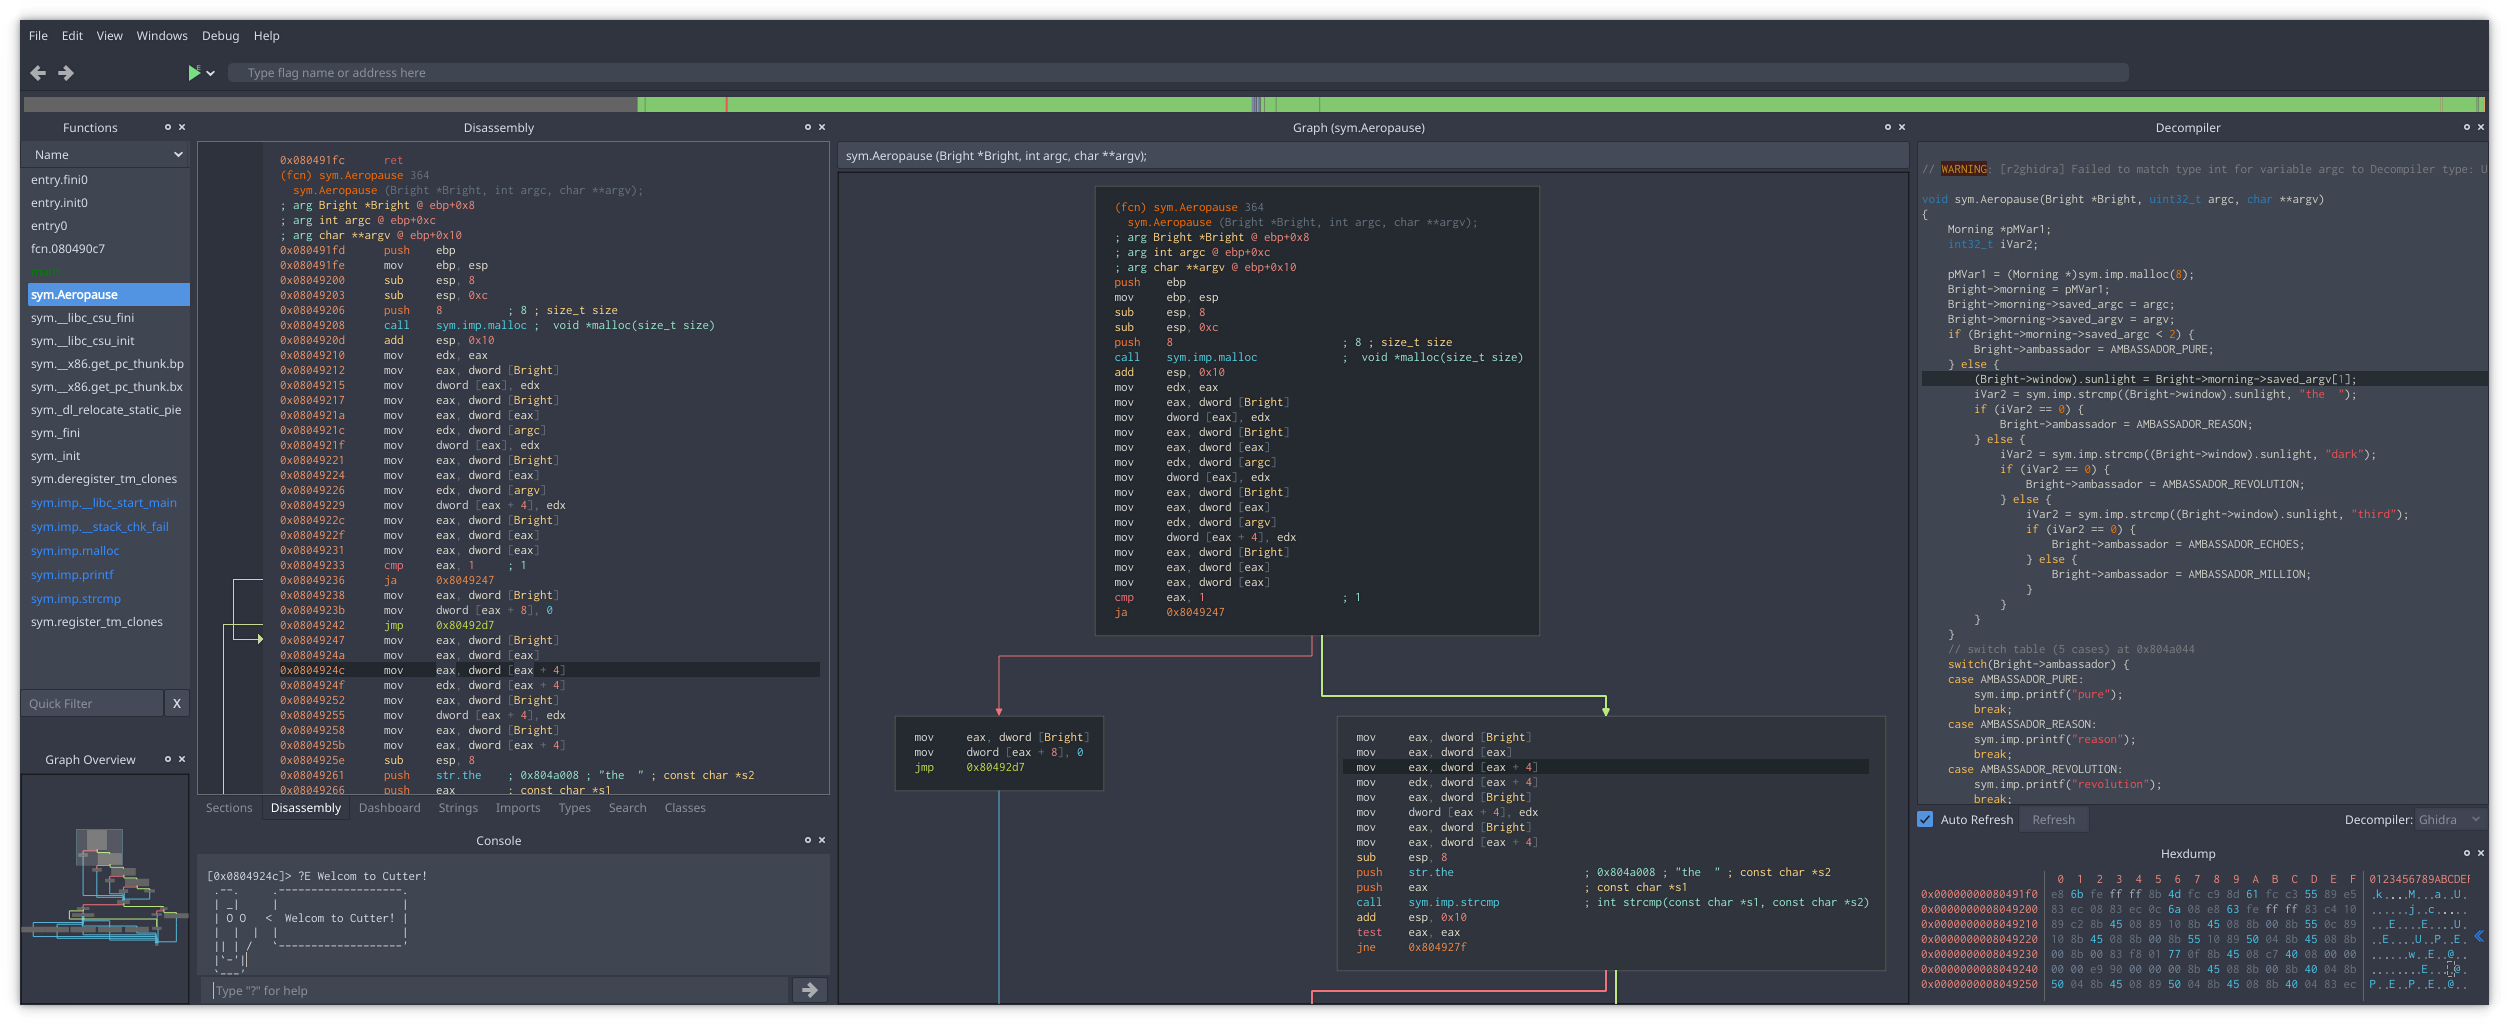
Build Status
Build status
Total alerts

Screenshot

Learn more at https://cutter.re.

Downloading a release

Cutter is available for all platforms (Linux, macOS, Windows).
You can download the latest release here.

  • macOS: Download the latest .dmg file or use Homebrew Cask brew cask install cutter.
  • Windows: Download the latest Zip archive.
  • Linux: Download the latest AppImage file. Then just make it executable and run it:
    • chmod +x <appimage_file>
    • ./<appimage_file>

Building from sources

To build Cutter on your local machine, please follow this guide: Building from source

Docker

To deploy cutter using a pre-built Dockerfile, it’s possible to use the provided configuration. The corresponding README.md file also contains instructions on how to get started using the docker image with minimal effort.

Documentation

You can find our documentation in our website.

Plugins

Cutter supports both Python and Native C++ plugins. Want to extend Cutter with Plugins? Read the Plugins section on our documentation.

Official and Community Plugins

Our community built many plugins and useful scripts for Cutter such as the native integration of Ghidra decompiler or the plugin to visualize DynamoRIO code coverage. You can find more plugins in the following list. Don’t hesitate to extend it with your own plugins and scripts for Cutter.

Help

The best place to obtain help from Cutter developers and community is to contact us on:

tabnine

TabNine

This is the repository for the backend of TabNine, the all-language autocompleter.
There are no source files here because the backend is closed source.

You can make feature requests by filing an issue. You are also welcome to make pull requests for changes to the configuration files.

languages.yml determines which file extensions are considered part of the same language. (For example, identifiers from .c files will be suggested in .h files.)

language_tokenization.json determines how languages are tokenized. For example, identifiers can contain dashes in Lisp, but not in Java.

If your feature request is specific to a particular editor’s TabNine client, please file an issue in one of these repositories:

You may be interested in these TabNine clients written by third parties:

Changelogs

If new features don’t work for you, check that you have the most recent version by typing TabNine::version into your text editor. If you don’t have the most recent version, try restarting your editor.

2.0.11 (August 24, 2019)

2.0.0 — 2.0.10 (July 15 — August 20, 2019)

  • Deep TabNine
  • Simplified bracket pairing logic
  • Simplified filesystem event handling
  • Added a configuration panel for viewing settings and logs which can be accessed by typing TabNine::config

1.0.14 (May 16, 2019)

  • TabNine no longer watches for filesystem events in ignored directories (closes #43).
  • TabNine now waits until a completion is requested to start the language server (closes #50).
  • Files with the .d extension are now recognized as D source files (closes #56).
  • Added LSP default configuration for PureScript.
  • Fixed a logic error that caused index size to be tracked incorrectly in some cases.

1.0.10 (December 1, 2018)

  • Fixed an internal logic error which could put indexing threads into a bad state, leading to an infinite loop (might close #24, we’ll see).
  • TabNine now considers a wider range of possibilities when completing in a zero-char context (i.e. when there are no characters immediately before the cursor).
  • TabNine now includes - in identifiers when parsing Racket code.

1.0.9 (November 27, 2018)

  • TabNine now uses the context after the cursor to filter its suggestions. For example, if there are tokens on the same line as the cursor, TabNine will not make a suggestion ending in a semicolon (unless there are already instances in the codebase of semicolons occurring in the middle of a line).
  • TabNine removes tokens matching the regex \d.*[a-zA-Z].*\d.*[a-zA-Z] from the project index. This is supposed to prevent long keys or base64 literals from occurring in autocompletion suggestions. The tokens are not filtered from the directory index or the file index.
  • TabNine now recognizes .tsx files as TypeScript rather than .xml (closes #21).
  • TabNine only checks its version directory, not its target directory, when auto-updating or writing registration keys. (This fixes an issue associated with DOS path shortening.)

1.0.7 (November 20, 2018)

  • Semantic completion is added! This allows TabNine to integrate with any language server that implements the Language Server Protocol.
    • TabNine will integrate the language server’s suggestions with its own. For example, TabNine can suggest multi-token completions where the first token is provided by the language server.
    • TabNine queries the language server asynchronously. So, if the language server is slow, you will see TabNine’s results only. Continue typing to see the language server’s results.
    • TabNine passes along any type information or documentation provided by the language server. (The Sublime and VS Code clients are not yet updated to display the documentation; this is coming soon.)
    • See the semantic completion guide for configuration help.
  • Paid index size limit increased to 100 MB (from 15 MB).
  • Free index size limit increased to 400 KB (from 200 KB).
  • Improved indexing performance.
  • Increased license price to $49/$99 personal/business (from $29/$89).
  • TabNine now provides closing brackets for its suggestions (so if it suggests foo( it will additionally insert ) to the right of the cursor once the suggestion is accepted). The editor clients do not support this yet as it requires an upgrade to the communication protocol with TabNine; this is coming soon. Closes #11 as this is no longer an issue with the TabNine backend.
  • TabNine now searches all parents to find the project root rather than stopping at the first .git. This permits nested Git repositories (closes #5).
  • TabNine provides an API call to get the regex it uses to find identifiers (closes #7).
  • TabNine no longer indexes files in .git (closes #8).
  • TabNine now respects .tabnineignore files (closes #15).
  • TabNine allows disabling auto-update by typing TabNine::disable_auto_update into your text editor (closes #14).
  • TabNine no longer stores registration keys and config in same directory where it is installed. This should prevent registration keys and config from being overwritten by client updates (closes #10). You can type TabNine::config_dir to see where config files are being stored.
Your browser is out-of-date!

Update your browser to view this website correctly. Update my browser now

×