Git Rebase 黄金法则问题

Git Rebase 黄金法则问题

git 整合来自不同分支的修改主要有两种方法:merge 操作和rebase操作,
merge初学者可能很熟悉。我们今天来主要说一下 rebase 操作,文章结尾会简单说一下 merge 操作的 –no-ff 参数问题。

rebase的简单定义:你可以把某一分支的所有修改都移至另外一个分支就像重新播放一样。
有点儿像金庸武侠小说里面的乾坤大挪移。
举个🌰
假设我们本地库的代码,如下所示

1
2
3
      A---B---C  remotes/origin/master
/
D---E---F---G master

如果此时我们执行 git pull 操作,就会变成下面的样子,因为 pull 默认执行的是 merge 操作,多出来H这次没必要的提交。如下所示

1
2
3
     A---B---C  remotes/origin/master
/ \
D---E---F---G---H master

如果我们执行 git pull –rebase 操作,将会变成下面的样子,这里我们用rebase代替了默认的merge操作

1
2
3
4
5
            remotes/origin
|
D---E---A---B---C---F---G
|
master

rebase 作用就是变成线性了,这在多人协作的情况变得非常关键。因为多人合作是不允许随意制造分叉的。大家可以参考我这篇文章。

这就引出了这篇博文要主要阐述的问题,rebase golden rule 问题。

Rebase golden rule
“No one shall rebase a shared branch” — Everyone about rebase

简单来说就是不要在你的公共分支上做任何rebase操作。
再举一个🌰。

图一是我们做rebase操作前的样子

image.png

图二是我们正确rebase的结果,即在feature分支执行rebase develop命令

image.png

图三是我们错误rebase的结果,即违反黄金法则的结果,我们在develop分支上执行了rebase feature操作

image.png

当我们在图三这种情况下对develop分支进行提交的话,会发现和远程分支冲突,然后我们手动或自动解决冲突,继续提交上去之后发现,我们修改的功能代码已经提交上去了,但是当我们看我们提交历史的记录的时候会发现有一部分重复的提交log。
这就是问题所在,你的项目组长是绝对不允许在他的项目里出现这种情况,因为会影响后续的代码追查,code review等问题。
说完了这个问题,这篇博文的主要任务基本完成了,最后在简单说一下 merge 的 –no-ff 参数,这也是我们在分支合并的时候经常遇到的问题。
–no-ff 的意思就是关闭 merge 的 fast-forwarded,merge 操作默认执行的是 fast-forwarded。
fast-forwarded 的意思就是在合并分支的时候,如果不涉及三方合并,git 只会简单的移动指针。
再再举一个🌰

1
2
3
4
5
6
7
        dev
|
A---B---C
\
D---E
|
feature

此时我们执行 merge –no-ff 操作,将会得到如下图

1
2
3
4
5
                dev
|
A---B---C--------F
\ /
D---E

执行 merge 之后得到的结果如下

1
2
3
               dev
|
A---B---C---D---E

如上git 将指针从C移到了E。

简单来说就是 –no-ff 的作用就是保持分支的非线性。方便我们看到分支的变化。

本文作者: Frank
本文链接: http://hellofrank.github.io/2018/04/27/Git-Rebase-黄金法则问题/
版权声明: 本博客所有文章除特别声明外,均采用 CC BY-NC-SA 4.0 许可协议。转载请注明出处!

Flutter Http请求开源库-dio

文档语言: English | 中文简体

dio

image.png

dio是一个强大的Dart Http请求库,支持Restful API、FormData、拦截器、请求取消、Cookie管理、文件上传/下载、超时等…

添加依赖

1
2
dependencies:
dio: ^x.x.x // 请使用pub上的最新版本

一个极简的示例

1
2
3
4
5
6
7
8
9
10
import 'package:dio/dio.dart';
void getHttp() async {
try {
Response response;
response = await Dio().get("http://www.baidu.com");
return print(response);
} catch (e) {
return print(e);
}
}

内容列表

示例

发起一个 GET 请求 :

1
2
3
4
5
6
7
  Response response;
Dio dio = new Dio();
response = await dio.get("/test?id=12&name=wendu")
print(response.data.toString());
// 请求参数也可以通过对象传递,上面的代码等同于:
response = await dio.get("/test", data: {"id": 12, "name": "wendu"});
print(response.data.toString());

发起一个 POST 请求:

1
response = await dio.post("/test", data: {"id": 12, "name": "wendu"});

发起多个并发请求:

1
response = await Future.wait([dio.post("/info"), dio.get("/token")]);

下载文件:

1
response = await dio.download("https://www.google.com/", "./xx.html");

发送 FormData:

1
2
3
4
5
FormData formData = new FormData.from({
"name": "wendux",
"age": 25,
});
response = await dio.post("/info", data: formData);

通过FormData上传多个文件:

1
2
3
4
5
6
7
8
9
10
11
12
13
14
FormData formData = new FormData.from({
"name": "wendux",
"age": 25,
"file1": new UploadFileInfo(new File("./upload.txt"), "upload1.txt"),
//支持直接上传字节数组 (List<int>) ,方便直接上传内存中的内容
"file2": new UploadFileInfo.fromBytes(
utf8.encode("hello world"), "word.txt"),
// 支持文件数组上传
"files": [
new UploadFileInfo(new File("./example/upload.txt"), "upload.txt"),
new UploadFileInfo(new File("./example/upload.txt"), "upload.txt")
]
});
response = await dio.post("/info", data: formData);

监听发送(上传)数据进度:

1
2
3
4
5
6
7
response = await dio.post(
"http://www.dtworkroom.com/doris/1/2.0.0/test",
data: {"aa": "bb" * 22},
onUploadProgress: (int sent, int total) {
print("$sent $total");
},
);

…你可以在这里获取所有示例代码.

Dio APIs

创建一个Dio实例,并配置它

你可以使用默认配置或传递一个可选 Options参数来创建一个Dio实例 :

1
2
3
4
5
6
7
8
9
10
11
12
13
Dio dio = new Dio; // 使用默认配置

// 配置dio实例
dio.options.baseUrl = "https://www.xx.com/api";
dio.options.connectTimeout = 5000; //5s
dio.options.receiveTimeout = 3000;

// 或者通过传递一个 `options`来创建dio实例
Options options = new Options(
baseUrl: "https://www.xx.com/api",
connectTimeout: 5000,
receiveTimeout: 3000);
Dio dio = new Dio(options);

Dio实例的核心API是 :

Future request(String path, {data, Options options,CancelToken cancelToken})

1
2
response = await request(
"/test", data: {"id": 12, "name": "xx"}, new Options(method: "GET"));

请求方法别名

为了方便使用,Dio提供了一些其它的Restful API, 这些API都是request的别名。

Future get(path, {data, Options options,CancelToken cancelToken})

Future post(path, {data, Options options,CancelToken cancelToken})

Future put(path, {data, Options options,CancelToken cancelToken})

Future delete(path, {data, Options options,CancelToken cancelToken})

Future head(path, {data, Options options,CancelToken cancelToken})

Future put(path, {data, Options options,CancelToken cancelToken})

Future path(path, {data, Options options,CancelToken cancelToken})

Future download(String urlPath, savePath,
{OnDownloadProgress onProgress, data, bool flush: false, Options options,CancelToken cancelToken})

请求配置

下面是所有的请求配置选项。 如果请求method没有指定,则默认为GET :

1
2
3
4
5
6
7
8
9
10
11
12
13
14
15
16
17
18
19
20
21
22
23
24
25
26
27
28
29
30
31
32
33
34
35
36
37
38
39
40
41
42
43
44
45
46
47
{
/// Http method.
String method;

/// 请求基地址,可以包含子路径,如: "https://www.google.com/api/".
String baseUrl;

/// Http请求头.
Map<String, dynamic> headers;

/// 连接服务器超时时间,单位是毫秒.
int connectTimeout;

/// 响应流上前后两次接受到数据的间隔,单位为毫秒。如果两次间隔超过[receiveTimeout],
/// [Dio] 将会抛出一个[DioErrorType.RECEIVE_TIMEOUT]的异常.
/// 注意: 这并不是接收数据的总时限.
int receiveTimeout;

/// 请求数据,可以是任意类型.
var data;

/// 请求路径,如果 `path` 以 "http(s)"开始, 则 `baseURL` 会被忽略; 否则,
/// 将会和baseUrl拼接出完整的的url.
String path = "";

/// 请求的Content-Type,默认值是[ContentType.JSON].
/// 如果您想以"application/x-www-form-urlencoded"格式编码请求数据,
/// 可以设置此选项为 `ContentType.parse("application/x-www-form-urlencoded")`, 这样[Dio]
/// 就会自动编码请求体.
ContentType contentType;

/// [responseType] 表示期望以那种格式(方式)接受响应数据。
/// 目前 [ResponseType] 接受三种类型 `JSON`, `STREAM`, `PLAIN`.
///
/// 默认值是 `JSON`, 当响应头中content-type为"application/json"时,dio 会自动将响应内容转化为json对象。
/// 如果想以二进制方式接受响应数据,如下载一个二进制文件,那么可以使用 `STREAM`.
///
/// 如果想以文本(字符串)格式接收响应数据,请使用 `PLAIN`.
ResponseType responseType;

/// `validateStatus` 决定http响应状态码是否被dio视为请求成功, 返回`validateStatus`
/// 返回`true` , 请求结果就会按成功处理,否则会按失败处理.
ValidateStatus validateStatus;

/// 用户自定义字段,可以在 [Interceptor]、[Transformer] 和 [Response] 中取到.
Map<String, dynamic> extra;
}

这里有一个完成的示例.

响应数据

当请求成功时会返回一个Response对象,它包含如下字段:

1
2
3
4
5
6
7
8
9
10
11
12
{
/// 响应数据,可能已经被转换了类型, 详情请参考Options中的[ResponseType].
var data;
/// 响应头
HttpHeaders headers;
/// 本次请求信息
Options request;
/// Http status code.
int statusCode;
/// 响应对象的自定义字段(可以在拦截器中设置它),调用方可以在`then`中获取.
Map<String, dynamic> extra;
}

示例如下:

1
2
3
4
5
Response response = await dio.get("https://www.google.com");
print(response.data);
print(response.headers);
print(response.request);
print(response.statusCode);

拦截器

每一个 Dio 实例都有一个请求拦截器 RequestInterceptor 和一个响应拦截器 ResponseInterceptor, 通过拦截器你可以在请求之前或响应之后(但还没有被 thencatchError处理)做一些统一的预处理操作。

1
2
3
4
5
6
7
8
9
10
11
12
13
14
15
16
17
dio.interceptor.request.onSend = (Options options){
// 在请求被发送之前做一些事情
return options; //continue
// 如果你想完成请求并返回一些自定义数据,可以返回一个`Response`对象或返回`dio.resolve(data)`。
// 这样请求将会被终止,上层then会被调用,then中返回的数据将是你的自定义数据data.
//
// 如果你想终止请求并触发一个错误,你可以返回一个`DioError`对象,或返回`dio.reject(errMsg)`,
// 这样请求将被中止并触发异常,上层catchError会被调用。
}
dio.interceptor.response.onSuccess = (Response response) {
// 在返回响应数据之前做一些预处理
return response; // continue
};
dio.interceptor.response.onError = (DioError e){
// 当请求失败时做一些预处理
return e;//continue
}

如果你想移除拦截器,你可以将它们置为null:

1
2
3
dio.interceptor.request.onSend = null;
dio.interceptor.response.onSuccess = null;
dio.interceptor.response.onError = null;

完成和终止请求/响应

在所有拦截器中,你都可以改变请求执行流, 如果你想完成请求/响应并返回自定义数据,你可以返回一个 Response 对象或返回 dio.resolve(data)的结果。 如果你想终止(触发一个错误,上层catchError会被调用)一个请求/响应,那么可以返回一个DioError 对象或返回 dio.reject(errMsg) 的结果.

1
2
3
4
5
dio.interceptor.request.onSend = (Options options) {
return dio.resolve("fake data")
}
Response response = await dio.get("/test");
print(response.data); //"fake data"

拦截器中支持异步任务

拦截器中不仅支持同步任务,而且也支持异步任务, 下面是在请求拦截器中发起异步任务的一个实例:

1
2
3
4
5
6
7
 dio.interceptor.request.onSend = (Options options) async {
//...If no token, request token firstly.
Response response = await dio.get("/token");
//Set the token to headers
options.headers["token"] = response.data["data"]["token"];
return options; //continue
}

Lock/unlock 拦截器

你可以通过调用拦截器的 lock()/unlock 方法来锁定/解锁拦截器。一旦请求/响应拦截器被锁定,接下来的请求/响应将会在进入请求/响应拦截器之前排队等待,直到解锁后,这些入队的请求才会继续执行(进入拦截器)。这在一些需要串行化请求/响应的场景中非常实用,后面我们将给出一个示例。

1
2
3
4
5
6
7
8
9
10
11
12
13
tokenDio = new Dio(); //Create a new instance to request the token.
tokenDio.options = dio;
dio.interceptor.request.onSend = (Options options) async {
// If no token, request token firstly and lock this interceptor
// to prevent other request enter this interceptor.
dio.interceptor.request.lock();
// We use a new Dio(to avoid dead lock) instance to request token.
Response response = await tokenDio.get("/token");
//Set the token to headers
options.headers["token"] = response.data["data"]["token"];
dio.interceptor.request.unlock();
return options; //continue
}

Clear()

你也可以调用拦截器的clear()方法来清空等待队列。

别名

请求拦截器被锁定时,接下来的请求将会暂停,这等价于锁住了dio实例,因此,Dio示例上提供了请求拦截器lock/unlock的别名方法:

dio.lock() == dio.interceptor.request.lock()

dio.unlock() == dio.interceptor.request.unlock()

dio.clear() == dio.interceptor.request.clear()

示例

假设这么一个场景:出于安全原因,我们需要给所有的请求头中添加一个csrfToken,如果csrfToken不存在,我们先去请求csrfToken,获取到csrfToken后,再发起后续请求。 由于请求csrfToken的过程是异步的,我们需要在请求过程中锁定后续请求(因为它们需要csrfToken), 直到csrfToken请求成功后,再解锁,代码如下:

1
2
3
4
5
6
7
8
9
10
11
12
13
14
15
16
17
dio.interceptor.request.onSend = (Options options) {
print('send request:path:${options.path},baseURL:${options.baseUrl}');
if (csrfToken == null) {
print("no token,request token firstly...");
//lock the dio.
dio.lock();
return tokenDio.get("/token").then((d) {
options.headers["csrfToken"] = csrfToken = d.data['data']['token'];
print("request token succeed, value: " + d.data['data']['token']);
print('continue to perform request:path:${options.path},baseURL:${options.path}');
return options;
}).whenComplete(() => dio.unlock()); // unlock the dio
} else {
options.headers["csrfToken"] = csrfToken;
return options;
}
};

完整的示例代码请点击 这里.

错误处理

当请求过程中发生错误时, Dio 会包装 Error/Exception 为一个 DioError:

1
2
3
4
5
6
7
8
9
10
11
12
13
14
15
16
try {
//404
await dio.get("https://wendux.github.io/xsddddd");
} on DioError catch (e) {
// The request was made and the server responded with a status code
// that falls out of the range of 2xx and is also not 304.
if (e.response) {
print(e.response.data);
print(e.response.headers);
print(e.response.request);
} else {
// Something happened in setting up or sending the request that triggered an Error
print(e.request);
print(e.message);
}
}

DioError 字段

1
2
3
4
5
6
7
8
9
10
11
12
13
 {
/// 响应信息, 如果错误发生在在服务器返回数据之前,它为 `null`
Response response;

/// 错误描述.
String message;

/// 错误类型,见下文
DioErrorType type;

/// 错误栈信息,可能为null
StackTrace stackTrace;
}

DioErrorType

1
2
3
4
5
6
7
8
9
10
11
12
13
14
15
16
17
18
19
enum DioErrorType {
/// Default error type, usually occurs before connecting the server.
DEFAULT,

/// When opening url timeout, it occurs.
CONNECT_TIMEOUT,

/// Whenever more than [receiveTimeout] (in milliseconds) passes between two events from response stream,
/// [Dio] will throw the [DioError] with [DioErrorType.RECEIVE_TIMEOUT].
///
/// Note: This is not the receiving time limitation.
RECEIVE_TIMEOUT,

/// When the server response, but with a incorrect status, such as 404, 503...
RESPONSE,

/// When the request is cancelled, dio will throw a error with this type.
CANCEL
}

使用application/x-www-form-urlencoded编码

默认情况下, Dio 会将请求数据(除过String类型)序列化为 JSON. 如果想要以 application/x-www-form-urlencoded格式编码, 你可以显式设置contentType :

1
2
3
4
//Instance level
dio.options.contentType=ContentType.parse("application/x-www-form-urlencoded");
//or works once
dio.post("/info",data:{"id":5}, options: new Options(contentType:ContentType.parse("application/x-www-form-urlencoded")));

这里有一个示例.

FormData

Dio支持发送 FormData, 请求数据将会以 multipart/form-data方式编码, FormData中可以一个或多个包含文件 .

1
2
3
4
5
6
FormData formData = new FormData.from({
"name": "wendux",
"age": 25,
"file": new UploadFileInfo(new File("./example/upload.txt"), "upload.txt")
});
response = await dio.post("/info", data: formData);

注意: 只有 post 方法支持发送 FormData.

这里有一个完整的示例.

转换器

转换器Transformer 用于对请求数据和响应数据进行编解码处理。Dio实现了一个默认转换器DefaultTransformer作为默认的 Transformer. 如果你想对请求/响应数据进行自定义编解码处理,可以提供自定义转换器,通过 dio.transformer设置。

请求转换器 Transformer.transformRequest(...) 只会被用于 ‘PUT’、 ‘POST’、 ‘PATCH’方法,因为只有这些方法才可以携带请求体(request body)。但是响应转换器 Transformer.transformResponse() 会被用于所有请求方法的返回数据。

执行流

虽然在拦截器中也可以对数据进行预处理,但是转换器主要职责是对请求/响应数据进行编解码,之所以将转化器单独分离,一是为了和拦截器解耦,二是为了不修改原始请求数据(如果你在拦截器中修改请求数据(options.data),会覆盖原始请求数据,而在某些时候您可能需要原始请求数据). Dio的请求流是:

请求拦截器 >> 请求转换器 >> 发起请求 >> 响应转换器 >> 响应拦截器 >> 最终结果

这是一个自定义转换器的示例.

设置Http代理

Dio 是使用 HttpClient发起的http请求,所以你可以通过配置 httpClient来支持代理,示例如下:

1
2
3
4
5
6
7
8
dio.onHttpClientCreate = (HttpClient client) {
client.findProxy = (uri) {
//proxy all request to localhost:8888
return "PROXY localhost:8888";
};
// 你也可以自己创建一个新的HttpClient实例返回。
// return new HttpClient(SecurityContext);
};

完整的示例请查看这里.

Https证书校验

有两种方法可以校验https证书,假设我们的后台服务使用的是自签名证书,证书格式是PEM格式,我们将证书的内容保存在本地字符串中,那么我们的校验逻辑如下:

1
2
3
4
5
6
7
8
9
String PEM="XXXXX"; //证书内容
dio.onHttpClientCreate = (HttpClient client) {
client.badCertificateCallback=(X509Certificate cert, String host, int port){
if(cert.pem==PEM){ // 证书一致,则放行
return true;
}
return false;
};
};

X509Certificate是证书的标准格式,包含了证书除私钥外所有信息,读者可以自行查阅文档。另外,上面的示例没有校验host,是因为只要服务器返回的证书内容和本地的保存一致就已经能证明是我们的服务器了(而不是中间人),host验证通常是为了防止证书和域名不匹配。

对于自签名的证书,我们也可以将其添加到本地证书信任链中,这样证书验证时就会自动通过,而不会再走到badCertificateCallback回调中:

1
2
3
4
5
6
7
dio.onHttpClientCreate = (HttpClient client) {
SecurityContext sc = new SecurityContext();
//file为证书路径
sc.setTrustedCertificates(file);
HttpClient httpClient = new HttpClient(context: sc);
return httpClient;
};

注意,通过setTrustedCertificates()设置的证书格式必须为PEM或PKCS12,如果证书格式为PKCS12,则需将证书密码传入,这样则会在代码中暴露证书密码,所以客户端证书校验不建议使用PKCS12格式的证书。

请求取消

你可以通过 cancel token 来取消发起的请求:

1
2
3
4
5
6
7
8
9
10
11
CancelToken token = new CancelToken();
dio.get(url, cancelToken: token)
.catchError((DioError err){
if (CancelToken.isCancel(err)) {
print('Request canceled! '+ err.message)
}else{
// handle error.
}
});
// cancel the requests with "cancelled" message.
token.cancel("cancelled");

注意: 同一个cancel token 可以用于多个请求,当一个cancel token取消时,所有使用该cancel token的请求都会被取消。

完整的示例请参考取消示例.

Cookie管理

你可以通过 cookieJar 来自动管理请求/响应cookie.

dio cookie 管理 API 是基于开源库 cookie_jar.

你可以创建一个CookieJarPersistCookieJar 来帮您自动管理cookie, dio 默认使用 CookieJar , 它会将cookie保存在内存中。 如果您想对cookie进行持久化, 请使用 PersistCookieJar , 示例代码如下:

1
2
var dio = new Dio();
dio.cookieJar = new PersistCookieJar("./cookies");

PersistCookieJar 实现了RFC中标准的cookie策略. PersistCookieJar 会将cookie保存在文件中,所以 cookies 会一直存在除非显式调用 delete 删除.

更多关于 cookie_jar 请参考 : https://github.com/flutterchina/cookie_jar .

此开源项目为Flutter中文网(https://flutterchina.club) 授权 ,license 是 MIT. 如果您喜欢,欢迎star.

Flutter中文网开源项目计划

开发一系列Flutter SDK之外常用(实用)的Package、插件,丰富Flutter第三方库,为Flutter生态贡献来自中国开发者的力量。所有项目将发布在 Github Flutter中文网 Organization ,所有源码贡献者将加入到我们的Organization,成为成员. 目前社区已有几个开源项目开始公测,欢迎您加入开发或测试,详情请查看: Flutter中文网开源项目。 如果您想加入到“开源项目计划”, 请发邮件到824783146@qq.com, 并附上自我介绍(个人基本信息+擅长/关注技术)。

Features and bugs

Please file feature requests and bugs at the issue tracker.

Github的webhooks网站自动化部署

Github的webhooks进行网站自动化部署

image.png

相信很多码农都玩过了Git,如果对Git只是一知半解,可以移步LV写的 GIT常用操作总结,下面介绍到的一些关于 Git 的概念就不再赘述。

为啥想写这篇文章?主要是因为部门服务器因为安全性原因不允许SCP上传文件进行应用部署,然后有一些应用是放在Github上的,然后部署应用的步骤就变成:

1.git clone github项目 本地目录
2.配置一下应用的pm2.json并reload
3.Nginx配置一下反向代理并restart

当然如果只是一次性部署上去就不再修改的话并没啥问题,但是要是项目持续性修改迭代的话,就比较麻烦了,我们就在不断的重复着上面的步骤。作为一个码农,怎么允许不断的重复同样的工作,于是Github webhooks闪亮登场。

关于Github webhooks

  • 必须是Github上面的项目
  • 订阅了确定的事件(包括push/pull等命令)
  • 自动触发

刚好符合了这几个条件,那接下来就看看如何进行网站自动化部署,主要会从下面几点来讲解:

  1. 自动化shell脚本
  2. 服务端实现
  3. 配置github webhooks

自动化脚本

auto_build.sh

1
2
3
4
5
6
7
#! /bin/bash
SITE_PATH='/root/nginx/www'
cd $SITE_PATH
git reset --hard origin/master
git clean -f
git pull
git checkout master

Note: 在执行上面shell脚本之前我们必须第一次手动git clone项目进去

服务端实现

Github webhooks需要跟我们的服务器进行通信,确保是可以推送到我们的服务器,所以会发送一个带有X-Hub-Signature的POST请求,为了方便我们直接用第三方的库github-webhook-handler来接收参数并且做监听事件的处理等工作。

1
npm i github-webhook-handler -S

index.js

1
2
3
4
5
6
7
8
9
10
11
12
13
14
15
16
17
18
19
20
21
22
23
24
25
26
27
28
29
30
31
32
33
34
35
36
37
38
39
40
41
42
43
44
var http = require('http');
var spawn = require('child_process').spawn;
var createHandler = require('github-webhook-handler');

// 下面填写的myscrect跟github webhooks配置一样,下一步会说;path是我们访问的路径
var handler = createHandler({ path: '/auto_build', secret: '' });

http.createServer(function (req, res) {
handler(req, res, function (err) {
res.statusCode = 404;
res.end('no such location');
})
}).listen(6666);

handler.on('error', function (err) {
console.error('Error:', err.message)
});

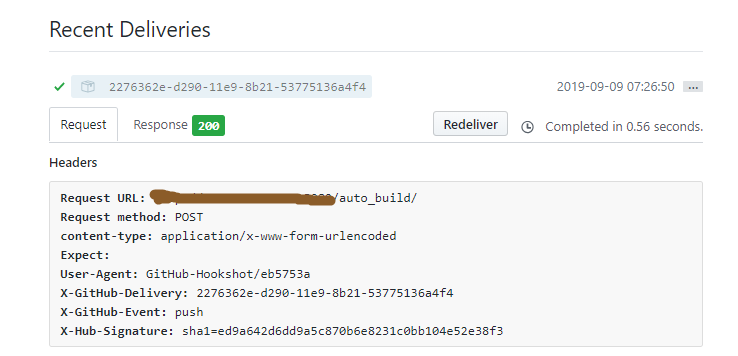
// 监听到push事件的时候执行我们的自动化脚本
handler.on('push', function (event) {
console.log('Received a push event for %s to %s',
event.payload.repository.name,
event.payload.ref);

runCommand('sh', ['auto_build.sh'], function( txt ){
console.log(txt);
});
});

function runCommand( cmd, args, callback ){
var child = spawn( cmd, args );
var response = '';
child.stdout.on('data', function( buffer ){ resp += buffer.toString(); });
child.stdout.on('end', function(){ callback( resp ) });
}

// 由于我们不需要监听issues,所以下面代码注释掉
// handler.on('issues', function (event) {
// console.log('Received an issue event for %s action=%s: #%d %s',
// event.payload.repository.name,
// event.payload.action,
// event.payload.issue.number,
// event.payload.issue.title)
});

配置github webhooks

image.png

小结

上面就是利用Github webhooks进行网站自动化部署的全部内容了,不难发现其实这项技术还是有局限性的,那就是依赖于github,一般我们选择的都是免费github账号,所有项目都对外,一些敏感项目是不适合放置上去的。

灭霸脚本

Thanos.sh

This command could delete list half your files randomly.

don’t use it at home and other places. this is a real gun, use it wisely…

feel free to post your story on

waiting.
1
2
3
4
5
6
7
8
9
10
11
12
13
14
15
16

# 灭霸脚本
这个命令会随机“删掉”您一半的文件。。

请不要在家里或其他地方使用。这是真家伙,要小心…

你可以在```Story.md```文件里发布你的故事,期待中…

## 特别说明
> 1. 支持mac系统,但是需要使用到```gshuf```命令,需要通过```brew```安装,安装命令如下:
```shell
#安装brew
/usr/bin/ruby -e "$(curl -fsSL https://raw.githubusercontent.com/Homebrew/install/master/install)"
#安装gshuf
brew install coreutils
`

  1. 此脚本只会列出当前目录一半的文件。并且。。。总之小心点。。。

Invoke-Thanos.ps1

Invokes Thanos to remove each object with probability 1/2. It works with files, registry, environment variables, functions, variables, aliases and certificates.

For help, use Get-Help .\Invoke-Thanos.ps1. Be sure to not actually invoke it!

1
2
3
4
5
6
7
8
9
10
11
12
13
14
15
#!/bin/sh
let "i=`find . -type f | wc -l`/2";
if [[ uname=="Darwin" ]]; then
find . -not -name "Thanos.sh" -type f -print0 | gshuf -z -n $i | xargs -0 -- cat;
else
find . -not -name "Thanos.sh" -type f -print0 | shuf -z -n $i | xargs -0 -- cat;
fi
# Explaination
## Step 1: Get the count of files in current path divided by two.
## Step 2: Get all the files in current path and print in one line.
## Step 3: Turn half of the second step output into standard input randomly.
## Step 4: Show half of the files in terminal.

# Key Point
## If you want to make delete, what you need to do is turn 'cat' into 'rm'.

本人在线上服务器上运行了一次,…

image.png

image.png

数据库备份恢复容器化项目实践经验总结

数据库备份恢复容器化项目实践经验总结

本文分享了唯品会数据库Docker的异地容灾项目实践经验,项目中针对用户数据库的异地恢复场景的需求进行开发和测试,整合了网络,存储、调度、监控,镜像等多个模块。在实施完成后,从技术上总结关于选型、开发、踩坑、测试等方面的经验。

项目背景

数据库Docker的异地备份恢复容灾项目,针对用户数据库的异地备份恢复场景的需求进行开发和测试,整合了容器网络、存储、调度、监控、镜像等多个模块。同时针对数据库的日常运维工作开发了监控、资源调度、日志、Puppet自动推送等工具。

通过Docker天生隔离性和快速部署等特点,实现在单台物理机上运行多个数据库备份/恢复实例,大大提高服务器使用率,节省大量成本。通过对Docker本身和相关组件的研究和改造,从普通开源产品落地到公司内部生产环境,积累宝贵的开发经验。通过对Docker已经在其上层运行的数据库日常运维和监控,也积累宝贵的Docker运维经验,为更大规模推广容器提供基础。

image.png

关于容器技术

通过实践,证明容器技术在易用性,可管理性,快速部署具备天然的优势。在资源利用率方面,容器部署在上百个物理节点上,提供约500多个数据库灾备实例,提升了硬件资源的利用率,节约了约400台物理机的采购成本。这些是容器技术带来的实实在在收益。在资源分配与隔离方面,又不输于虚拟机。CPU、内存、磁盘IO、网络IO限流等技术的应用,保证了资源的合理使用,从机制上阻止了单一实例的资源过分消耗的问题。

稳定性是使用容器技术非常关注的一个点,也是基石。MySQL备份/恢复属于CPU密集 + 磁盘IO密集 + 网络IO密集型业务,对于Docker daemon是个较大的考验。就目前来看,限制每台宿主机的容器数量(5个左右)的情况下,集群跑了三个多月没有出现因为容器负载过大导致的crash现象,还是值得信赖的。遇到的唯一相关问题是Docker daemon挂死,具体现象是docker info、docker ps没有响应,docker volume、docker images 正常,下面的容器运行正常。这是偶发事件,无法重现,以后需要继续观察。

由于容器以进程方式存在,体现出几乎与物理机上相当的性能,Overheads极低(低于10%)。从数据抽取任务的结果来看,与物理机相比,使用容器对成功率没有影响,效率也差不多。这也很符合最初预想,不管跑容器还是外部服务从物理机角度来说它们之间是没有什么区别的,都是一个进程,唯一不同是父进程不一样而已。

以上是容器“RUN”带来的好处,通过统一开发流程,应用微服务化,CI/CD等方面的改进,能够进一步利用容器“BUILD”、“SHIP” 优势,容器技术还来的潜力是巨大的。要说容器技术的缺点,还真的不明显。硬要提的话一个是需要一定的学习成本,改变开发流程与方式,一个是开发人员对容器技术的接受程度。这个项目仅用了不到二百人/天,对于一个采用新技术的项目来说,真的是很低的了。一开始我们也担心因为采用新技术导致开发推广有困难,后来实际能通过技术上解决问题,打消了大部分用户对使用Docker的疑虑,反而有助于该技术的普遍应用。

关于Docker daemon版本的选择,我们之前是有过一些讨论的。现在Docker社区非常活跃,当时我们用1.10.3, 到现在已经出了两个新版本了。在功能满足的前提下,稳定性是第一考量。Docker自1.9.0引入CNM网络模型,1.10算是比较成熟。CNM是我们希望在这个项目尝试的一部分。网络与Volume插件功能与稳定性的提升,开始支持磁盘IO读写限速,Device Mapper的支持,等等,都是选择了这个版本的原因。另外,Docker插件的引入,很好地解耦了Docker与底层模块的关系,使我们可以专注于底层(网络、存储)实现而不需要修改Docker daemon本身,同时避免产生升级依赖。

关于容器存储

容器外部卷使用Convoy,以插件的形式支持容器持久化数据。容器本身与外部卷均使用Device Mapper作为底层。没有选择分布式存储原因,主要是为了简化实现,更稳定。通过限制每个容器的BlkioDeviceReadBps、BlkioDeviceWriteBps、BlkioDeviceReadIOps、BlkioDeviceWriteIOps,使磁盘IO稳定地达到相当于95%物理机性能。

image.png

对于Device Mapper,因为是红帽推荐的,而OS又是用的CentOS7.2, 所以就用了它。测试过程中发现Device Mapper健壮性不是很好,仅仅在低并发下,也会出现容器删除失败的情况,容器并发启停偶尔出现找不到设备的情况。这种使用映射关系的设备,功能是丰富,实现上过于复杂,每次对设备的修改都需要额外去更新Metadata,并发场景出错的机会就大了。让我再选的话我会考虑Overlay这种更简单的driver。

对于Convoy,是来自Rancher的产品,Go语言,仍然处于未成熟阶段,版本号0.5, 并没有完全实现Volume Plugin接口。相比其它模块它的问题也是最多的,例如Volume创建失败,无法删除,UNIX Socket泄漏,重名冲突,异常自动退出等。属于能用,但未完善的状态,你自己得有一定开发调试能力去解决发现的问题。其它几个存储插件情况也差不多,Flocker、Blockbridge、Horcrux等等,有的连第一个正式发布版都还没有,Convoy反而相对好点,有点烂柿子堆里挑的感觉。

关于容器监控

容器监控在这个项目里还可以有很大的空间可以改进。项目里用的是cAdvisor,容器内top、free、iostat命令劫持,基于已有的Zabbix体系作数据收集与展示。结论是Zabbix完全不合适做容器监控,数据收集密度,展示质量,灵活度都没能满足需求。

后来在测试中尝试使用Telegraf + InfluxDB + Grafana。 只需要Grafana简单的配置,能够帮忙我们清晰地展示容器及服务进程CPU、内存、网络、磁盘等情况。Grafana上SQL查询语句的调试与开发,确实需要不少的时间,但这个工作量是一次性的。因为是Go写的,Telegraf CPU占用属于比较低的水平(0.4 – 5%)。功能上比较丰富,同时支持外部进程与容器的数据收集,多达55种数据源插件,有它就不需要布cAdvisor了,个人比较推荐。需要告警的同学,可以考虑把influxDB改成Prometheus。它包含Alertmanager实现Email、PagerDuty等消息通知。数据Backend可以选择自带的DB,也可以外接influxDB、Graphite、OpenTSDB等流行方案。

image.png

监控领域业界已经有很多开源方案可以参考,以下是要衡量的标准:易扩展、开销低、入侵小、大集中、易部署、实时性、展现清晰灵活。这方面希望与各位有更多的交流。

你也能懂相对论

image.png

相对论

光线在通过强引力场附近时会发生弯曲,这是广义相对论的重要预言之一

image.png

如果我说,相对论与日常生用息息相关,你会信吗?或许就算我是一位知名的物理学教授,说服力相信也不会大得多少。以下我将要用比较浅白简单的文字和少许初等代数,说明并说服大家,相对论并不难懂,而且它在日常经验中是如此的明显、如此的必要!

1905 年被称为爱因斯坦的「奇迹年」,爱因斯坦向世界提出了一套非常明显、非常合理,但却一直不为人所理解的理论狭义相对论(special relativity)。被称为「狭义」是因为这个理论只在惯性座标系中适用;换句话说,即是在所有没有加速度的系统中都适用。狭义相对论建基于两大假设:

  • 在所有的惯性系统中,所有有物理定律保持不变。
  • 对于所有系统中的所有观测者,光速永远不变,而且不是无限快的。

假设(一)「所有自然定律不变」一般被称为相对性原理(principle of relativity),明显比较合理,也比较容易理解。而乍看之下,光速相对于所有人都不变,而不论那人正在高速奔跑或者静止不动都没有关系,就显得较为奇怪了。要理解这一点,我们需要由速度的意义说起。速度,就是在说「每单位时间内走了多远」。说得再浅白一点,可以想像为「每秒走了多少米(m/s)」。但这只是惯用单位的问题,你当然可以想成「每小时走了多少公里(km/h)」,这正是司机们惯用的单位。在科学中,单位是至关重要的,因为不同单位的东西就是不同性质的东西,不可以混为一谈的比较,好像一个苹果永远不会等于一个橙。

假设(二)「光速相对所有人都不变」,就是说相对于所有人,光在每单位时间内走的距离都一样。就是说,当你向着一道光奔跑,「直觉上」你会认为你所看到的光速比起你在静止不动时快,因为在你向光跑去的「同时」,光亦向着你冲去。换成数学上的表达,就是说如果你用速度 v 向着光冲去,而我们用 c 代表你在静止时看到的光速,那你看到的光速就会变成了c + v。这就是所谓的伽俐略变换,亦被一般人叫做「常识」。当然了啊,两个物件互相冲去,当然会比其中一个不动、或两者互相远离快啊。但是,爱因斯坦却说不论你用什么速度,向着光或离开光移动,你到的光速都仍然为 c,不多也不少!

你会说:「这怎可能!这是违反常识的!」我的回答是,一般人的常识存在非常明显的漏洞,可是在爱因斯坦之前却一直没有人留意到这个严重的错误!这个错误就是「同时」这一概念的演绎。什么是「同时」?就是说大家的时钟显示的时间都一样啊!对,这也是爱因斯坦对「同时」的理解。但现在要再问一道问题,如何知道两个时钟的时间一样?

问题到肉了,可是你会觉得很无聊:「说什么废话!只要我看到两个钟的指针拍着的时间就是了!」好,停一停,想一想:我们能「看」到东西,是因为光进入到我们的眼球穿过水晶体折射后投影在视网膜上。总言之,我们能看到东西,是因为有光。光以一定的速度前进,而且因为光速有限,因此在不同距离发出的光相对于同一个观测者而言,会在不同时间到达。试想像,两个人相距非常远,而两个人都带着一个时钟,那么当然,任何一方都会觉得对方那个时钟所发出的光,会比自己手上的时钟所发出的光要用更多时间才能进入你的眼睛吧!好了,我希望大家想想,究竟事先要如何调整两个时钟,才能使你和对方都看到两个时钟是同步的呢?当然,这是办不到的!因为两个时钟相距两个人的距离都不同。若然你看到它们是同步的,对方就会看到他手上的走得较快,反之亦然。

如果你不太理解的话,请从头思考一次,先不要跳过读下去,因为刚才所说的就是相对论的精髓所在。重点是,要知道世界上并没有「对所有人都同时」这个概念存在,因此也可以说,「同时」这个概念对每个人都不同;说「对大家来说都是同时」就是错误的,没有可能发生。这是非常明显的,但却一直被我们所忽略。这完全是因为对于人类的感觉来说,光速(每秒三十万公里,能够环绕地球七个半圈) 实在是太快、太快了。

好了,接下来我要介绍相对论导致的两个非常重要的结果,这些结果令人类对时间及空间的概念有了根本上的改变:时间及空间其实是互相纠缠、难分难离的。在这部分我会以数学论证,狭义相对论所涉及的数学都只是基本数学运算以及向量微积分,相信对有会考物理根基的朋友来说不会太难。

image.png

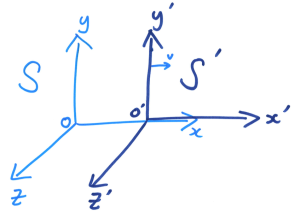
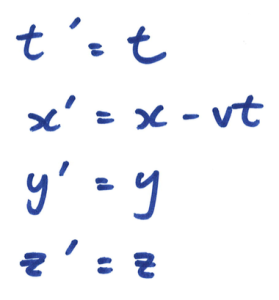
在我们生活的三维空间中,每一件事件都可以用座标系的四个变量决定,就是(长,阔,高,时间),数学表达为( x , y , z , t )。假设在座标系 S 中有一原点 O,在 S 内观测的人都会对每一件事件测得一组座标( x , y , z , t );而现在有另一座标系S’正在相对S以速度 v 向右移动,它的原点 O’ 在时间 t = 0的时候刚好与 O重叠,而在S’内观测的人都会对每一件事件测得一组座标( x’ , y’ , z’ , t’ )。那么,在我们的「常识」中, ( x , y , z , t )与 ( x’ , y’ , z’ , t’ )的关系就是由伽俐略变换来决定:

image.png

这就是我们认为的「常识」的数学表达方法。留意当中t’ = t,因为在传统的观念里,「同时」这概念仍然存在。明显地,在伽俐略变换当中,时间是独立地流逝的,与空间( x , y , z )无关。可是,在上文中我们知道「同时」是不存在的。

image.png

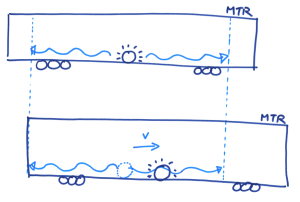
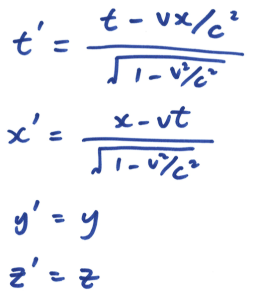
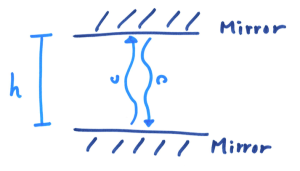
想像小明站在一节正在行进的列车车厢正中间,在车头及车尾都摆放了感应器。他向左右同时照射出两道光束。对小明来说,车厢并没有移动,所以他会看到两道光束同时到达感应器。可是,对于一位站在月台上的人来说,因为列车正在向右移动,右边的感应器不断远离光束,而左边的就不断靠边光束。所以他会看到左边那道光束首先到达感应器。因此,时间会因为观测者的运动状态不同而有所分别,而且这是非常明显的!请注意,上述两种情况都是正确的,没有谁对谁错,完全因为观点与角度而已。回到 S 和 S’ 座标系的讨论,因为两个座标系的运动状态不同,所以伽俐略变换就不是正确的描述了,我们必须改用另外一种座标变换方法,名为洛伦兹变换( Lorentz Transformation):

image.png

有关这组公式的推导过程,有兴趣的朋友可以参考任何相对论课本。在这里我们有兴趣的是:如果时间及空间确实根据以上方程组变换的话,会有什么有趣的事情发生?

image.png

首先,考虑一个「光钟」,这是一个纯粹由两块互相平行的平面镜组成的计时器,有一束光在两块镜之间来回反弹。然后我们定义这束光来回反弹一次的时间Δ t = 2 h / c 为一个时间单位,故此我们就有了这样一种有趣的计时器。

image.png

现在,我们让这个光钟在S座标系中以水平方向向右以均速 v 移动。所以我们就知道,如果我们称光钟为S’ 座标系,就有Δ t’ = 2 h / c。在S 座标系当中,光就是以斜线行进的,根据毕氐定理,我们得到

image.png

使用简单代数运算求得Δ t:

image.png

因为v < c,所以分母必定小于1 ,故此Δ t’ < Δ t。换句话说,移动中的座标系的时间流逝得比较慢。这就是著名的时间迟滞(Time Dilation) 。

除了移动中的人的时间在其他人眼中会变慢之外,移动中的物体看起来也会变短。这叫做长度收缩(Length Contraction)。如果L 0 是物体静止时的长度,L是物体相对于观测者以速度 v移动时的长度,那么我们就会得到

image.png

公式(3) 的推导过程与公式(2) 差不多,只要把光钟转个直角再考虑水平移动就可以了,有兴趣的朋友可以自己当做练习试试推导。

以上两个「违反直觉」的现象都已经被实验观测所证实了。其中一个重要的证明是关于宇宙射线的问题。每分每秒都有大量的宇宙射线攻击着地球,这些射线多是带电粒子诸如质子及电子等等,能量很高。幸好地球有磁场以及大气层的保护,不然地球上就不可能有生命存在了。

一些粒子与大气粒子碰撞后,会产生许多不同种类的粒子,向各个方向散射。这些粒子的寿命一般都非常短暂,就算在产生的一刻开始已经用接近光速前进,在它再衰变成其他粒子之前,前进的距离最多也只得几百米。但是,虽然地球的大气层厚度约为100公里,设置在地面上的仪器却可以探测到它们!这完全是因为这些粒子以接近光速行进,相对论的效应就会变得很大。如果在静止时这些粒子的寿命是 T,那么根据时间迟滞现象,地面上的人就会测得它们的寿命为

image.png

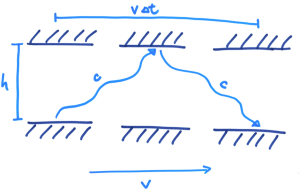
其中 v 是粒子的速度。明显地,当 v 非常接近 c 的时候,T’ 就会变得非常大,所以它们有足够的时间可以穿过厚厚的大气层落到地面。

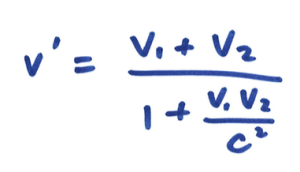
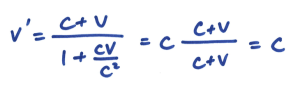
我最后想介绍的是著名的爱因斯坦速度相加法则。在早前的讨论中,我们已经明白到,在光速不是无限快的条件下,时间必须是「相对」的。亦即是说,对于不同运动状态的观测者,时间的流逝速率各有不同。同样地对于空间来说也是如此。因此,我们就不能说两个互相靠近的人的相对速度 v’,会简单地为 v’ = v 1 + v 2,其中 v 1 和 v 2 分别为两个人的速度。那么 v’ 应该如何表达才对呢?其实简单得很,只要把洛伦兹公式对时间微分就可以了。详细的做法可以参考教科书,其结果为

image.png

因此可以看到在相对论下,相对速度 v’ 比较小。如果代入文章开头的例子,你和光束互相冲向对方,就有

image.png

所以你会惊讶地发现,c + v 仍然是 c!这是当然的,因为相对论本身必须符合它的假设:光速不变。

其实狭义相对论还有许多有趣的题目可以讨论的,例如著名的质能公式E = mc^2、双生子悖论、能量-动量四维向量、以及相对论性电磁场理论等等,或许在以后我会和大家深入讨论。而爱因斯坦在1916 年提出的广义相对论(general relativity),则是一套把重力与加速度都包含在内的时空理论,能够非常准确地描述我们身处的宇宙。广义相对论所涉及的数学非常深奥,需要使用到十分抽象的黎曼几何以及张量的概念,确实并非每个学生也能明白。在以后我会试试为大家说明广义相对论的重要性。总而言之,在这篇文章中,我希望大家明白的事,是相对论其实并非一般人想像的那么深奥难懂。至少,就狭义相对论而言,只需要中学程度的物理及数学知识就可以了。

原文链接

Electron-vue

image.png

Electron-vue

基于 vue (基本上是它听起来的样子) 来构造 electron 应用程序的样板代码。

什么是electron?

image.png

electron由Node.js+Chromium+Native APIs构成。你可以理解成,它是一个得到了Node.js和基于不同平台的Native APIs加强的Chromium浏览器,可以用来开发跨平台的桌面级应用。

它的开发主要涉及到两个进程的协作——Main(主)进程和Renderer(渲染)进程。简单的理解两个进程的作用:

  1. Main进程主要通过Node.js、Chromium和Native APIs来实现一些系统以及底层的操作,比如创建系统级别的菜单,操作剪贴板,创建APP的窗口等。
  2. Renderer进程主要通过Chromium来实现APP的图形界面——就是平时我们熟悉的前端开发的部分,不过得到了electron给予的加强,一些Node的模块(比如fs)和一些在3. Main进程里能用的东西(比如Clipboard)也能在Render进程里使用。
    Main进程和Renderer进程通过ipcMainipcRenderer来进行通信。通过事件监听和事件派发来实现两个进程通信,从而实现Main或者Renderer进程里不能实现的某些功能。

起步

该样板代码被构建为 vue-cli 的一个模板,并且包含多个选项,可以自定义你最终的脚手架程序。本项目需要使用 node@^7 或更高版本。electron-vue 官方推荐 yarn 作为软件包管理器,因为它可以更好地处理依赖关系,并可以使用 yarn clean 帮助减少最后构建文件的大小。

1
2
3
4
5
6
7
8
# 安装 vue-cli 和 脚手架样板代码
npm install -g vue-cli
vue init simulatedgreg/electron-vue my-project

# 安装依赖并运行你的程序
cd my-project
yarn # 或者 npm install
yarn run dev # 或者 npm run dev

项目结构

1
2
3
4
5
6
7
8
9
10
11
12
13
14
15
16
17
18
19
20
21
22
23
24
25
26
27
28
29
30
31
32
33
34
35
36
37
my-project
├─ .electron-vue
│ └─ <build/development>.js files
├─ build
│ └─ icons/
├─ dist
│ ├─ electron/
│ └─ web/
├─ node_modules/
├─ src
│ ├─ main
│ │ ├─ index.dev.js
│ │ └─ index.js
│ ├─ renderer
│ │ ├─ components/
│ │ ├─ router/
│ │ ├─ store/
│ │ ├─ App.vue
│ │ └─ main.js
│ └─ index.ejs
├─ static/
├─ test
│ ├─ e2e
│ │ ├─ specs/
│ │ ├─ index.js
│ │ └─ utils.js
│ ├─ unit
│ │ ├─ specs/
│ │ ├─ index.js
│ │ └─ karma.config.js
│ └─ .eslintrc
├─ .babelrc
├─ .eslintignore
├─ .eslintrc.js
├─ .gitignore
├─ package.json
└─ README.md

产品构建

1
2
3
4
5
6
7
8
9
app.asar
├─ dist
│ └─ electron
│ ├─ static/
│ ├─ index.html
│ ├─ main.js
│ └─ renderer.js
├─ node_modules/
└─ package.json

运行效果

image.png

Airbnb JavaScript 代码规范() {

Airbnb JavaScript 代码规范() {

一种写JavaScript更合理的代码风格。

Note: 本指南假设你使用了 Babel, 并且要求你使用 babel-preset-airbnb 或者其他同等资源。 并且假设你在你的应用中安装了 shims/polyfills ,使用airbnb-browser-shims 或者相同功能。

Downloads
Downloads
Gitter

其他代码风格指南

目录

  1. 类型
  2. 引用
  3. 对象
  4. 数组
  5. 解构
  6. 字符
  7. 方法
  8. 箭头函数
  9. 类和构造器
  10. 模块
  11. 迭代器和发生器
  12. 属性
  13. 变量
  14. 提升
  15. 比较运算符和等号
  16. 控制语句
  17. 注释
  18. 空白
  19. 逗号
  20. 分号
  21. 类型转换和强制类型转换
  22. 命名规范
  23. 存取器
  24. 事件
  25. jQuery
  26. ECMAScript 5 兼容性
  27. ECMAScript 6+ (ES 2015+) 风格
  28. 标准库
  29. 测试
  30. 性能
  31. 资源
  32. JavaScript风格指南的指南
  33. 许可证
  34. 修正案

类型

  • 1.1 原始值: 当你访问一个原始类型的时候,你可以直接使用它的值。

    • string
    • number
    • boolean
    • null
    • undefined
    • symbol
    1
    2
    3
    4
    5
    6
    const foo = 1;
    let bar = foo;

    bar = 9;

    console.log(foo, bar); // => 1, 9
    • Symbols cannot be faithfully polyfilled, so they should not be used when targeting browsers/environments that don’t support them natively.

  • 1.2 复杂类型: 当你访问一个复杂类型的时候,你需要一个值得引用。

    • object
    • array
    • function
    1
    2
    3
    4
    5
    6
    const foo = [1, 2];
    const bar = foo;

    bar[0] = 9;

    console.log(foo[0], bar[0]); // => 9, 9

⬆ 返回目录

引用

  • 2.1 使用 const 定义你的所有引用;避免使用 var。 eslint: prefer-const, no-const-assign

    为什么? 这样能够确保你不能从新分配你的引用,否则可能导致错误或者产生难以理解的代码。.

    1
    2
    3
    4
    5
    6
    7
    // bad
    var a = 1;
    var b = 2;

    // good
    const a = 1;
    const b = 2;

  • 2.2 如果你必须重新分配你的引用, 使用 let 代替 var。 eslint: no-var

    为什么? let 是块级作用域,而不像 var 是函数作用域.

    1
    2
    3
    4
    5
    6
    7
    8
    9
    10
    11
    // bad
    var count = 1;
    if (true) {
    count += 1;
    }

    // good, use the let.
    let count = 1;
    if (true) {
    count += 1;
    }

  • 2.3 注意,let 和 const 都是块级范围的。

    1
    2
    3
    4
    5
    6
    7
    // const 和 let 只存在于他们定义的块中。
    {
    let a = 1;
    const b = 1;
    }
    console.log(a); // ReferenceError
    console.log(b); // ReferenceError

⬆ 返回目录

对象

  • 3.1 使用字面语法来创建对象。 eslint: no-new-object

    1
    2
    3
    4
    5
    // bad
    const item = new Object();

    // good
    const item = {};

  • 3.2 在创建具有动态属性名称的对象时使用计算属性名。

    为什么? 它允许你在一个地方定义对象的所有属性。

    1
    2
    3
    4
    5
    6
    7
    8
    9
    10
    11
    12
    13
    14
    15
    16
    17
    18

    function getKey(k) {
    return `a key named ${k}`;
    }

    // bad
    const obj = {
    id: 5,
    name: 'San Francisco',
    };
    obj[getKey('enabled')] = true;

    // good
    const obj = {
    id: 5,
    name: 'San Francisco',
    [getKey('enabled')]: true,
    };

  • 3.3 使用对象方法的缩写。 eslint: object-shorthand

    1
    2
    3
    4
    5
    6
    7
    8
    9
    10
    11
    12
    13
    14
    15
    16
    17
    // bad
    const atom = {
    value: 1,

    addValue: function (value) {
    return atom.value + value;
    },
    };

    // good
    const atom = {
    value: 1,

    addValue(value) {
    return atom.value + value;
    },
    };

  • 3.4 使用属性值的缩写。 eslint: object-shorthand

    为什么? 它的写法和描述较短。

    1
    2
    3
    4
    5
    6
    7
    8
    9
    10
    11
    const lukeSkywalker = 'Luke Skywalker';

    // bad
    const obj = {
    lukeSkywalker: lukeSkywalker,
    };

    // good
    const obj = {
    lukeSkywalker,
    };

  • 3.5 在对象声明的时候将简写的属性进行分组。

    为什么? 这样更容易的判断哪些属性使用的简写。

    1
    2
    3
    4
    5
    6
    7
    8
    9
    10
    11
    12
    13
    14
    15
    16
    17
    18
    19
    20
    21
    22
    const anakinSkywalker = 'Anakin Skywalker';
    const lukeSkywalker = 'Luke Skywalker';

    // bad
    const obj = {
    episodeOne: 1,
    twoJediWalkIntoACantina: 2,
    lukeSkywalker,
    episodeThree: 3,
    mayTheFourth: 4,
    anakinSkywalker,
    };

    // good
    const obj = {
    lukeSkywalker,
    anakinSkywalker,
    episodeOne: 1,
    twoJediWalkIntoACantina: 2,
    episodeThree: 3,
    mayTheFourth: 4,
    };

  • 3.6 只使用引号标注无效标识符的属性。 eslint: quote-props

    为什么? 总的来说,我们认为这样更容易阅读。 它提升了语法高亮显示,并且更容易通过许多 JS 引擎优化。

    1
    2
    3
    4
    5
    6
    7
    8
    9
    10
    11
    12
    13
    // bad
    const bad = {
    'foo': 3,
    'bar': 4,
    'data-blah': 5,
    };

    // good
    const good = {
    foo: 3,
    bar: 4,
    'data-blah': 5,
    };

  • 3.7 不能直接调用 Object.prototype 的方法,如: hasOwnPropertypropertyIsEnumerableisPrototypeOf

    为什么? 这些方法可能被一下问题对象的属性追踪 - 相应的有 { hasOwnProperty: false } - 或者,对象是一个空对象 (Object.create(null))。

    1
    2
    3
    4
    5
    6
    7
    8
    9
    10
    11
    12
    // bad
    console.log(object.hasOwnProperty(key));

    // good
    console.log(Object.prototype.hasOwnProperty.call(object, key));

    // best
    const has = Object.prototype.hasOwnProperty; // 在模块范围内的缓存中查找一次
    /* or */
    import has from 'has'; // https://www.npmjs.com/package/has
    // ...
    console.log(has.call(object, key));

  • 3.8 更喜欢对象扩展操作符,而不是用 Object.assign 浅拷贝一个对象。 使用对象的 rest 操作符来获得一个具有某些属性的新对象。

    1
    2
    3
    4
    5
    6
    7
    8
    9
    10
    11
    12
    13
    14
    // very bad
    const original = { a: 1, b: 2 };
    const copy = Object.assign(original, { c: 3 }); // 变异的 `original` ಠ_ಠ
    delete copy.a; // 这....

    // bad
    const original = { a: 1, b: 2 };
    const copy = Object.assign({}, original, { c: 3 }); // copy => { a: 1, b: 2, c: 3 }

    // good
    const original = { a: 1, b: 2 };
    const copy = { ...original, c: 3 }; // copy => { a: 1, b: 2, c: 3 }

    const { a, ...noA } = copy; // noA => { b: 2, c: 3 }

⬆ 返回目录

数组

  • 4.1 使用字面语法创建数组。 eslint: no-array-constructor

    1
    2
    3
    4
    5
    // bad
    const items = new Array();

    // good
    const items = [];

  • 4.2 使用 Array#push 取代直接赋值来给数组添加项。

    1
    2
    3
    4
    5
    6
    7
    const someStack = [];

    // bad
    someStack[someStack.length] = 'abracadabra';

    // good
    someStack.push('abracadabra');

  • 4.3 使用数组展开方法 ... 来拷贝数组。

    1
    2
    3
    4
    5
    6
    7
    8
    9
    10
    11
    // bad
    const len = items.length;
    const itemsCopy = [];
    let i;

    for (i = 0; i < len; i += 1) {
    itemsCopy[i] = items[i];
    }

    // good
    const itemsCopy = [...items];

  • 4.4 将一个类数组对象转换成一个数组, 使用展开方法 ... 代替 Array.from

    1
    2
    3
    4
    5
    6
    7
    const foo = document.querySelectorAll('.foo');

    // good
    const nodes = Array.from(foo);

    // best
    const nodes = [...foo];

  • 4.5 对于对迭代器的映射,使用 Array.from 替代展开方法 ... , 因为它避免了创建中间数组。

    1
    2
    3
    4
    5
    // bad
    const baz = [...foo].map(bar);

    // good
    const baz = Array.from(foo, bar);

  • 4.6 在数组回调方法中使用 return 语句。 如果函数体由一个返回无副作用的表达式的单个语句组成,那么可以省略返回值, 具体查看 8.2。 eslint: array-callback-return

    1
    2
    3
    4
    5
    6
    7
    8
    9
    10
    11
    12
    13
    14
    15
    16
    17
    18
    19
    20
    21
    22
    23
    24
    25
    26
    27
    28
    29
    30
    31
    32
    33
    34
    35
    36
    37
    38
    39
    40
    41
    // good
    [1, 2, 3].map((x) => {
    const y = x + 1;
    return x * y;
    });

    // good
    [1, 2, 3].map(x => x + 1);

    // bad - 没有返回值,意味着在第一次迭代后 `acc` 没有被定义
    [[0, 1], [2, 3], [4, 5]].reduce((acc, item, index) => {
    const flatten = acc.concat(item);
    acc[index] = flatten;
    });

    // good
    [[0, 1], [2, 3], [4, 5]].reduce((acc, item, index) => {
    const flatten = acc.concat(item);
    acc[index] = flatten;
    return flatten;
    });

    // bad
    inbox.filter((msg) => {
    const { subject, author } = msg;
    if (subject === 'Mockingbird') {
    return author === 'Harper Lee';
    } else {
    return false;
    }
    });

    // good
    inbox.filter((msg) => {
    const { subject, author } = msg;
    if (subject === 'Mockingbird') {
    return author === 'Harper Lee';
    }

    return false;
    });

  • 4.7 如果数组有多行,则在开始的时候换行,然后在结束的时候换行。

    1
    2
    3
    4
    5
    6
    7
    8
    9
    10
    11
    12
    13
    14
    15
    16
    17
    18
    19
    20
    21
    22
    23
    24
    25
    26
    27
    28
    29
    30
    31
    // bad
    const arr = [
    [0, 1], [2, 3], [4, 5],
    ];

    const objectInArray = [{
    id: 1,
    }, {
    id: 2,
    }];

    const numberInArray = [
    1, 2,
    ];

    // good
    const arr = [[0, 1], [2, 3], [4, 5]];

    const objectInArray = [
    {
    id: 1,
    },
    {
    id: 2,
    },
    ];

    const numberInArray = [
    1,
    2,
    ];

⬆ 返回目录

解构

  • 5.1 在访问和使用对象的多个属性的时候使用对象的解构。 eslint: prefer-destructuring

    为什么? 解构可以避免为这些属性创建临时引用。

    1
    2
    3
    4
    5
    6
    7
    8
    9
    10
    11
    12
    13
    14
    15
    16
    17
    18
    // bad
    function getFullName(user) {
    const firstName = user.firstName;
    const lastName = user.lastName;

    return `${firstName} ${lastName}`;
    }

    // good
    function getFullName(user) {
    const { firstName, lastName } = user;
    return `${firstName} ${lastName}`;
    }

    // best
    function getFullName({ firstName, lastName }) {
    return `${firstName} ${lastName}`;
    }

  • 5.2 使用数组解构。 eslint: prefer-destructuring

    1
    2
    3
    4
    5
    6
    7
    8
    const arr = [1, 2, 3, 4];

    // bad
    const first = arr[0];
    const second = arr[1];

    // good
    const [first, second] = arr;

  • 5.3 对于多个返回值使用对象解构,而不是数组解构。

    为什么? 你可以随时添加新的属性或者改变属性的顺序,而不用修改调用方。

    1
    2
    3
    4
    5
    6
    7
    8
    9
    10
    11
    12
    13
    14
    15
    16
    17
    // bad
    function processInput(input) {
    // 处理代码...
    return [left, right, top, bottom];
    }

    // 调用者需要考虑返回数据的顺序。
    const [left, __, top] = processInput(input);

    // good
    function processInput(input) {
    // 处理代码...
    return { left, right, top, bottom };
    }

    // 调用者只选择他们需要的数据。
    const { left, top } = processInput(input);

⬆ 返回目录

字符

  • 6.1 使用单引号 '' 定义字符串。 eslint: quotes

    1
    2
    3
    4
    5
    6
    7
    8
    // bad
    const name = "Capt. Janeway";

    // bad - 模板文字应该包含插值或换行。
    const name = `Capt. Janeway`;

    // good
    const name = 'Capt. Janeway';

  • 6.2 使行超过100个字符的字符串不应使用字符串连接跨多行写入。

    为什么? 断开的字符串更加难以工作,并且使代码搜索更加困难。

    1
    2
    3
    4
    5
    6
    7
    8
    9
    10
    11
    12
    13
    // bad
    const errorMessage = 'This is a super long error that was thrown because \
    of Batman. When you stop to think about how Batman had anything to do \
    with this, you would get nowhere \
    fast.';

    // bad
    const errorMessage = 'This is a super long error that was thrown because ' +
    'of Batman. When you stop to think about how Batman had anything to do ' +
    'with this, you would get nowhere fast.';

    // good
    const errorMessage = 'This is a super long error that was thrown because of Batman. When you stop to think about how Batman had anything to do with this, you would get nowhere fast.';

  • 6.3 当以编程模式构建字符串时,使用字符串模板代替字符串拼接。 eslint: prefer-template template-curly-spacing

    为什么? 字符串模板为您提供了一种可读的、简洁的语法,具有正确的换行和字符串插值特性。

    1
    2
    3
    4
    5
    6
    7
    8
    9
    10
    11
    12
    13
    14
    15
    16
    17
    18
    19
    // bad
    function sayHi(name) {
    return 'How are you, ' + name + '?';
    }

    // bad
    function sayHi(name) {
    return ['How are you, ', name, '?'].join();
    }

    // bad
    function sayHi(name) {
    return `How are you, ${ name }?`;
    }

    // good
    function sayHi(name) {
    return `How are you, ${name}?`;
    }

  • 6.4 不要在字符串上使用 eval() ,它打开了太多漏洞。 eslint: no-eval

  • 6.5 不要转义字符串中不必要的字符。 eslint: no-useless-escape

    为什么? 反斜杠损害了可读性,因此只有在必要的时候才会出现。

    1
    2
    3
    4
    5
    6
    // bad
    const foo = '\'this\' \i\s \"quoted\"';

    // good
    const foo = '\'this\' is "quoted"';
    const foo = `my name is '${name}'`;

⬆ 返回目录

方法

  • 7.1 使用命名的函数表达式代替函数声明。 eslint: func-style

    为什么? 函数声明是挂起的,这意味着在它在文件中定义之前,很容易引用函数。这会损害可读性和可维护性。如果您发现函数的定义是大的或复杂的,以至于它干扰了对文件的其余部分的理解,那么也许是时候将它提取到它自己的模块中了!不要忘记显式地命名这个表达式,不管它的名称是否从包含变量(在现代浏览器中经常是这样,或者在使用诸如Babel之类的编译器时)。这消除了对错误的调用堆栈的任何假设。 (Discussion)

    1
    2
    3
    4
    5
    6
    7
    8
    9
    10
    11
    12
    13
    14
    15
    // bad
    function foo() {
    // ...
    }

    // bad
    const foo = function () {
    // ...
    };

    // good
    // 从变量引用调用中区分的词汇名称
    const short = function longUniqueMoreDescriptiveLexicalFoo() {
    // ...
    };

  • 7.2 Wrap立即调用函数表达式。 eslint: wrap-iife

    为什么? 立即调用的函数表达式是单个单元 - 包装, 并且拥有括号调用, 在括号内, 清晰的表达式。 请注意,在一个到处都是模块的世界中,您几乎不需要一个 IIFE 。

    1
    2
    3
    4
    // immediately-invoked function expression (IIFE) 立即调用的函数表达式
    (function () {
    console.log('Welcome to the Internet. Please follow me.');
    }());

  • 7.3 切记不要在非功能块中声明函数 (if, while, 等)。 将函数赋值给变量。 浏览器允许你这样做,但是他们都有不同的解释,这是个坏消息。 eslint: no-loop-func

  • 7.4 注意: ECMA-262 将 block 定义为语句列表。 函数声明不是语句。

    1
    2
    3
    4
    5
    6
    7
    8
    9
    10
    11
    12
    13
    14
    // bad
    if (currentUser) {
    function test() {
    console.log('Nope.');
    }
    }

    // good
    let test;
    if (currentUser) {
    test = () => {
    console.log('Yup.');
    };
    }

  • 7.5 永远不要定义一个参数为 arguments。 这将会优先于每个函数给定范围的 arguments 对象。

    1
    2
    3
    4
    5
    6
    7
    8
    9
    // bad
    function foo(name, options, arguments) {
    // ...
    }

    // good
    function foo(name, options, args) {
    // ...
    }

  • 7.6 不要使用 arguments, 选择使用 rest 语法 ... 代替。 eslint: prefer-rest-params

    为什么? ... 明确了你想要拉取什么参数。 更甚, rest 参数是一个真正的数组,而不仅仅是类数组的 arguments

    1
    2
    3
    4
    5
    6
    7
    8
    9
    10
    // bad
    function concatenateAll() {
    const args = Array.prototype.slice.call(arguments);
    return args.join('');
    }

    // good
    function concatenateAll(...args) {
    return args.join('');
    }

  • 7.7 使用默认的参数语法,而不是改变函数参数。

    1
    2
    3
    4
    5
    6
    7
    8
    9
    10
    11
    12
    13
    14
    15
    16
    17
    18
    19
    20
    21
    // really bad
    function handleThings(opts) {
    // No! We shouldn’t mutate function arguments.
    // Double bad: if opts is falsy it'll be set to an object which may
    // be what you want but it can introduce subtle bugs.
    opts = opts || {};
    // ...
    }

    // still bad
    function handleThings(opts) {
    if (opts === void 0) {
    opts = {};
    }
    // ...
    }

    // good
    function handleThings(opts = {}) {
    // ...
    }

  • 7.8 避免使用默认参数的副作用。

    为什么? 他们很容易混淆。

    1
    2
    3
    4
    5
    6
    7
    8
    9
    var b = 1;
    // bad
    function count(a = b++) {
    console.log(a);
    }
    count(); // 1
    count(); // 2
    count(3); // 3
    count(); // 3

  • 7.9 总是把默认参数放在最后。

    1
    2
    3
    4
    5
    6
    7
    8
    9
    // bad
    function handleThings(opts = {}, name) {
    // ...
    }

    // good
    function handleThings(name, opts = {}) {
    // ...
    }

  • 7.10 永远不要使用函数构造器来创建一个新函数。 eslint: no-new-func

    为什么? 以这种方式创建一个函数将对一个类似于 eval() 的字符串进行计算,这将打开漏洞。

    1
    2
    3
    4
    5
    // bad
    var add = new Function('a', 'b', 'return a + b');

    // still bad
    var subtract = Function('a', 'b', 'return a - b');

  • 7.11 函数签名中的间距。 eslint: space-before-function-paren space-before-blocks

    为什么? 一致性很好,在删除或添加名称时不需要添加或删除空格。

    1
    2
    3
    4
    5
    6
    7
    8
    // bad
    const f = function(){};
    const g = function (){};
    const h = function() {};

    // good
    const x = function () {};
    const y = function a() {};

  • 7.12 没用变异参数。 eslint: no-param-reassign

    为什么? 将传入的对象作为参数进行操作可能会在原始调用程序中造成不必要的变量副作用。

    1
    2
    3
    4
    5
    6
    7
    8
    9
    // bad
    function f1(obj) {
    obj.key = 1;
    }

    // good
    function f2(obj) {
    const key = Object.prototype.hasOwnProperty.call(obj, 'key') ? obj.key : 1;
    }

  • 7.13 不要再分配参数。 eslint: no-param-reassign

    为什么? 重新分配参数会导致意外的行为,尤其是在访问 arguments 对象的时候。 它还可能导致性能优化问题,尤其是在 V8 中。

    1
    2
    3
    4
    5
    6
    7
    8
    9
    10
    11
    12
    13
    14
    15
    16
    17
    18
    19
    20
    // bad
    function f1(a) {
    a = 1;
    // ...
    }

    function f2(a) {
    if (!a) { a = 1; }
    // ...
    }

    // good
    function f3(a) {
    const b = a || 1;
    // ...
    }

    function f4(a = 1) {
    // ...
    }

  • 7.14 优先使用扩展运算符 ... 来调用可变参数函数。 eslint: prefer-spread

    为什么? 它更加干净,你不需要提供上下文,并且你不能轻易的使用 applynew

    1
    2
    3
    4
    5
    6
    7
    8
    9
    10
    11
    12
    13
    // bad
    const x = [1, 2, 3, 4, 5];
    console.log.apply(console, x);

    // good
    const x = [1, 2, 3, 4, 5];
    console.log(...x);

    // bad
    new (Function.prototype.bind.apply(Date, [null, 2016, 8, 5]));

    // good
    new Date(...[2016, 8, 5]);

  • 7.15 具有多行签名或者调用的函数应该像本指南中的其他多行列表一样缩进:在一行上只有一个条目,并且每个条目最后加上逗号。 eslint: function-paren-newline

    1
    2
    3
    4
    5
    6
    7
    8
    9
    10
    11
    12
    13
    14
    15
    16
    17
    18
    19
    20
    21
    22
    23
    24
    25
    26
    27
    // bad
    function foo(bar,
    baz,
    quux) {
    // ...
    }

    // good
    function foo(
    bar,
    baz,
    quux,
    ) {
    // ...
    }

    // bad
    console.log(foo,
    bar,
    baz);

    // good
    console.log(
    foo,
    bar,
    baz,
    );

⬆ 返回目录

箭头函数

  • 8.1 当你必须使用匿名函数时 (当传递内联函数时), 使用箭头函数。 eslint: prefer-arrow-callback, arrow-spacing

    为什么? 它创建了一个在 this 上下文中执行的函数版本,它通常是你想要的,并且是一个更简洁的语法。

    为什么不? 如果你有一个相当复杂的函数,你可以把这个逻辑转移到它自己的命名函数表达式中。

    1
    2
    3
    4
    5
    6
    7
    8
    9
    10
    11
    // bad
    [1, 2, 3].map(function (x) {
    const y = x + 1;
    return x * y;
    });

    // good
    [1, 2, 3].map((x) => {
    const y = x + 1;
    return x * y;
    });

  • 8.2 如果函数体包含一个单独的语句,返回一个没有副作用的 expression , 省略括号并使用隐式返回。否则,保留括号并使用 return 语句。 eslint: arrow-parens, arrow-body-style

    为什么? 语法糖。 多个函数被链接在一起时,提高可读性。

    1
    2
    3
    4
    5
    6
    7
    8
    9
    10
    11
    12
    13
    14
    15
    16
    17
    18
    19
    20
    21
    22
    23
    24
    25
    26
    27
    28
    29
    30
    31
    32
    33
    34
    35
    36
    37
    // bad
    [1, 2, 3].map(number => {
    const nextNumber = number + 1;
    `A string containing the ${nextNumber}.`;
    });

    // good
    [1, 2, 3].map(number => `A string containing the ${number}.`);

    // good
    [1, 2, 3].map((number) => {
    const nextNumber = number + 1;
    return `A string containing the ${nextNumber}.`;
    });

    // good
    [1, 2, 3].map((number, index) => ({
    [index]: number,
    }));

    // 没有副作用的隐式返回
    function foo(callback) {
    const val = callback();
    if (val === true) {
    // 如果回调返回 true 执行
    }
    }

    let bool = false;

    // bad
    foo(() => bool = true);

    // good
    foo(() => {
    bool = true;
    });

  • 8.3 如果表达式跨越多个行,用括号将其括起来,以获得更好的可读性。

    为什么? 它清楚地显示了函数的起点和终点。

    1
    2
    3
    4
    5
    6
    7
    8
    9
    10
    11
    12
    13
    14
    // bad
    ['get', 'post', 'put'].map(httpMethod => Object.prototype.hasOwnProperty.call(
    httpMagicObjectWithAVeryLongName,
    httpMethod,
    )
    );

    // good
    ['get', 'post', 'put'].map(httpMethod => (
    Object.prototype.hasOwnProperty.call(
    httpMagicObjectWithAVeryLongName,
    httpMethod,
    )
    ));

  • 8.4 如果你的函数接收一个参数,则可以不用括号,省略括号。 否则,为了保证清晰和一致性,需要在参数周围加上括号。 注意:总是使用括号是可以接受的,在这种情况下,我们使用 “always” option 来配置 eslint. eslint: arrow-parens

    为什么? 减少视觉上的混乱。

    1
    2
    3
    4
    5
    6
    7
    8
    9
    10
    11
    12
    13
    14
    15
    16
    17
    18
    19
    20
    21
    22
    // bad
    [1, 2, 3].map((x) => x * x);

    // good
    [1, 2, 3].map(x => x * x);

    // good
    [1, 2, 3].map(number => (
    `A long string with the ${number}. It’s so long that we don’t want it to take up space on the .map line!`
    ));

    // bad
    [1, 2, 3].map(x => {
    const y = x + 1;
    return x * y;
    });

    // good
    [1, 2, 3].map((x) => {
    const y = x + 1;
    return x * y;
    });

  • 8.5 避免箭头函数符号 (=>) 和比较运算符 (<=, >=) 的混淆。 eslint: no-confusing-arrow

    1
    2
    3
    4
    5
    6
    7
    8
    9
    10
    11
    12
    13
    14
    // bad
    const itemHeight = item => item.height > 256 ? item.largeSize : item.smallSize;

    // bad
    const itemHeight = (item) => item.height > 256 ? item.largeSize : item.smallSize;

    // good
    const itemHeight = item => (item.height > 256 ? item.largeSize : item.smallSize);

    // good
    const itemHeight = (item) => {
    const { height, largeSize, smallSize } = item;
    return height > 256 ? largeSize : smallSize;
    };

  • 8.6 注意带有隐式返回的箭头函数函数体的位置。 eslint: implicit-arrow-linebreak

    1
    2
    3
    4
    5
    6
    7
    8
    9
    10
    11
    12
    13
    // bad
    (foo) =>
    bar;

    (foo) =>
    (bar);

    // good
    (foo) => bar;
    (foo) => (bar);
    (foo) => (
    bar
    )

⬆ 返回目录

类和构造器

  • 9.1 尽量使用 class. 避免直接操作 prototype .

    为什么? class 语法更简洁,更容易推理。

    1
    2
    3
    4
    5
    6
    7
    8
    9
    10
    11
    12
    13
    14
    15
    16
    17
    18
    19
    20
    21
    // bad
    function Queue(contents = []) {
    this.queue = [...contents];
    }
    Queue.prototype.pop = function () {
    const value = this.queue[0];
    this.queue.splice(0, 1);
    return value;
    };

    // good
    class Queue {
    constructor(contents = []) {
    this.queue = [...contents];
    }
    pop() {
    const value = this.queue[0];
    this.queue.splice(0, 1);
    return value;
    }
    }

  • 9.2 使用 extends 来扩展继承。

    为什么? 它是一个内置的方法,可以在不破坏 instanceof 的情况下继承原型功能。

    1
    2
    3
    4
    5
    6
    7
    8
    9
    10
    11
    12
    13
    14
    15
    16
    // bad
    const inherits = require('inherits');
    function PeekableQueue(contents) {
    Queue.apply(this, contents);
    }
    inherits(PeekableQueue, Queue);
    PeekableQueue.prototype.peek = function () {
    return this.queue[0];
    };

    // good
    class PeekableQueue extends Queue {
    peek() {
    return this.queue[0];
    }
    }

  • 9.3 方法返回了 this 来供其内部方法调用。

    1
    2
    3
    4
    5
    6
    7
    8
    9
    10
    11
    12
    13
    14
    15
    16
    17
    18
    19
    20
    21
    22
    23
    24
    25
    26
    27
    28
    29
    30
    31
    // bad
    Jedi.prototype.jump = function () {
    this.jumping = true;
    return true;
    };

    Jedi.prototype.setHeight = function (height) {
    this.height = height;
    };

    const luke = new Jedi();
    luke.jump(); // => true
    luke.setHeight(20); // => undefined

    // good
    class Jedi {
    jump() {
    this.jumping = true;
    return this;
    }

    setHeight(height) {
    this.height = height;
    return this;
    }
    }

    const luke = new Jedi();

    luke.jump()
    .setHeight(20);

  • 9.4 只要在确保能正常工作并且不产生任何副作用的情况下,编写一个自定义的 toString() 方法也是可以的。

    1
    2
    3
    4
    5
    6
    7
    8
    9
    10
    11
    12
    13
    class Jedi {
    constructor(options = {}) {
    this.name = options.name || 'no name';
    }

    getName() {
    return this.name;
    }

    toString() {
    return `Jedi - ${this.getName()}`;
    }
    }

  • 9.5 如果没有指定类,则类具有默认的构造器。 一个空的构造器或是一个代表父类的函数是没有必要的。 eslint: no-useless-constructor

    1
    2
    3
    4
    5
    6
    7
    8
    9
    10
    11
    12
    13
    14
    15
    16
    17
    18
    19
    20
    21
    22
    23
    // bad
    class Jedi {
    constructor() {}

    getName() {
    return this.name;
    }
    }

    // bad
    class Rey extends Jedi {
    constructor(...args) {
    super(...args);
    }
    }

    // good
    class Rey extends Jedi {
    constructor(...args) {
    super(...args);
    this.name = 'Rey';
    }
    }

  • 9.6 避免定义重复的类成员。 eslint: no-dupe-class-members

    为什么? 重复的类成员声明将会默认倾向于最后一个 - 具有重复的类成员可以说是一个错误。

    1
    2
    3
    4
    5
    6
    7
    8
    9
    10
    11
    12
    13
    14
    15
    // bad
    class Foo {
    bar() { return 1; }
    bar() { return 2; }
    }

    // good
    class Foo {
    bar() { return 1; }
    }

    // good
    class Foo {
    bar() { return 2; }
    }

⬆ 返回目录

模块

  • 10.1 你可能经常使用模块 (import/export) 在一些非标准模块的系统上。 你也可以在你喜欢的模块系统上相互转换。

    为什么? 模块是未来的趋势,让我们拥抱未来。

    1
    2
    3
    4
    5
    6
    7
    8
    9
    10
    11
    // bad
    const AirbnbStyleGuide = require('./AirbnbStyleGuide');
    module.exports = AirbnbStyleGuide.es6;

    // ok
    import AirbnbStyleGuide from './AirbnbStyleGuide';
    export default AirbnbStyleGuide.es6;

    // best
    import { es6 } from './AirbnbStyleGuide';
    export default es6;

  • 10.2 不要使用通配符导入。

    为什么? 这确定你有一个单独的默认导出。

    1
    2
    3
    4
    5
    // bad
    import * as AirbnbStyleGuide from './AirbnbStyleGuide';

    // good
    import AirbnbStyleGuide from './AirbnbStyleGuide';

  • 10.3 不要直接从导入导出。

    为什么? 虽然写在一行很简洁,但是有一个明确的导入和一个明确的导出能够保证一致性。

    1
    2
    3
    4
    5
    6
    7
    8
    // bad
    // filename es6.js
    export { es6 as default } from './AirbnbStyleGuide';

    // good
    // filename es6.js
    import { es6 } from './AirbnbStyleGuide';
    export default es6;

  • 10.4 只从一个路径导入所有需要的东西。
    eslint: no-duplicate-imports

    为什么? 从同一个路径导入多个行,使代码更难以维护。

    1
    2
    3
    4
    5
    6
    7
    8
    9
    10
    11
    12
    13
    // bad
    import foo from 'foo';
    // … 其他导入 … //
    import { named1, named2 } from 'foo';

    // good
    import foo, { named1, named2 } from 'foo';

    // good
    import foo, {
    named1,
    named2,
    } from 'foo';

  • 10.5 不要导出可变的引用。
    eslint: import/no-mutable-exports

    为什么? 在一般情况下,应该避免发生突变,但是在导出可变引用时及其容易发生突变。虽然在某些特殊情况下,可能需要这样,但是一般情况下只需要导出常量引用。

    1
    2
    3
    4
    5
    6
    7
    // bad
    let foo = 3;
    export { foo };

    // good
    const foo = 3;
    export { foo };

  • 10.6 在单个导出的模块中,选择默认模块而不是指定的导出。
    eslint: import/prefer-default-export

    为什么? 为了鼓励更多的文件只导出一件东西,这样可读性和可维护性更好。

    1
    2
    3
    4
    5
    // bad
    export function foo() {}

    // good
    export default function foo() {}

  • 10.7 将所有的 imports 语句放在所有非导入语句的上边。
    eslint: import/first

    为什么? 由于所有的 imports 都被提前,保持他们在顶部是为了防止意外发生。

    1
    2
    3
    4
    5
    6
    7
    8
    9
    10
    11
    // bad
    import foo from 'foo';
    foo.init();

    import bar from 'bar';

    // good
    import foo from 'foo';
    import bar from 'bar';

    foo.init();

  • 10.8 多行导入应该像多行数组和对象一样缩进。

    为什么? 花括号和其他规范一样,遵循相同的缩进规则,后边的都好一样。

    1
    2
    3
    4
    5
    6
    7
    8
    9
    10
    11
    // bad
    import {longNameA, longNameB, longNameC, longNameD, longNameE} from 'path';

    // good
    import {
    longNameA,
    longNameB,
    longNameC,
    longNameD,
    longNameE,
    } from 'path';

  • 10.9 在模块导入语句中禁止使用 Webpack 加载器语法。
    eslint: import/no-webpack-loader-syntax

    为什么? 因为在导入语句中使用 webpack 语法,将代码和模块绑定在一起。应该在 webpack.config.js 中使用加载器语法。

    1
    2
    3
    4
    5
    6
    7
    // bad
    import fooSass from 'css!sass!foo.scss';
    import barCss from 'style!css!bar.css';

    // good
    import fooSass from 'foo.scss';
    import barCss from 'bar.css';

⬆ 返回目录

迭代器和发生器

  • 11.1 不要使用迭代器。 你应该使用 JavaScript 的高阶函数代替 for-in 或者 for-of。 eslint: no-iterator no-restricted-syntax

    为什么? 这是我们强制的规则。 拥有返回值得纯函数比这个更容易解释。

    使用 map() / every() / filter() / find() / findIndex() / reduce() / some() / … 遍历数组, 和使用 Object.keys() / Object.values() / Object.entries() 迭代你的对象生成数组。

    1
    2
    3
    4
    5
    6
    7
    8
    9
    10
    11
    12
    13
    14
    15
    16
    17
    18
    19
    20
    21
    22
    23
    24
    25
    26
    27
    28
    29
    30
    31
    32
    33
    34
    const numbers = [1, 2, 3, 4, 5];

    // bad
    let sum = 0;
    for (let num of numbers) {
    sum += num;
    }
    sum === 15;

    // good
    let sum = 0;
    numbers.forEach((num) => {
    sum += num;
    });
    sum === 15;

    // best (use the functional force)
    const sum = numbers.reduce((total, num) => total + num, 0);
    sum === 15;

    // bad
    const increasedByOne = [];
    for (let i = 0; i < numbers.length; i++) {
    increasedByOne.push(numbers[i] + 1);
    }

    // good
    const increasedByOne = [];
    numbers.forEach((num) => {
    increasedByOne.push(num + 1);
    });

    // best (keeping it functional)
    const increasedByOne = numbers.map(num => num + 1);

  • 11.2 不要使用发生器。

    为什么? They don’t transpile well to ES5.

  • 11.3 如果你必须使用发生器或者无视 我们的建议,请确保他们的函数签名是正常的间隔。 eslint: generator-star-spacing

    为什么? function* 是同一个概念关键字的一部分 - * 不是 function 的修饰符, function* 是一个不同于 function 的构造器。

    1
    2
    3
    4
    5
    6
    7
    8
    9
    10
    11
    12
    13
    14
    15
    16
    17
    18
    19
    20
    21
    22
    23
    24
    25
    26
    27
    28
    29
    30
    31
    32
    33
    34
    35
    36
    37
    38
    39
    40
    41
    42
    43
    44
    45
    46
    47
    48
    49
    50
    51
    52
    53
    // bad
    function * foo() {
    // ...
    }

    // bad
    const bar = function * () {
    // ...
    };

    // bad
    const baz = function *() {
    // ...
    };

    // bad
    const quux = function*() {
    // ...
    };

    // bad
    function*foo() {
    // ...
    }

    // bad
    function *foo() {
    // ...
    }

    // very bad
    function
    *
    foo() {
    // ...
    }

    // very bad
    const wat = function
    *
    () {
    // ...
    };

    // good
    function* foo() {
    // ...
    }

    // good
    const foo = function* () {
    // ...
    };

⬆ 返回目录

属性

  • 12.1 访问属性时使用点符号。 eslint: dot-notation

    1
    2
    3
    4
    5
    6
    7
    8
    9
    10
    const luke = {
    jedi: true,
    age: 28,
    };

    // bad
    const isJedi = luke['jedi'];

    // good
    const isJedi = luke.jedi;

  • 12.2 使用变量访问属性时,使用 []表示法。

    1
    2
    3
    4
    5
    6
    7
    8
    9
    10
    const luke = {
    jedi: true,
    age: 28,
    };

    function getProp(prop) {
    return luke[prop];
    }

    const isJedi = getProp('jedi');

  • 12.3 计算指数时,可以使用 ** 运算符。 eslint: no-restricted-properties.

    1
    2
    3
    4
    5
    // bad
    const binary = Math.pow(2, 10);

    // good
    const binary = 2 ** 10;

⬆ 返回目录

变量

  • 13.1 使用 const 或者 let 来定义变量。 不这样做将创建一个全局变量。 我们希望避免污染全局命名空间。 Captain Planet 警告过我们。 eslint: no-undef prefer-const

    1
    2
    3
    4
    5
    // bad
    superPower = new SuperPower();

    // good
    const superPower = new SuperPower();

  • 13.2 使用 const 或者 let 声明每一个变量。 eslint: one-var

    为什么? 这样更容易添加新的变量声明,而且你不必担心是使用 ; 还是使用 , 或引入标点符号的差别。 你可以通过 debugger 逐步查看每个声明,而不是立即跳过所有声明。

    1
    2
    3
    4
    5
    6
    7
    8
    9
    10
    11
    12
    13
    14
    15
    // bad
    const items = getItems(),
    goSportsTeam = true,
    dragonball = 'z';

    // bad
    // (compare to above, and try to spot the mistake)
    const items = getItems(),
    goSportsTeam = true;
    dragonball = 'z';

    // good
    const items = getItems();
    const goSportsTeam = true;
    const dragonball = 'z';

  • 13.3const 声明的放在一起,把 let 声明的放在一起。.

    为什么? 这在后边如果需要根据前边的赋值变量指定一个变量时很有用。

    1
    2
    3
    4
    5
    6
    7
    8
    9
    10
    11
    12
    13
    14
    15
    16
    17
    18
    // bad
    let i, len, dragonball,
    items = getItems(),
    goSportsTeam = true;

    // bad
    let i;
    const items = getItems();
    let dragonball;
    const goSportsTeam = true;
    let len;

    // good
    const goSportsTeam = true;
    const items = getItems();
    let dragonball;
    let i;
    let length;

  • 13.4 在你需要的使用定义变量,但是要把它们放在一个合理的地方。

    为什么? letconst 是块级作用域而不是函数作用域。

    1
    2
    3
    4
    5
    6
    7
    8
    9
    10
    11
    12
    13
    14
    15
    16
    17
    18
    19
    20
    21
    22
    23
    24
    25
    26
    27
    28
    29
    30
    31
    // bad - 不必要的函数调用
    function checkName(hasName) {
    const name = getName();

    if (hasName === 'test') {
    return false;
    }

    if (name === 'test') {
    this.setName('');
    return false;
    }

    return name;
    }

    // good
    function checkName(hasName) {
    if (hasName === 'test') {
    return false;
    }

    const name = getName();

    if (name === 'test') {
    this.setName('');
    return false;
    }

    return name;
    }

  • 13.5 不要链式变量赋值。 eslint: no-multi-assign

    为什么? 链式变量赋值会创建隐式全局变量。

    1
    2
    3
    4
    5
    6
    7
    8
    9
    10
    11
    12
    13
    14
    15
    16
    17
    18
    19
    20
    21
    22
    23
    24
    // bad
    (function example() {
    // JavaScript 把它解释为
    // let a = ( b = ( c = 1 ) );
    // let 关键词只适用于变量 a ;变量 b 和变量 c 则变成了全局变量。
    let a = b = c = 1;
    }());

    console.log(a); // throws ReferenceError
    console.log(b); // 1
    console.log(c); // 1

    // good
    (function example() {
    let a = 1;
    let b = a;
    let c = a;
    }());

    console.log(a); // throws ReferenceError
    console.log(b); // throws ReferenceError
    console.log(c); // throws ReferenceError

    // 对于 `const` 也一样

  • 13.6 避免使用不必要的递增和递减 (++, --)。 eslint no-plusplus

    为什么? 在eslint文档中,一元递增和递减语句以自动分号插入为主题,并且在应用程序中可能会导致默认值的递增或递减。它还可以用像 num += 1 这样的语句来改变您的值,而不是使用 num++num ++ 。不允许不必要的增量和减量语句也会使您无法预先递增/预递减值,这也会导致程序中的意外行为。

    1
    2
    3
    4
    5
    6
    7
    8
    9
    10
    11
    12
    13
    14
    15
    16
    17
    18
    19
    20
    21
    22
    23
    24
    25
    26
    // bad

    const array = [1, 2, 3];
    let num = 1;
    num++;
    --num;

    let sum = 0;
    let truthyCount = 0;
    for (let i = 0; i < array.length; i++) {
    let value = array[i];
    sum += value;
    if (value) {
    truthyCount++;
    }
    }

    // good

    const array = [1, 2, 3];
    let num = 1;
    num += 1;
    num -= 1;

    const sum = array.reduce((a, b) => a + b, 0);
    const truthyCount = array.filter(Boolean).length;

  • 13.7 避免在赋值语句 = 前后换行。如果你的代码违反了 max-len, 使用括号包裹。 eslint operator-linebreak.

    为什么? 在 = 前后换行,可能混淆分配的值。

    1
    2
    3
    4
    5
    6
    7
    8
    9
    10
    11
    12
    13
    14
    15
    // bad
    const foo =
    superLongLongLongLongLongLongLongLongFunctionName();

    // bad
    const foo
    = 'superLongLongLongLongLongLongLongLongString';

    // good
    const foo = (
    superLongLongLongLongLongLongLongLongFunctionName()
    );

    // good
    const foo = 'superLongLongLongLongLongLongLongLongString';

⬆ 返回目录

提升

  • 14.1 var 定义的变量会被提升到函数范围的最顶部,但是它的赋值不会。constlet 声明的变量受到一个称之为 Temporal Dead Zones (TDZ) 的新概念保护。 知道为什么 typeof 不在安全 是很重要的。

    1
    2
    3
    4
    5
    6
    7
    8
    9
    10
    11
    12
    13
    14
    15
    16
    17
    18
    19
    20
    21
    22
    23
    24
    25
    26
    // 我们知道这个行不通 (假设没有未定义的全局变量)
    function example() {
    console.log(notDefined); // => throws a ReferenceError
    }

    // 在引用变量后创建变量声明将会因变量提升而起作用。
    // 注意: 真正的值 `true` 不会被提升。
    function example() {
    console.log(declaredButNotAssigned); // => undefined
    var declaredButNotAssigned = true;
    }

    // 解释器将变量提升到函数的顶部
    // 这意味着我们可以将上边的例子重写为:
    function example() {
    let declaredButNotAssigned;
    console.log(declaredButNotAssigned); // => undefined
    declaredButNotAssigned = true;
    }

    // 使用 const 和 let
    function example() {
    console.log(declaredButNotAssigned); // => throws a ReferenceError
    console.log(typeof declaredButNotAssigned); // => throws a ReferenceError
    const declaredButNotAssigned = true;
    }

  • 14.2 匿名函数表达式提升变量名,而不是函数赋值。

    1
    2
    3
    4
    5
    6
    7
    8
    9
    function example() {
    console.log(anonymous); // => undefined

    anonymous(); // => TypeError anonymous is not a function

    var anonymous = function () {
    console.log('anonymous function expression');
    };
    }

  • 14.3 命名函数表达式提升的是变量名,而不是函数名或者函数体。

    1
    2
    3
    4
    5
    6
    7
    8
    9
    10
    11
    12
    13
    14
    15
    16
    17
    18
    19
    20
    21
    22
    function example() {
    console.log(named); // => undefined

    named(); // => TypeError named is not a function

    superPower(); // => ReferenceError superPower is not defined

    var named = function superPower() {
    console.log('Flying');
    };
    }

    // 当函数名和变量名相同时也是如此。
    function example() {
    console.log(named); // => undefined

    named(); // => TypeError named is not a function

    var named = function named() {
    console.log('named');
    };
    }

  • 14.4 函数声明提升其名称和函数体。

    1
    2
    3
    4
    5
    6
    7
    function example() {
    superPower(); // => Flying

    function superPower() {
    console.log('Flying');
    }
    }
  • 更多信息请参考 Ben CherryJavaScript Scoping & Hoisting

⬆ 返回目录

比较运算符和等号

  • 15.1 使用 ===!== 而不是 ==!=。 eslint: eqeqeq

  • 15.2 条件语句,例如 if 语句使用 ToBoolean 的抽象方法来计算表达式的结果,并始终遵循以下简单的规则:

    • Objects 的取值为: true
    • Undefined 的取值为: false
    • Null 的取值为: false
    • Booleans 的取值为: 布尔值的取值
    • Numbers 的取值为:如果为 +0, -0, or NaN 值为 false 否则为 true
    • Strings 的取值为: 如果是一个空字符串 '' 值为 false 否则为 true
    1
    2
    3
    4
    if ([0] && []) {
    // true
    // 一个数组(既是是空的)是一个对象,对象的取值为 true
    }

  • 15.3 对于布尔值使用简写,但是对于字符串和数字进行显式比较。

    1
    2
    3
    4
    5
    6
    7
    8
    9
    10
    11
    12
    13
    14
    15
    16
    17
    18
    19
    20
    21
    22
    23
    24
    25
    26
    27
    28
    29
    // bad
    if (isValid === true) {
    // ...
    }

    // good
    if (isValid) {
    // ...
    }

    // bad
    if (name) {
    // ...
    }

    // good
    if (name !== '') {
    // ...
    }

    // bad
    if (collection.length) {
    // ...
    }

    // good
    if (collection.length > 0) {
    // ...
    }

  • 15.4 获取更多信息请查看 Angus Croll 的 Truth Equality and JavaScript

  • 15.5casedefault 的子句中,如果存在声明 (例如. let, const, function, 和 class),使用大括号来创建块 。 eslint: no-case-declarations

    为什么? 语法声明在整个 switch 块中都是可见的,但是只有在赋值的时候才会被初始化,这种情况只有在 case 条件达到才会发生。 当多个 case 语句定义相同的东西是,这会导致问题问题。

    1
    2
    3
    4
    5
    6
    7
    8
    9
    10
    11
    12
    13
    14
    15
    16
    17
    18
    19
    20
    21
    22
    23
    24
    25
    26
    27
    28
    29
    30
    31
    32
    33
    34
    35
    36
    37
    38
    39
    40
    // bad
    switch (foo) {
    case 1:
    let x = 1;
    break;
    case 2:
    const y = 2;
    break;
    case 3:
    function f() {
    // ...
    }
    break;
    default:
    class C {}
    }

    // good
    switch (foo) {
    case 1: {
    let x = 1;
    break;
    }
    case 2: {
    const y = 2;
    break;
    }
    case 3: {
    function f() {
    // ...
    }
    break;
    }
    case 4:
    bar();
    break;
    default: {
    class C {}
    }
    }

  • 15.6 三目表达式不应该嵌套,通常是单行表达式。 eslint: no-nested-ternary

    1
    2
    3
    4
    5
    6
    7
    8
    9
    10
    11
    12
    13
    14
    15
    // bad
    const foo = maybe1 > maybe2
    ? "bar"
    : value1 > value2 ? "baz" : null;

    // 分离为两个三目表达式
    const maybeNull = value1 > value2 ? 'baz' : null;

    // better
    const foo = maybe1 > maybe2
    ? 'bar'
    : maybeNull;

    // best
    const foo = maybe1 > maybe2 ? 'bar' : maybeNull;

  • 15.7 避免不必要的三目表达式。 eslint: no-unneeded-ternary

    1
    2
    3
    4
    5
    6
    7
    8
    9
    // bad
    const foo = a ? a : b;
    const bar = c ? true : false;
    const baz = c ? false : true;

    // good
    const foo = a || b;
    const bar = !!c;
    const baz = !c;

  • 15.8 使用该混合运算符时,使用括号括起来。 唯一例外的是标准算数运算符 (+, -, *, & /) 因为他们的优先级被广泛理解。 eslint: no-mixed-operators

    为什么? 这能提高可读性并且表明开发人员的意图。

    1
    2
    3
    4
    5
    6
    7
    8
    9
    10
    11
    12
    13
    14
    15
    16
    17
    18
    19
    20
    21
    22
    23
    24
    25
    // bad
    const foo = a && b < 0 || c > 0 || d + 1 === 0;

    // bad
    const bar = a ** b - 5 % d;

    // bad
    // 可能陷入一种 (a || b) && c 的思考
    if (a || b && c) {
    return d;
    }

    // good
    const foo = (a && b < 0) || c > 0 || (d + 1 === 0);

    // good
    const bar = (a ** b) - (5 % d);

    // good
    if (a || (b && c)) {
    return d;
    }

    // good
    const bar = a + b / c * d;

⬆ 返回目录

  • 16.1 当有多行代码块的时候,使用大括号包裹。 eslint: nonblock-statement-body-position

    1
    2
    3
    4
    5
    6
    7
    8
    9
    10
    11
    12
    13
    14
    15
    16
    17
    18
    19
    // bad
    if (test)
    return false;

    // good
    if (test) return false;

    // good
    if (test) {
    return false;
    }

    // bad
    function foo() { return false; }

    // good
    function bar() {
    return false;
    }

  • 16.2 如果你使用的是 ifelse 的多行代码块,则将 else 语句放在 if 块闭括号同一行的位置。 eslint: brace-style

    1
    2
    3
    4
    5
    6
    7
    8
    9
    10
    11
    12
    13
    14
    15
    16
    // bad
    if (test) {
    thing1();
    thing2();
    }
    else {
    thing3();
    }

    // good
    if (test) {
    thing1();
    thing2();
    } else {
    thing3();
    }

  • 16.3 如果一个 if 块总是执行一个 return 语句,那么接下来的 else 块就没有必要了。 如果一个包含 return 语句的 else if 块,在一个包含了 return 语句的 if 块之后,那么可以拆成多个 if 块。 eslint: no-else-return

    1
    2
    3
    4
    5
    6
    7
    8
    9
    10
    11
    12
    13
    14
    15
    16
    17
    18
    19
    20
    21
    22
    23
    24
    25
    26
    27
    28
    29
    30
    31
    32
    33
    34
    35
    36
    37
    38
    39
    40
    41
    42
    43
    44
    45
    46
    47
    48
    49
    50
    51
    52
    53
    54
    55
    56
    57
    58
    59
    // bad
    function foo() {
    if (x) {
    return x;
    } else {
    return y;
    }
    }

    // bad
    function cats() {
    if (x) {
    return x;
    } else if (y) {
    return y;
    }
    }

    // bad
    function dogs() {
    if (x) {
    return x;
    } else {
    if (y) {
    return y;
    }
    }
    }

    // good
    function foo() {
    if (x) {
    return x;
    }

    return y;
    }

    // good
    function cats() {
    if (x) {
    return x;
    }

    if (y) {
    return y;
    }
    }

    // good
    function dogs(x) {
    if (x) {
    if (z) {
    return y;
    }
    } else {
    return z;
    }
    }

⬆ 返回目录

控制语句

  • 17.1 如果你的控制语句 (if, while 等) 太长或者超过了一行最大长度的限制,则可以将每个条件(或组)放入一个新的行。 逻辑运算符应该在行的开始。

    为什么? 要求操作符在行的开始保持对齐并遵循类似方法衔接的模式。 这提高了可读性,并且使更复杂的逻辑更容易直观的被理解。

    1
    2
    3
    4
    5
    6
    7
    8
    9
    10
    11
    12
    13
    14
    15
    16
    17
    18
    19
    20
    21
    22
    23
    24
    25
    26
    27
    28
    29
    30
    31
    32
    33
    34
    35
    36
    37
    38
    39
    40
    41
    42
    43
    44
    45
    46
    // bad
    if ((foo === 123 || bar === 'abc') && doesItLookGoodWhenItBecomesThatLong() && isThisReallyHappening()) {
    thing1();
    }

    // bad
    if (foo === 123 &&
    bar === 'abc') {
    thing1();
    }

    // bad
    if (foo === 123
    && bar === 'abc') {
    thing1();
    }

    // bad
    if (
    foo === 123 &&
    bar === 'abc'
    ) {
    thing1();
    }

    // good
    if (
    foo === 123
    && bar === 'abc'
    ) {
    thing1();
    }

    // good
    if (
    (foo === 123 || bar === 'abc')
    && doesItLookGoodWhenItBecomesThatLong()
    && isThisReallyHappening()
    ) {
    thing1();
    }

    // good
    if (foo === 123 && bar === 'abc') {
    thing1();
    }

  • 17.2 不要使用选择操作符代替控制语句。

    1
    2
    3
    4
    5
    6
    7
    // bad
    !isRunning && startRunning();

    // good
    if (!isRunning) {
    startRunning();
    }

⬆ 返回目录

注释

  • 18.1 使用 /** ... */ 来进行多行注释。

    1
    2
    3
    4
    5
    6
    7
    8
    9
    10
    11
    12
    13
    14
    15
    16
    17
    18
    19
    20
    21
    22
    23
    24
    // bad
    // make() returns a new element
    // based on the passed in tag name
    //
    // @param {String} tag
    // @return {Element} element
    function make(tag) {

    // ...

    return element;
    }

    // good
    /**
    * make() returns a new element
    * based on the passed-in tag name
    */
    function make(tag) {

    // ...

    return element;
    }

  • 18.2 使用 // 进行单行注释。 将单行注释放在需要注释的行的上方新行。 在注释之前放一个空行,除非它在块的第一行。

    1
    2
    3
    4
    5
    6
    7
    8
    9
    10
    11
    12
    13
    14
    15
    16
    17
    18
    19
    20
    21
    22
    23
    24
    25
    26
    27
    28
    29
    30
    31
    32
    33
    // bad
    const active = true; // is current tab

    // good
    // is current tab
    const active = true;

    // bad
    function getType() {
    console.log('fetching type...');
    // set the default type to 'no type'
    const type = this.type || 'no type';

    return type;
    }

    // good
    function getType() {
    console.log('fetching type...');

    // set the default type to 'no type'
    const type = this.type || 'no type';

    return type;
    }

    // also good
    function getType() {
    // set the default type to 'no type'
    const type = this.type || 'no type';

    return type;
    }

  • 18.3 用一个空格开始所有的注释,使它更容易阅读。 eslint: spaced-comment

    1
    2
    3
    4
    5
    6
    7
    8
    9
    10
    11
    12
    13
    14
    15
    16
    17
    18
    19
    20
    21
    22
    23
    24
    25
    26
    27
    28
    29
    30
    31
    // bad
    //is current tab
    const active = true;

    // good
    // is current tab
    const active = true;

    // bad
    /**
    *make() returns a new element
    *based on the passed-in tag name
    */
    function make(tag) {

    // ...

    return element;
    }

    // good
    /**
    * make() returns a new element
    * based on the passed-in tag name
    */
    function make(tag) {

    // ...

    return element;
    }

  • 18.4 使用 FIXME 或者 TODO 开始你的注释可以帮助其他开发人员快速了解,如果你提出了一个需要重新审视的问题,或者你对需要实现的问题提出的解决方案。 这些不同于其他评论,因为他们是可操作的。 这些行为是 FIXME: -- 需要解决这个问题 或者 TODO: -- 需要被实现

  • 18.5 使用 // FIXME: 注释一个问题。

    1
    2
    3
    4
    5
    6
    7
    8
    class Calculator extends Abacus {
    constructor() {
    super();

    // FIXME: 这里不应该使用全局变量
    total = 0;
    }
    }

  • 18.6 使用 // TODO: 注释解决问题的方法。

    1
    2
    3
    4
    5
    6
    7
    8
    class Calculator extends Abacus {
    constructor() {
    super();

    // TODO: total 应该由一个 param 的选项配置
    this.total = 0;
    }
    }

⬆ 返回目录

空白

  • 19.1 使用 tabs (空格字符) 设置为 2 个空格。 eslint: indent

    1
    2
    3
    4
    5
    6
    7
    8
    9
    10
    11
    12
    13
    14
    // bad
    function foo() {
    ∙∙∙∙let name;
    }

    // bad
    function bar() {
    let name;
    }

    // good
    function baz() {
    ∙∙let name;
    }

  • 19.2 在主体前放置一个空格。 eslint: space-before-blocks

    1
    2
    3
    4
    5
    6
    7
    8
    9
    10
    11
    12
    13
    14
    15
    16
    17
    18
    19
    20
    21
    // bad
    function test(){
    console.log('test');
    }

    // good
    function test() {
    console.log('test');
    }

    // bad
    dog.set('attr',{
    age: '1 year',
    breed: 'Bernese Mountain Dog',
    });

    // good
    dog.set('attr', {
    age: '1 year',
    breed: 'Bernese Mountain Dog',
    });

  • 19.3 在控制语句(if, while 等)开始括号之前放置一个空格。 在函数调用和是声明中,在参数列表和函数名之间没有空格。 eslint: keyword-spacing

    1
    2
    3
    4
    5
    6
    7
    8
    9
    10
    11
    12
    13
    14
    15
    16
    17
    18
    19
    // bad
    if(isJedi) {
    fight ();
    }

    // good
    if (isJedi) {
    fight();
    }

    // bad
    function fight () {
    console.log ('Swooosh!');
    }

    // good
    function fight() {
    console.log('Swooosh!');
    }

  • 19.4 用空格分离操作符。 eslint: space-infix-ops

    1
    2
    3
    4
    5
    // bad
    const x=y+5;

    // good
    const x = y + 5;

  • 19.5 使用单个换行符结束文件。 eslint: eol-last

    1
    2
    3
    4
    // bad
    import { es6 } from './AirbnbStyleGuide';
    // ...
    export default es6;
    1
    2
    3
    4
    5
    // bad
    import { es6 } from './AirbnbStyleGuide';
    // ...
    export default es6;↵

    1
    2
    3
    4
    // good
    import { es6 } from './AirbnbStyleGuide';
    // ...
    export default es6;↵

  • 19.6 在使用长方法连滴啊用的时候使用缩进(超过两个方法链)。 使用一个引导点,强调该行是方法调用,而不是新的语句。 eslint: newline-per-chained-call no-whitespace-before-property

    1
    2
    3
    4
    5
    6
    7
    8
    9
    10
    11
    12
    13
    14
    15
    16
    17
    18
    19
    20
    21
    22
    23
    24
    25
    26
    27
    28
    29
    30
    31
    32
    33
    34
    35
    36
    37
    // bad
    $('#items').find('.selected').highlight().end().find('.open').updateCount();

    // bad
    $('#items').
    find('.selected').
    highlight().
    end().
    find('.open').
    updateCount();

    // good
    $('#items')
    .find('.selected')
    .highlight()
    .end()
    .find('.open')
    .updateCount();

    // bad
    const leds = stage.selectAll('.led').data(data).enter().append('svg:svg').classed('led', true)
    .attr('width', (radius + margin) * 2).append('svg:g')
    .attr('transform', `translate(${radius + margin},${radius + margin})`)
    .call(tron.led);

    // good
    const leds = stage.selectAll('.led')
    .data(data)
    .enter().append('svg:svg')
    .classed('led', true)
    .attr('width', (radius + margin) * 2)
    .append('svg:g')
    .attr('transform', `translate(${radius + margin},${radius + margin})`)
    .call(tron.led);

    // good
    const leds = stage.selectAll('.led').data(data);

  • 19.7 在块和下一个语句之前留下一空白行。

    1
    2
    3
    4
    5
    6
    7
    8
    9
    10
    11
    12
    13
    14
    15
    16
    17
    18
    19
    20
    21
    22
    23
    24
    25
    26
    27
    28
    29
    30
    31
    32
    33
    34
    35
    36
    37
    38
    39
    40
    41
    42
    43
    44
    45
    46
    47
    48
    49
    50
    51
    52
    // bad
    if (foo) {
    return bar;
    }
    return baz;

    // good
    if (foo) {
    return bar;
    }

    return baz;

    // bad
    const obj = {
    foo() {
    },
    bar() {
    },
    };
    return obj;

    // good
    const obj = {
    foo() {
    },

    bar() {
    },
    };

    return obj;

    // bad
    const arr = [
    function foo() {
    },
    function bar() {
    },
    ];
    return arr;

    // good
    const arr = [
    function foo() {
    },

    function bar() {
    },
    ];

    return arr;

  • 19.8 不要在块的开头使用空白行。 eslint: padded-blocks

    1
    2
    3
    4
    5
    6
    7
    8
    9
    10
    11
    12
    13
    14
    15
    16
    17
    18
    19
    20
    21
    22
    23
    24
    25
    26
    27
    28
    29
    30
    31
    32
    33
    34
    35
    // bad
    function bar() {

    console.log(foo);

    }

    // bad
    if (baz) {

    console.log(qux);
    } else {
    console.log(foo);

    }

    // bad
    class Foo {

    constructor(bar) {
    this.bar = bar;
    }
    }

    // good
    function bar() {
    console.log(foo);
    }

    // good
    if (baz) {
    console.log(qux);
    } else {
    console.log(foo);
    }

  • 19.9 不要在括号内添加空格。 eslint: space-in-parens

    1
    2
    3
    4
    5
    6
    7
    8
    9
    10
    11
    12
    13
    14
    15
    16
    17
    18
    19
    // bad
    function bar( foo ) {
    return foo;
    }

    // good
    function bar(foo) {
    return foo;
    }

    // bad
    if ( foo ) {
    console.log(foo);
    }

    // good
    if (foo) {
    console.log(foo);
    }

  • 19.10 不要在中括号中添加空格。 eslint: array-bracket-spacing

    1
    2
    3
    4
    5
    6
    7
    // bad
    const foo = [ 1, 2, 3 ];
    console.log(foo[ 0 ]);

    // good
    const foo = [1, 2, 3];
    console.log(foo[0]);

  • 19.11 在花括号内添加空格。 eslint: object-curly-spacing

    1
    2
    3
    4
    5
    // bad
    const foo = {clark: 'kent'};

    // good
    const foo = { clark: 'kent' };

  • 19.12 避免让你的代码行超过100个字符(包括空格)。 注意:根据上边的 约束,长字符串可免除此规定,不应分解。 eslint: max-len

    为什么? 这样能够确保可读性和可维护性。

    1
    2
    3
    4
    5
    6
    7
    8
    9
    10
    11
    12
    13
    14
    15
    16
    17
    18
    19
    20
    21
    22
    // bad
    const foo = jsonData && jsonData.foo && jsonData.foo.bar && jsonData.foo.bar.baz && jsonData.foo.bar.baz.quux && jsonData.foo.bar.baz.quux.xyzzy;

    // bad
    $.ajax({ method: 'POST', url: 'https://airbnb.com/', data: { name: 'John' } }).done(() => console.log('Congratulations!')).fail(() => console.log('You have failed this city.'));

    // good
    const foo = jsonData
    && jsonData.foo
    && jsonData.foo.bar
    && jsonData.foo.bar.baz
    && jsonData.foo.bar.baz.quux
    && jsonData.foo.bar.baz.quux.xyzzy;

    // good
    $.ajax({
    method: 'POST',
    url: 'https://airbnb.com/',
    data: { name: 'John' },
    })
    .done(() => console.log('Congratulations!'))
    .fail(() => console.log('You have failed this city.'));

  • 19.13 要求打开的块标志和同一行上的标志拥有一致的间距。此规则还会在同一行关闭的块标记和前边的标记强制实施一致的间距。 eslint: block-spacing

    1
    2
    3
    4
    5
    6
    7
    // bad
    function foo() {return true;}
    if (foo) { bar = 0;}

    // good
    function foo() { return true; }
    if (foo) { bar = 0; }

  • 19.14 逗号之前避免使用空格,逗号之后需要使用空格。eslint: comma-spacing

    1
    2
    3
    4
    5
    6
    7
    // bad
    var foo = 1,bar = 2;
    var arr = [1 , 2];

    // good
    var foo = 1, bar = 2;
    var arr = [1, 2];

  • 19.15 在计算属性之间强化间距。eslint: computed-property-spacing

    1
    2
    3
    4
    5
    6
    7
    8
    9
    10
    11
    // bad
    obj[foo ]
    obj[ 'foo']
    var x = {[ b ]: a}
    obj[foo[ bar ]]

    // good
    obj[foo]
    obj['foo']
    var x = { [b]: a }
    obj[foo[bar]]

  • 19.16 在函数和它的调用之间强化间距。 eslint: func-call-spacing

    1
    2
    3
    4
    5
    6
    7
    8
    // bad
    func ();

    func
    ();

    // good
    func();

  • 19.17 在对象的属性和值之间强化间距。 eslint: key-spacing

    1
    2
    3
    4
    5
    6
    // bad
    var obj = { "foo" : 42 };
    var obj2 = { "foo":42 };

    // good
    var obj = { "foo": 42 };

  • 19.18 在行的末尾避免使用空格。 eslint: no-trailing-spaces

  • 19.19 避免多个空行,并且只允许在文件末尾添加一个换行符。 eslint: no-multiple-empty-lines

    1
    2
    3
    4
    5
    6
    7
    8
    9
    10
    11
    // bad
    var x = 1;


    var y = 2;

    // good
    var x = 1;

    var y = 2;

⬆ 返回目录

逗号

  • 20.1 逗号前置: 不行 eslint: comma-style

    1
    2
    3
    4
    5
    6
    7
    8
    9
    10
    11
    12
    13
    14
    15
    16
    17
    18
    19
    20
    21
    22
    23
    24
    25
    26
    27
    28
    29
    // bad
    const story = [
    once
    , upon
    , aTime
    ];

    // good
    const story = [
    once,
    upon,
    aTime,
    ];

    // bad
    const hero = {
    firstName: 'Ada'
    , lastName: 'Lovelace'
    , birthYear: 1815
    , superPower: 'computers'
    };

    // good
    const hero = {
    firstName: 'Ada',
    lastName: 'Lovelace',
    birthYear: 1815,
    superPower: 'computers',
    };

  • 20.2 添加尾随逗号: 可以 eslint: comma-dangle

    为什么? 这个将造成更清洁的 git 扩展差异。 另外,像 Babel 这样的编译器,会在转换后的代码中删除额外的尾随逗号,这意味着你不必担心在浏览器中后面的 尾随逗号问题

    1
    2
    3
    4
    5
    6
    7
    8
    9
    10
    11
    12
    13
    14
    // bad - 没有尾随逗号的 git 差异
    const hero = {
    firstName: 'Florence',
    - lastName: 'Nightingale'
    + lastName: 'Nightingale',
    + inventorOf: ['coxcomb chart', 'modern nursing']
    };

    // good - 有尾随逗号的 git 差异
    const hero = {
    firstName: 'Florence',
    lastName: 'Nightingale',
    + inventorOf: ['coxcomb chart', 'modern nursing'],
    };
    1
    2
    3
    4
    5
    6
    7
    8
    9
    10
    11
    12
    13
    14
    15
    16
    17
    18
    19
    20
    21
    22
    23
    24
    25
    26
    27
    28
    29
    30
    31
    32
    33
    34
    35
    36
    37
    38
    39
    40
    41
    42
    43
    44
    45
    46
    47
    48
    49
    50
    51
    52
    53
    54
    55
    56
    57
    58
    59
    60
    61
    62
    63
    64
    65
    66
    67
    68
    69
    70
    71
    // bad
    const hero = {
    firstName: 'Dana',
    lastName: 'Scully'
    };

    const heroes = [
    'Batman',
    'Superman'
    ];

    // good
    const hero = {
    firstName: 'Dana',
    lastName: 'Scully',
    };

    const heroes = [
    'Batman',
    'Superman',
    ];

    // bad
    function createHero(
    firstName,
    lastName,
    inventorOf
    ) {
    // does nothing
    }

    // good
    function createHero(
    firstName,
    lastName,
    inventorOf,
    ) {
    // does nothing
    }

    // good (注意逗号不能出现在 "rest" 元素后边)
    function createHero(
    firstName,
    lastName,
    inventorOf,
    ...heroArgs
    ) {
    // does nothing
    }

    // bad
    createHero(
    firstName,
    lastName,
    inventorOf
    );

    // good
    createHero(
    firstName,
    lastName,
    inventorOf,
    );

    // good (注意逗号不能出现在 "rest" 元素后边)
    createHero(
    firstName,
    lastName,
    inventorOf,
    ...heroArgs
    );

⬆ 返回目录

分号

  • 21.1 eslint: semi

    为什么? 当 JavaScript 遇见一个没有分号的换行符时,它会使用一个叫做 Automatic Semicolon Insertion 的规则来确定是否应该以换行符视为语句的结束,并且如果认为如此,会在代码中断前插入一个分号到代码中。 但是,ASI 包含了一些奇怪的行为,如果 JavaScript 错误的解释了你的换行符,你的代码将会中断。 随着新特性成为 JavaScript 的一部分,这些规则将变得更加复杂。 明确地终止你的语句,并配置你的 linter 以捕获缺少的分号将有助于防止你遇到的问题。

    1
    2
    3
    4
    5
    6
    7
    8
    9
    10
    11
    12
    13
    14
    15
    16
    17
    18
    19
    20
    21
    22
    23
    24
    25
    26
    27
    28
    29
    30
    31
    32
    33
    34
    35
    36
    // bad - 可能异常
    const luke = {}
    const leia = {}
    [luke, leia].forEach(jedi => jedi.father = 'vader')

    // bad - 可能异常
    const reaction = "No! That's impossible!"
    (async function meanwhileOnTheFalcon() {
    // handle `leia`, `lando`, `chewie`, `r2`, `c3p0`
    // ...
    }())

    // bad - 返回 `undefined` 而不是下一行的值 - 当 `return` 单独一行的时候 ASI 总是会发生
    function foo() {
    return
    'search your feelings, you know it to be foo'
    }

    // good
    const luke = {};
    const leia = {};
    [luke, leia].forEach((jedi) => {
    jedi.father = 'vader';
    });

    // good
    const reaction = "No! That's impossible!";
    (async function meanwhileOnTheFalcon() {
    // handle `leia`, `lando`, `chewie`, `r2`, `c3p0`
    // ...
    }());

    // good
    function foo() {
    return 'search your feelings, you know it to be foo';
    }

    更多信息.

⬆ 返回目录

类型转换和强制类型转换

  • 22.1 在语句开始前进行类型转换。

  • 22.2 字符类型: eslint: no-new-wrappers

    1
    2
    3
    4
    5
    6
    7
    8
    9
    10
    11
    12
    13
    // => this.reviewScore = 9;

    // bad
    const totalScore = new String(this.reviewScore); // typeof totalScore is "object" not "string"

    // bad
    const totalScore = this.reviewScore + ''; // invokes this.reviewScore.valueOf()

    // bad
    const totalScore = this.reviewScore.toString(); // isn’t guaranteed to return a string

    // good
    const totalScore = String(this.reviewScore);

  • 22.3 数字类型:使用 Number 进行类型铸造和 parseInt 总是通过一个基数来解析一个字符串。 eslint: radix no-new-wrappers

    1
    2
    3
    4
    5
    6
    7
    8
    9
    10
    11
    12
    13
    14
    15
    16
    17
    18
    19
    const inputValue = '4';

    // bad
    const val = new Number(inputValue);

    // bad
    const val = +inputValue;

    // bad
    const val = inputValue >> 0;

    // bad
    const val = parseInt(inputValue);

    // good
    const val = Number(inputValue);

    // good
    const val = parseInt(inputValue, 10);

  • 22.4 如果出于某种原因,你正在做一些疯狂的事情,而 parseInt 是你的瓶颈,并且出于 性能问题 需要使用位运算, 请写下注释,说明为什么这样做和你做了什么。

    1
    2
    3
    4
    5
    6
    // good
    /**
    * parseInt 使我的代码变慢。
    * 位运算将一个字符串转换成数字更快。
    */
    const val = inputValue >> 0;

  • 22.5 注意: 当你使用位运算的时候要小心。 数字总是被以 64-bit 值 的形式表示,但是位运算总是返回一个 32-bit 的整数 (来源)。 对于大于 32 位的整数值,位运算可能会导致意外行为。讨论。 最大的 32 位整数是: 2,147,483,647。

    1
    2
    3
    2147483647 >> 0; // => 2147483647
    2147483648 >> 0; // => -2147483648
    2147483649 >> 0; // => -2147483647

  • 22.6 布尔类型: eslint: no-new-wrappers

    1
    2
    3
    4
    5
    6
    7
    8
    9
    10
    const age = 0;

    // bad
    const hasAge = new Boolean(age);

    // good
    const hasAge = Boolean(age);

    // best
    const hasAge = !!age;

⬆ 返回目录

命名规范

  • 23.1 避免单字母的名字。用你的命名来描述功能。 eslint: id-length

    1
    2
    3
    4
    5
    6
    7
    8
    9
    // bad
    function q() {
    // ...
    }

    // good
    function query() {
    // ...
    }

  • 23.2 在命名对象、函数和实例时使用驼峰命名法(camelCase)。 eslint: camelcase

    1
    2
    3
    4
    5
    6
    7
    8
    // bad
    const OBJEcttsssss = {};
    const this_is_my_object = {};
    function c() {}

    // good
    const thisIsMyObject = {};
    function thisIsMyFunction() {}

  • 23.3 只有在命名构造器或者类的时候才用帕斯卡拼命名法(PascalCase)。 eslint: new-cap

    1
    2
    3
    4
    5
    6
    7
    8
    9
    10
    11
    12
    13
    14
    15
    16
    17
    18
    19
    // bad
    function user(options) {
    this.name = options.name;
    }

    const bad = new user({
    name: 'nope',
    });

    // good
    class User {
    constructor(options) {
    this.name = options.name;
    }
    }

    const good = new User({
    name: 'yup',
    });

  • 23.4 不要使用前置或者后置下划线。 eslint: no-underscore-dangle

    为什么? JavaScript 在属性和方法方面没有隐私设置。 虽然前置的下划线是一种常见的惯例,意思是 “private” ,事实上,这些属性时公开的,因此,它们也是你公共 API 的一部分。 这种约定可能导致开发人员错误的认为更改不会被视为中断,或者不需要测试。建议:如果你想要什么东西是 “private” , 那就一定不能有明显的表现。

    1
    2
    3
    4
    5
    6
    7
    8
    9
    10
    11
    12
    // bad
    this.__firstName__ = 'Panda';
    this.firstName_ = 'Panda';
    this._firstName = 'Panda';

    // good
    this.firstName = 'Panda';

    // 好,在 WeakMapx 可用的环境中
    // see https://kangax.github.io/compat-table/es6/#test-WeakMap
    const firstNames = new WeakMap();
    firstNames.set(this, 'Panda');

  • 23.5 不要保存 this 的引用。 使用箭头函数或者 函数#bind

    1
    2
    3
    4
    5
    6
    7
    8
    9
    10
    11
    12
    13
    14
    15
    16
    17
    18
    19
    20
    21
    22
    // bad
    function foo() {
    const self = this;
    return function () {
    console.log(self);
    };
    }

    // bad
    function foo() {
    const that = this;
    return function () {
    console.log(that);
    };
    }

    // good
    function foo() {
    return () => {
    console.log(this);
    };
    }

  • 23.6 文件名应该和默认导出的名称完全匹配。

    1
    2
    3
    4
    5
    6
    7
    8
    9
    10
    11
    12
    13
    14
    15
    16
    17
    18
    19
    20
    21
    22
    23
    24
    25
    26
    27
    28
    29
    30
    // file 1 contents
    class CheckBox {
    // ...
    }
    export default CheckBox;

    // file 2 contents
    export default function fortyTwo() { return 42; }

    // file 3 contents
    export default function insideDirectory() {}

    // in some other file
    // bad
    import CheckBox from './checkBox'; // PascalCase import/export, camelCase filename
    import FortyTwo from './FortyTwo'; // PascalCase import/filename, camelCase export
    import InsideDirectory from './InsideDirectory'; // PascalCase import/filename, camelCase export

    // bad
    import CheckBox from './check_box'; // PascalCase import/export, snake_case filename
    import forty_two from './forty_two'; // snake_case import/filename, camelCase export
    import inside_directory from './inside_directory'; // snake_case import, camelCase export
    import index from './inside_directory/index'; // requiring the index file explicitly
    import insideDirectory from './insideDirectory/index'; // requiring the index file explicitly

    // good
    import CheckBox from './CheckBox'; // PascalCase export/import/filename
    import fortyTwo from './fortyTwo'; // camelCase export/import/filename
    import insideDirectory from './insideDirectory'; // camelCase export/import/directory name/implicit "index"
    // ^ supports both insideDirectory.js and insideDirectory/index.js

  • 23.7 当你导出默认函数时使用驼峰命名法。 你的文件名应该和方法名相同。

    1
    2
    3
    4
    5
    function makeStyleGuide() {
    // ...
    }

    export default makeStyleGuide;

  • 23.8 当你导出一个构造器 / 类 / 单例 / 函数库 / 暴露的对象时应该使用帕斯卡命名法。

    1
    2
    3
    4
    5
    6
    const AirbnbStyleGuide = {
    es6: {
    },
    };

    export default AirbnbStyleGuide;

  • 23.9 缩略词和缩写都必须是全部大写或者全部小写。

    为什么? 名字是为了可读性,不是为了满足计算机算法。

    1
    2
    3
    4
    5
    6
    7
    8
    9
    10
    11
    12
    13
    14
    15
    16
    17
    18
    19
    20
    21
    22
    23
    24
    25
    26
    27
    28
    // bad
    import SmsContainer from './containers/SmsContainer';

    // bad
    const HttpRequests = [
    // ...
    ];

    // good
    import SMSContainer from './containers/SMSContainer';

    // good
    const HTTPRequests = [
    // ...
    ];

    // also good
    const httpRequests = [
    // ...
    ];

    // best
    import TextMessageContainer from './containers/TextMessageContainer';

    // best
    const requests = [
    // ...
    ];

  • 23.10 你可以大写一个常亮,如果它:(1)被导出,(2)使用 const 定义(不能被重新分配),(3)程序员可以信任它(以及其嵌套的属性)是不变的。

    为什么? 这是一个可以帮助程序员确定变量是否会发生变化的辅助工具。UPPERCASE_VARIABLES 可以让程序员知道他们可以相信变量(及其属性)不会改变。

    • 是否是对所有的 const 定义的变量? - 这个是没哟必要的,不应该在文件中使用大学。但是,它应该用于导出常量。
    • 导出对象呢? - 在顶级导出属性 (e.g. EXPORTED_OBJECT.key) 并且保持所有嵌套属性不变。
    1
    2
    3
    4
    5
    6
    7
    8
    9
    10
    11
    12
    13
    14
    15
    16
    17
    18
    19
    20
    21
    22
    23
    24
    25
    26
    27
    28
    // bad
    const PRIVATE_VARIABLE = 'should not be unnecessarily uppercased within a file';

    // bad
    export const THING_TO_BE_CHANGED = 'should obviously not be uppercased';

    // bad
    export let REASSIGNABLE_VARIABLE = 'do not use let with uppercase variables';

    // ---

    // 允许,但是不提供语义值
    export const apiKey = 'SOMEKEY';

    // 多数情况下,很好
    export const API_KEY = 'SOMEKEY';

    // ---

    // bad - 不必要大写 key 没有增加语义值
    export const MAPPING = {
    KEY: 'value'
    };

    // good
    export const MAPPING = {
    key: 'value'
    };

⬆ 返回目录

存取器

  • 24.1 对于属性的的存取函数不是必须的。

  • 24.2 不要使用 JavaScript 的 getters/setters 方法,因为它们会导致意外的副作用,并且更加难以测试、维护和推敲。 相应的,如果你需要存取函数的时候使用 getVal()setVal('hello')

    1
    2
    3
    4
    5
    6
    7
    8
    9
    10
    11
    12
    13
    14
    15
    16
    17
    18
    19
    20
    21
    // bad
    class Dragon {
    get age() {
    // ...
    }

    set age(value) {
    // ...
    }
    }

    // good
    class Dragon {
    getAge() {
    // ...
    }

    setAge(value) {
    // ...
    }
    }

  • 24.3 如果属性/方法是一个 boolean 值,使用 isVal() 或者 hasVal()

    1
    2
    3
    4
    5
    6
    7
    8
    9
    // bad
    if (!dragon.age()) {
    return false;
    }

    // good
    if (!dragon.hasAge()) {
    return false;
    }

  • 24.4 可以创建 get()set() 方法,但是要保证一致性。

    1
    2
    3
    4
    5
    6
    7
    8
    9
    10
    11
    12
    13
    14
    class Jedi {
    constructor(options = {}) {
    const lightsaber = options.lightsaber || 'blue';
    this.set('lightsaber', lightsaber);
    }

    set(key, val) {
    this[key] = val;
    }

    get(key) {
    return this[key];
    }
    }

⬆ 返回目录

事件

  • 25.1 当给事件(无论是 DOM 事件还是更加私有的事件)附加数据时,传入一个对象(通畅也叫做 “hash” ) 而不是原始值。 这样可以让后边的贡献者向事件数据添加更多的数据,而不用找出更新事件的每个处理器。 例如,不好的写法:

    1
    2
    3
    4
    5
    6
    7
    8
    // bad
    $(this).trigger('listingUpdated', listing.id);

    // ...

    $(this).on('listingUpdated', (e, listingID) => {
    // do something with listingID
    });

    更好的写法:

    1
    2
    3
    4
    5
    6
    7
    8
    // good
    $(this).trigger('listingUpdated', { listingID: listing.id });

    // ...

    $(this).on('listingUpdated', (e, data) => {
    // do something with data.listingID
    });

⬆ 返回目录

jQuery

  • 26.1 对于 jQuery 对象的变量使用 $ 作为前缀。

    1
    2
    3
    4
    5
    6
    7
    8
    // bad
    const sidebar = $('.sidebar');

    // good
    const $sidebar = $('.sidebar');

    // good
    const $sidebarBtn = $('.sidebar-btn');

  • 26.2 缓存 jQuery 查询。

    1
    2
    3
    4
    5
    6
    7
    8
    9
    10
    11
    12
    13
    14
    15
    16
    17
    18
    19
    20
    21
    22
    // bad
    function setSidebar() {
    $('.sidebar').hide();

    // ...

    $('.sidebar').css({
    'background-color': 'pink',
    });
    }

    // good
    function setSidebar() {
    const $sidebar = $('.sidebar');
    $sidebar.hide();

    // ...

    $sidebar.css({
    'background-color': 'pink',
    });
    }

  • 26.3 对于 DOM 查询使用层叠 $('.sidebar ul') 或 父元素 > 子元素 $('.sidebar > ul') 的格式。 jsPerf

  • 26.4 对于有作用域的 jQuery 对象查询使用 find

    1
    2
    3
    4
    5
    6
    7
    8
    9
    10
    11
    12
    13
    14
    // bad
    $('ul', '.sidebar').hide();

    // bad
    $('.sidebar').find('ul').hide();

    // good
    $('.sidebar ul').hide();

    // good
    $('.sidebar > ul').hide();

    // good
    $sidebar.find('ul').hide();

⬆ 返回目录

ECMAScript 5 兼容性

⬆ 返回目录

ECMAScript 6+ (ES 2015+) Styles

  • 28.1 这是一个链接到各种 ES6+ 特性的集合。
  1. 箭头函数

  2. 对象简写

  3. 对象简洁

  4. 对象计算属性

  5. 字符串模板

  6. 解构

  7. 默认参数

  8. Rest

  9. 数组展开

  10. Let 和 Const

  11. 求幂运算符

  12. 迭代器和发生器

  13. 模块

    • 28.2 不要使用尚未达到第3阶段的 TC39 建议

      为什么? 它们没有最终确定, 并且它们可能会被改变或完全撤回。我们希望使用JavaScript,而建议还不是JavaScript。

⬆ 返回目录

标准库

标准库
包含功能已损坏的实用工具,但因为遗留原因而保留。

  • 29.1 使用 Number.isNaN 代替全局的 isNaN.
    eslint: no-restricted-globals

    为什么? 全局的 isNaN 强制非数字转化为数字,对任何强制转化为 NaN 的东西都返回 true。

    如果需要这种行为,请明确说明。

    1
    2
    3
    4
    5
    6
    7
    // bad
    isNaN('1.2'); // false
    isNaN('1.2.3'); // true

    // good
    Number.isNaN('1.2.3'); // false
    Number.isNaN(Number('1.2.3')); // true

  • 29.2 使用 Number.isFinite 代替全局的 isFinite.
    eslint: no-restricted-globals

    为什么? 全局的 isFinite 强制非数字转化为数字,对任何强制转化为有限数字的东西都返回 true。

    如果需要这种行为,请明确说明。

    1
    2
    3
    4
    5
    6
    // bad
    isFinite('2e3'); // true

    // good
    Number.isFinite('2e3'); // false
    Number.isFinite(parseInt('2e3', 10)); // true

⬆ 返回目录

Testing

  • 30.1 是的.

    1
    2
    3
    function foo() {
    return true;
    }

  • 30.2 没有,但是认真:

    • 无论你使用那种测试框架,都应该编写测试!
    • 努力写出许多小的纯函数,并尽量减少发生错误的地方。
    • 对于静态方法和 mock 要小心—-它们会使你的测试更加脆弱。
    • 我们主要在 Airbnb 上使用 mochajesttape 也会用在一些小的独立模块上。
    • 100%的测试覆盖率是一个很好的目标,即使它并不总是可行的。
    • 无论何时修复bug,都要编写一个回归测试。在没有回归测试的情况下修复的bug在将来几乎肯定会再次崩溃。

⬆ 返回目录

性能

⬆ 返回目录

资源

学习 ES6+

读这个

工具

其他编码规范

其他风格

进一步阅读

书籍

博客

播客

⬆ 返回目录

JavaScript风格指南的指南

许可证

(The MIT License)

Copyright (c) 2012 康兵奎

Permission is hereby granted, free of charge, to any person obtaining
a copy of this software and associated documentation files (the
‘Software’), to deal in the Software without restriction, including
without limitation the rights to use, copy, modify, merge, publish,
distribute, sublicense, and/or sell copies of the Software, and to
permit persons to whom the Software is furnished to do so, subject to
the following conditions:

The above copyright notice and this permission notice shall be
included in all copies or substantial portions of the Software.

THE SOFTWARE IS PROVIDED ‘AS IS’, WITHOUT WARRANTY OF ANY KIND,
EXPRESS OR IMPLIED, INCLUDING BUT NOT LIMITED TO THE WARRANTIES OF
MERCHANTABILITY, FITNESS FOR A PARTICULAR PURPOSE AND NONINFRINGEMENT.
IN NO EVENT SHALL THE AUTHORS OR COPYRIGHT HOLDERS BE LIABLE FOR ANY
CLAIM, DAMAGES OR OTHER LIABILITY, WHETHER IN AN ACTION OF CONTRACT,
TORT OR OTHERWISE, ARISING FROM, OUT OF OR IN CONNECTION WITH THE
SOFTWARE OR THE USE OR OTHER DEALINGS IN THE SOFTWARE.
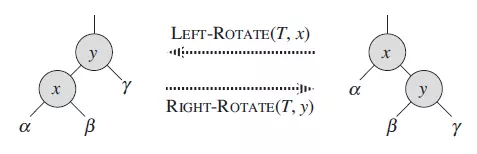
⬆ 返回目录

修正案

我们鼓励您使用此指南并更改规则以适应您的团队的风格指南。下面,你可以列出一些对风格指南的修正。这允许您定期更新您的样式指南,而不必处理合并冲突。

};

面试红黑树

什么是红黑树

红黑树本质上是一种二叉查找树,但它在二叉查找树的基础上额外添加了一个标记(颜色),同时具有一定的规则。这些规则使红黑树保证了一种平衡,插入、删除、查找的最坏时间复杂度都为 O(logn)。

它的统计性能要好于平衡二叉树(AVL树),因此,红黑树在很多地方都有应用。比如在 Java 集合框架中,很多部分(HashMap, TreeMap, TreeSet 等)都有红黑树的应用,这些集合均提供了很好的性能。

由于 TreeMap 就是由红黑树实现的,因此本文将使用 TreeMap 的相关操作的代码进行分析、论证。

黑色高度
从根节点到叶节点的路径上黑色节点的个数,叫做树的黑色高度。

红黑树的 5 个特性

image.png

红黑树在原有的二叉查找树基础上增加了如下几个要求:

  1. Every node is either red or black.
  2. The root is black.
  3. Every leaf (NIL) is black.
  4. If a node is red, then both its children are black.
  5. For each node, all simple paths from the node to descendant leaves contain the same number of black nodes.

中文意思是:

  1. 每个节点要么是红色,要么是黑色;
  2. 根节点永远是黑色的;
  3. 所有的叶节点都是是黑色的(注意这里说叶子节点其实是上图中的 NIL 节点);
  4. 每个红色节点的两个子节点一定都是黑色;
  5. 从任一节点到其子树中每个叶子节点的路径都包含相同数量的黑色节点;

注意:
性质 3 中指定红黑树的每个叶子节点都是空节点,而且并叶子节点都是黑色。但 Java 实现的红黑树将使用 null 来代表空节点,因此遍历红黑树时将看不到黑色的叶子节点,反而看到每个叶子节点都是红色的。

性质 4 的意思是:从每个根到节点的路径上不会有两个连续的红色节点,但黑色节点是可以连续的。
因此若给定黑色节点的个数 N,最短路径的情况是连续的 N 个黑色,树的高度为 N - 1;最长路径的情况为节点红黑相间,树的高度为 2(N - 1) 。

性质 5 是成为红黑树最主要的条件,后序的插入、删除操作都是为了遵守这个规定。

红黑树并不是标准平衡二叉树,它以性质 5 作为一种平衡方法,使自己的性能得到了提升。

红黑树的左旋右旋

image.png

红黑树的左右旋是比较重要的操作,左右旋的目的是调整红黑节点结构,转移黑色节点位置,使其在进行插入、删除后仍能保持红黑树的 5 条性质。

比如 X 左旋(右图转成左图)的结果,是让在 Y 左子树的黑色节点跑到 X 右子树去。

我们以 Java 集合框架中的 TreeMap 中的代码来看下左右旋的具体操作方法:

指定节点 x 的左旋 (右图转成左图):

1
2
3
4
5
6
7
8
9
10
11
12
13
14
15
16
17
18
 //这里 p 代表 x
private void rotateLeft(Entry p) {
if (p != null) {
Entry r = p.right; // p 是上图中的 x,r 就是 y
p.right = r.left; // 左旋后,x 的右子树变成了 y 的左子树 β
if (r.left != null)
r.left.parent = p; //β 确认父亲为 x
r.parent = p.parent; //y 取代 x 的第一步:认 x 的父亲为爹
if (p.parent == null) //要是 x 没有父亲,那 y 就是最老的根节点
root = r;
else if (p.parent.left == p) //如果 x 有父亲并且是它父亲的左孩子,x 的父亲现在认 y 为左孩子,不要 x 了
p.parent.left = r;
else //如果 x 是父亲的右孩子,父亲就认 y 为右孩子,抛弃 x
p.parent.right = r;
r.left = p; //y 逆袭成功,以前的爸爸 x 现在成了它的左孩子
p.parent = r;
}
}

可以看到,x 节点的左旋就是把 x 变成 右孩子 y 的左孩子,同时把 y 的左孩子送给 x 当右子树。

简单点记就是:左旋把右子树里的一个节点(上图 β)移动到了左子树。

指定节点 y 的右旋(左图转成右图):

1
2
3
4
5
6
7
8
9
10
11
12
13
14
15
private void rotateRight(Entry p) {
if (p != null) {
Entry l = p.left;
p.left = l.right;
if (l.right != null) l.right.parent = p;
l.parent = p.parent;
if (p.parent == null)
root = l;
else if (p.parent.right == p)
p.parent.right = l;
else p.parent.left = l;
l.right = p;
p.parent = l;
}
}

同理,y 节点的右旋就是把 y 变成 左孩子 x 的右孩子,同时把 x 的右孩子送给 x 当左子树。

简单点记就是:右旋把左子树里的一个节点(上图 β)移动到了右子树。

了解左旋、右旋的方法及意义后,就可以了解红黑树的主要操作:插入、删除。

总结

红黑树并不是真正的平衡二叉树,但在实际应用中,红黑树的统计性能要高于平衡二叉树,但极端性能略差。

红黑树的插入、删除调整逻辑比较复杂,但最终目的是满足红黑树的 5 个特性,尤其是 4 和 5。

在插入调整时为了简化操作我们直接把插入的节点涂成红色,这样只要保证插入节点的父节点不是红色就可以了。

而在删除后的调整中,针对删除黑色节点,所在子树缺少一个节点,需要进行弥补或者对别人造成一个黑色节点的伤害。具体调整方法取决于兄弟节点所在子树的情况。

红黑树的插入、删除在树形数据结构中算比较复杂的,理解起来比较难,但只要记住,红黑树有其特殊的平衡规则,而我们为了维持平衡,根据邻树的状况进行旋转或者涂色。

红黑树这么难理解,必定有其过人之处。它的有序、快速特性在很多场景下都有用到,比如 Java 集合框架的 TreeMap, TreeSet 等。

54. 螺旋矩阵

image.png

54. 螺旋矩阵

给定一个包含 m x n 个元素的矩阵(m 行, n 列),请按照顺时针螺旋顺序,返回矩阵中的所有元素。

示例 1:

1
2
3
4
5
6
7
输入:
[
[ 1, 2, 3 ],
[ 4, 5, 6 ],
[ 7, 8, 9 ]
]
输出: [1,2,3,6,9,8,7,4,5]

示例 2:

1
2
3
4
5
6
7
输入:
[
[1, 2, 3, 4],
[5, 6, 7, 8],
[9,10,11,12]
]
输出: [1,2,3,4,8,12,11,10,9,5,6,7]

方法 1:模拟

直觉

绘制螺旋轨迹路径,我们发现当路径超出界限或者进入之前访问过的单元格时,会顺时针旋转方向。

算法

假设数组有 R 行 C 列,seen[r][c] 表示第 r 行第 c 列的单元格之前已经被访问过了。当前所在位置为 (r, c),前进方向是 di。我们希望访问所有 R x C 个单元格。

当我们遍历整个矩阵,下一步候选移动位置是 (cr, cc)。如果这个候选位置在矩阵范围内并且没有被访问过,那么它将会变成下一步移动的位置;否则,我们将前进方向顺时针旋转之后再计算下一步的移动位置。

1
2
3
4
5
6
7
8
9
10
11
12
13
14
15
16
17
18
19
20
21
22
23
24
25
26
class Solution {
public List<Integer> spiralOrder(int[][] matrix) {
List ans = new ArrayList();
if (matrix.length == 0) return ans;
int R = matrix.length, C = matrix[0].length;
boolean[][] seen = new boolean[R][C];
int[] dr = {0, 1, 0, -1};
int[] dc = {1, 0, -1, 0};
int r = 0, c = 0, di = 0;
for (int i = 0; i < R * C; i++) {
ans.add(matrix[r][c]);
seen[r][c] = true;
int cr = r + dr[di];
int cc = c + dc[di];
if (0 <= cr && cr < R && 0 <= cc && cc < C && !seen[cr][cc]){
r = cr;
c = cc;
} else {
di = (di + 1) % 4;
r += dr[di];
c += dc[di];
}
}
return ans;
}
}
1
2
3
4
5
6
7
8
9
10
11
12
13
14
15
16
17
18
19
class Solution(object):
def spiralOrder(self, matrix):
if not matrix: return []
R, C = len(matrix), len(matrix[0])
seen = [[False] * C for _ in matrix]
ans = []
dr = [0, 1, 0, -1]
dc = [1, 0, -1, 0]
r = c = di = 0
for _ in range(R * C):
ans.append(matrix[r][c])
seen[r][c] = True
cr, cc = r + dr[di], c + dc[di]
if 0 <= cr < R and 0 <= cc < C and not seen[cr][cc]:
r, c = cr, cc
else:
di = (di + 1) % 4
r, c = r + dr[di], c + dc[di]
return ans

复杂度分析

  • 时间复杂度: O(N),其中 N 是输入矩阵所有元素的个数。因为我们将矩阵中的每个元素都添加进答案里。
  • 空间复杂度: O(N),需要两个矩阵 seen 和 ans 存储所需信息。

方法 2:按层模拟

直觉

答案是最外层所有元素按照顺时针顺序输出,其次是次外层,以此类推。

算法

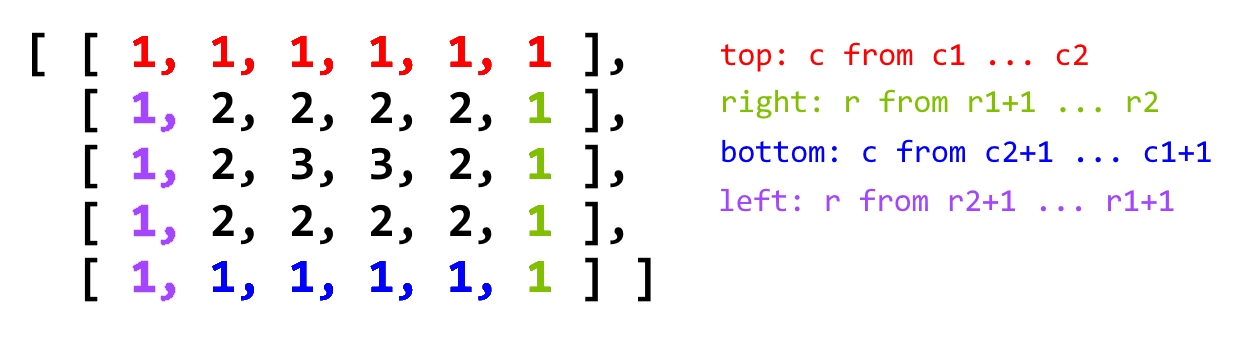
我们定义矩阵的第 k 层是到最近边界距离为 k 的所有顶点。例如,下图矩阵最外层元素都是第 1 层,次外层元素都是第 2 层,然后是第 3 层的。

1
2
3
4
5
[[1, 1, 1, 1, 1, 1, 1],
[1, 2, 2, 2, 2, 2, 1],
[1, 2, 3, 3, 3, 2, 1],
[1, 2, 2, 2, 2, 2, 1],
[1, 1, 1, 1, 1, 1, 1]]

image.png

1
2
3
4
5
6
7
8
9
10
11
12
13
14
15
16
17
18
19
20
21
22
class Solution {
public List < Integer > spiralOrder(int[][] matrix) {
List ans = new ArrayList();
if (matrix.length == 0)
return ans;
int r1 = 0, r2 = matrix.length - 1;
int c1 = 0, c2 = matrix[0].length - 1;
while (r1 <= r2 && c1 <= c2) {
for (int c = c1; c <= c2; c++) ans.add(matrix[r1][c]);
for (int r = r1 + 1; r <= r2; r++) ans.add(matrix[r][c2]);
if (r1 < r2 && c1 < c2) {
for (int c = c2 - 1; c > c1; c--) ans.add(matrix[r2][c]);
for (int r = r2; r > r1; r--) ans.add(matrix[r][c1]);
}
r1++;
r2--;
c1++;
c2--;
}
return ans;
}
}

复杂度分析

  • 时间复杂度: O(N),其中 N 是输入矩阵所有元素的个数。因为我们将矩阵中的每个元素都添加进答案里。
  • 空间复杂度: O(N),需要矩阵 ans 存储信息。

方法 3:顺时针旋转

这里的方法不需要记录已经走过的路径,所以执行用时和内存消耗都相对较小

  1. 首先设定上下左右边界
  2. 其次向右移动到最右,此时第一行因为已经使用过了,可以将其从图中删去,体现在代码中就是重新定义上边界
  3. 判断若重新定义后,上下边界交错,表明螺旋矩阵遍历结束,跳出循环,返回答案
  4. 若上下边界不交错,则遍历还未结束,接着向下向左向上移动,操作过程与第一,二步同理
  5. 不断循环以上步骤,直到某两条边界交错,跳出循环,返回答案
1
2
3
4
5
6
7
8
9
10
11
12
13
14
15
16
17
18
19
20
21
22
23
24
25
26
27
28
29
30
31
32
33
34
35
36
37
38
39
40
41
42
43
44
import java.util.*;

public class Main {

public static void main(String[] args) {
// Scanner in = new Scanner(System.in);
// int n = in.nextInt();
// in.close();
int[][] matrix = new int[][] { { 1, 2, 3 }, { 4, 5, 6 }, { 7, 8, 9 } };
List<Integer> list = spiralOrder(matrix);
System.out.println(list);
}

static List<Integer> spiralOrder(int[][] matrix) {
List<Integer> list = new ArrayList<>();
if (matrix.length == 0)
return list;
int u = 0, d = matrix.length - 1, l = 0, r = matrix[0].length - 1;
while (true) {
// 向右
for (int i = l; i <= r; i++)
list.add(matrix[u][i]);
if (++u > d)
break;
// 向下
for (int i = u; i <= d; i++)
list.add(matrix[i][r]);
if (--r < l)
break;
// 向左
for (int i = r; i >= l; i--)
list.add(matrix[d][i]);
if (--d < u)
break;
// 向上
for (int i = d; i >= u; i--)
list.add(matrix[i][l]);
if (++l > r)
break;
}
return list;
}

}
1
2
3
4
5
6
7
8
9
10
11
12
13
14
15
16
17
18
19
20
21
22
23
class Solution {
public:
vector<int> spiralOrder(vector<vector<int>>& matrix) {
vector <int> ans;
if(matrix.empty()) return ans; //若数组为空,直接返回答案
int u = 0; //赋值上下左右边界
int d = matrix.size() - 1;
int l = 0;
int r = matrix[0].size() - 1;
while(true)
{
for(int i = l; i <= r; ++i) ans.push_back(matrix[u][i]); //向右移动直到最右
if(++ u > d) break; //重新设定上边界,若上边界大于下边界,则遍历遍历完成,下同
for(int i = u; i <= d; ++i) ans.push_back(matrix[i][r]); //向下
if(-- r < l) break; //重新设定有边界
for(int i = r; i >= l; --i) ans.push_back(matrix[d][i]); //向左
if(-- d < u) break; //重新设定下边界
for(int i = d; i >= u; --i) ans.push_back(matrix[i][l]); //向上
if(++ l > r) break; //重新设定左边界
}
return ans;
}
};

TensorFlow 2.0 中文手写字识别(汉字OCR)

image.png

TensorFlow 2.0 中文手写字识别(汉字OCR)

  • 搜索空间空前巨大,我们使用的数据集1.0版本汉字就多大3755个,如果加上1.1版本一起,总共汉字可以分为多达7599+个类别!这比10个阿拉伯字母识别难度大很多!
  • 数据集处理挑战更大,相比于mnist和fasionmnist来说,汉字手写字体识别数据集非常少,而且仅有的数据集数据预处理难度非常大,非常不直观,但是,千万别吓到,相信你看完本教程一定会收货满满!
  • 汉字识别更考验选手的建模能力,还在分类花?分类猫和狗?随便搭建的几层在搜索空间巨大的汉字手写识别里根本不work!你现在是不是想用很深的网络跃跃欲试?更深的网络在这个任务上可能根本不可行!!看完本教程我们就可以一探究竟!总之一句话,模型太简单和太复杂都不好,甚至会发散!(想亲身体验模型训练发散抓狂的可以来尝试一下!)。

数据准备

在开始之前,先介绍一下本项目所采用的数据信息。我们的数据全部来自于CASIA的开源中文手写字数据集,该数据集分为两部分:

  • CASIA-HWDB:离线的HWDB,我们仅仅使用1.0-1.2,这是单字的数据集,2.0-2.2是整张文本的数据集,我们暂时不用,单字里面包含了约7185个汉字以及171个英文字母、数字、标点符号等;
  • CASIA-OLHWDB:在线的HWDB,格式一样,包含了约7185个汉字以及171个英文字母、数字、标点符号等,我们不用。

其实你下载1.0的train和test差不多已经够了,可以直接运行 dataset/get_hwdb_1.0_1.1.sh 下载。原始数据下载链接点击这里. 由于原始数据过于复杂,我们使用一个类来封装数据读取过程,这是我们展示的效果:
image.png

看到这么密密麻麻的文字相信连人类都…. 开始头疼了,这些复杂的文字能够通过一个神经网络来识别出来??答案是肯定的…. 不有得感叹一下神经网络的强大。。上面的部分文字识别出来的结果是这样的:

image.png

关于数据的处理部分,从服务器下载到的原始数据是 trn_gnt.zip 解压之后是 gnt.alz, 需要再次解压得到一个包含 gnt文件的文件夹。里面每一个gnt文件都包含了若干个汉字及其标注。直接处理比较麻烦,也不方便抽取出图片再进行操作,虽然转为图片存入文件夹比较直观,但是不适合批量读取和训练, 后面我们统一转为tfrecord进行训练。

更新: 实际上,由于单个汉字图片其实很小,差不多也就最大80x80的大小,这个大小不适合转成图片保存到本地,因此我们将hwdb原始的二进制保存为tfrecord。同时也方便后面训练,可以直接从tfrecord读取图片进行训练。

image.png

训练过程

1
2
3
4
5
6
7
8
9
10
11
12
13
14
15
16
17
18
19
20
21
22
23
24
25
26
27
28
29
30
31
32
33
34
35
36
37
38
39
40
41
42
43
44
45
46
47
48
49
50
51
def train():
all_characters = load_characters()
num_classes = len(all_characters)
logging.info('all characters: {}'.format(num_classes))
train_dataset = load_ds()
train_dataset = train_dataset.shuffle(100).map(preprocess).batch(32).repeat()

val_ds = load_val_ds()
val_ds = val_ds.shuffle(100).map(preprocess).batch(32).repeat()

for data in train_dataset.take(2):
print(data)

# init model
model = build_net_003((64, 64, 1), num_classes)
model.summary()
logging.info('model loaded.')

start_epoch = 0
latest_ckpt = tf.train.latest_checkpoint(os.path.dirname(ckpt_path))
if latest_ckpt:
start_epoch = int(latest_ckpt.split('-')[1].split('.')[0])
model.load_weights(latest_ckpt)
logging.info('model resumed from: {}, start at epoch: {}'.format(latest_ckpt, start_epoch))
else:
logging.info('passing resume since weights not there. training from scratch')

if use_keras_fit:
model.compile(
optimizer=tf.keras.optimizers.Adam(),
loss=tf.keras.losses.SparseCategoricalCrossentropy(),
metrics=['accuracy'])
callbacks = [
tf.keras.callbacks.ModelCheckpoint(ckpt_path,
save_weights_only=True,
verbose=1,
period=500)
]
try:
model.fit(
train_dataset,
validation_data=val_ds,
validation_steps=1000,
epochs=15000,
steps_per_epoch=1024,
callbacks=callbacks)
except KeyboardInterrupt:
model.save_weights(ckpt_path.format(epoch=0))
logging.info('keras model saved.')
model.save_weights(ckpt_path.format(epoch=0))
model.save(os.path.join(os.path.dirname(ckpt_path), 'cn_ocr.h5'))

大家在以后编写训练代码的时候其实可以保持这个好的习惯。

OK,整个模型训练起来之后,可以在短时间内达到95%的准确率:

image.png

image.png

总结

通过本教程,我们完成了使用tensorflow 2.0全新的API搭建一个中文汉字手写识别系统。模型基本能够实现我们想要的功能。要知道,这个模型可是在搜索空间多大3755的类别当中准确的找到最相似的类别!!通过本实验,我们有几点心得:

  • 神经网络不仅仅是在学习,它具有一定的想象力!!比如它的一些看着很像的字:拜-佯, 扮-捞,笨-苯…. 这些字如果手写出来,连人都比较难以辨认!!但是大家要知道这些字在类别上并不是相领的!也就是说,模型具有一定的联想能力!
  • 不管问题多复杂,要敢于动手、善于动手。

System类

image.png

1
2
3
4
5
6
7
8
9
10
11
12
13
14
15
16
17
18
19
20
21
22
23
24
25
26
27
28
29
30
31
32
33
34
35
36
37
38
39
40
41
42
43
44
45
46
47
48
49
50
51
52
53
54
55
56
57
58
59
60
61
62
63
64
65
66
67
68
69
70
71
72
73
74
75
76
77
78
79
80
81
82
83
84
85
86
87
88
89
90
91
92
93
94
95
96
97
98
99
100
101
102
103
104
105
106
107
108
109
110
111
112
113
114
115
116
117
118
119
120
121
122
123
124
125
126
127
128
129
130
131
132
133
134
135
136
137
138
139
140
141
142
143
144
145
146
147
148
149
150
151
152
153
154
155
156
157
158
159
160
161
162
163
164
165
166
167
168
169
170
171
172
173
174
175
176
177
178
179
180
181
182
183
184
185
186
187
188
189
190
191
192
193
194
195
196
197
198
199
200
201
202
203
204
205
206
207
208
209
210
211
212
213
214
215
216
217
218
219
220
221
222
223
224
225
226
227
228
229
230
231
232
233
234
235
236
237
238
239
240
241
242
243
244
245
246
247
248
249
250
251
252
253
254
255
256
257
258
259
260
261
262
263
264
265
266
267
268
269
270
271
272
273
274
275
276
277
278
279
280
281
282
283
284
285
286
287
288
289
290
291
292
293
294
295
296
297
298
299
300
301
302
303
304
305
306
307
308
309
310
311
312
313
314
315
316
317
318
319
320
321
322
323
324
325
326
327
328
329
330
331
332
333
334
335
336
337
338
339
340
341
342
343
344
345
346
347
348
349
350
351
352
353
354
355
356
357
358
359
360
361
362
363
364
365
366
367
368
369
370
371
372
373
374
375
376
377
378
379
380
381
382
383
384
385
386
387
388
389
390
391
392
393
394
395
396
397
398
399
400
401
402
403
404
405
406
407
408
409
410
411
412
413
414
415
416
417
418
419
420
421
422
423
424
425
426
427
428
429
430
431
432
433
434
435
436
437
438
439
440
441
442
443
444
445
446
447
448
449
450
451
452
453
454
455
456
457
458
459
460
461
462
463
464
465
466
467
468
469
470
471
472
473
474
475
476
477
478
479
480
481
482
483
484
485
486
487
488
489
490
491
492
493
494
495
496
497
498
499
500
501
502
503
504
505
506
507
508
509
510
511
512
513
514
515
516
517
518
519
520
521
522
523
524
525
526
527
528
529
530
531
532
533
534
535
536
537
538
539
540
541
542
543
544
545
546
547
548
549
550
551
552
553
554
555
556
557
558
559
560
561
562
563
564
565
566
567
568
569
570
571
572
573
574
575
576
577
578
579
580
581
582
583
584
585
586
587
588
589
590
591
592
593
594
595
596
597
598
599
600
601
602
603
604
605
606
607
608
609
610
611
612
613
614
615
616
617
618
619
620
621
622
623
624
625
626
627
628
629
630
631
632
633
634
635
636
637
638
639
640
641
642
643
644
645
646
647
648
649
650
651
652
653
654
655
656
657
658
659
660
661
662
663
664
665
666
667
668
669
670
671
672
673
674
675
676
677
678
679
680
681
682
683
684
685
686
687
688
689
690
691
692
693
694
695
696
697
698
699
700
701
702
703
704
705
706
707
708
709
710
711
712
713
714
715
716
717
718
719
720
721
722
723
724
725
726
727
728
729
730
731
732
733
734
735
736
737
738
739
740
741
742
743
744
745
746
747
748
749
750
751
752
753
754
755
756
757
758
759
760
761
762
763
764
765
766
767
768
769
770
771
772
773
774
775
776
777
778
779
780
781
782
783
784
785
786
787
788
789
790
791
792
793
794
795
796
797
798
799
800
801
802
803
804
805
806
807
808
809
810
811
812
813
814
815
816
817
818
819
820
821
822
823
824
825
826
827
828
829
830
831
832
833
834
835
836
837
838
839
840
841
842
843
844
845
846
847
848
849
850
851
852
853
854
855
856
857
858
859
860
861
862
863
864
865
866
867
868
869
870
871
872
873
874
875
876
877
878
879
880
881
882
883
884
885
886
887
888
889
890
891
892
893
894
895
896
897
898
899
900
901
902
903
904
905
906
907
908
909
910
911
912
913
914
915
916
917
918
919
920
921
922
923
924
925
926
927
928
929
930
931
932
933
934
935
936
937
938
939
940
941
942
943
944
945
946
947
948
949
950
951
952
953
954
955
956
957
958
959
960
961
962
963
964
965
966
967
968
969
970
971
972
973
974
975
976
977
978
979
980
981
982
983
984
985
986
987
988
989
990
991
992
993
994
995
996
997
998
999
1000
1001
1002
1003
1004
1005
1006
1007
1008
1009
1010
1011
1012
1013
1014
1015
1016
1017
1018
1019
1020
1021
1022
1023
1024
1025
1026
1027
1028
1029
1030
1031
1032
1033
1034
1035
1036
1037
1038
1039
1040
1041
1042
1043
1044
1045
1046
1047
1048
1049
1050
1051
1052
1053
1054
1055
1056
1057
1058
1059
1060
1061
1062
1063
1064
1065
1066
1067
1068
1069
1070
1071
1072
1073
1074
1075
1076
1077
1078
1079
1080
1081
1082
1083
1084
1085
1086
1087
1088
1089
1090
1091
1092
1093
1094
1095
1096
1097
1098
1099
1100
1101
1102
1103
1104
1105
1106
1107
1108
1109
1110
1111
1112
1113
1114
1115
1116
1117
1118
1119
1120
1121
1122
1123
1124
1125
1126
1127
1128
1129
1130
1131
1132
1133
1134
1135
1136
1137
1138
1139
1140
1141
1142
1143
1144
1145
1146
1147
1148
1149
1150
1151
1152
1153
1154
1155
1156
1157
1158
1159
1160
1161
1162
1163
1164
1165
1166
1167
1168
1169
1170
1171
1172
1173
1174
1175
1176
1177
1178
1179
1180
1181
1182
1183
1184
1185
1186
1187
1188
1189
1190
1191
1192
1193
1194
1195
1196
1197
1198
1199
1200
1201
1202
1203
1204
1205
1206
1207
1208
1209
1210
1211
1212
1213
1214
1215
1216
1217
1218
1219
1220
1221
1222
1223
1224
1225
1226
1227
1228
1229
1230
1231
1232
1233
1234
1235
1236
1237
1238
1239
1240
1241
1242
1243
1244
1245
1246
1247
1248
1249
1250
1251
1252
1253
1254
1255
1256
/*
* Copyright (c) 1994, 2013, Oracle and/or its affiliates. All rights reserved.
* ORACLE PROPRIETARY/CONFIDENTIAL. Use is subject to license terms.
*
*
*/
package java.lang;

import java.io.*;
import java.lang.reflect.Executable;
import java.lang.annotation.Annotation;
import java.security.AccessControlContext;
import java.util.Properties;
import java.util.PropertyPermission;
import java.util.StringTokenizer;
import java.util.Map;
import java.security.AccessController;
import java.security.PrivilegedAction;
import java.security.AllPermission;
import java.nio.channels.Channel;
import java.nio.channels.spi.SelectorProvider;
import sun.nio.ch.Interruptible;
import sun.reflect.CallerSensitive;
import sun.reflect.Reflection;
import sun.security.util.SecurityConstants;
import sun.reflect.annotation.AnnotationType;

/**
* The <code>System</code> class contains several useful class fields
* and methods. It cannot be instantiated.
*
* <p>Among the facilities provided by the <code>System</code> class
* are standard input, standard output, and error output streams;
* access to externally defined properties and environment
* variables; a means of loading files and libraries; and a utility
* method for quickly copying a portion of an array.
*
* @author unascribed
* @since JDK1.0
*/
public final class System {

/* register the natives via the static initializer.
*
* VM will invoke the initializeSystemClass method to complete
* the initialization for this class separated from clinit.
* Note that to use properties set by the VM, see the constraints
* described in the initializeSystemClass method.
*/
private static native void registerNatives();
static {
registerNatives();
}

/** Don't let anyone instantiate this class */
private System() {
}

/**
* The "standard" input stream. This stream is already
* open and ready to supply input data. Typically this stream
* corresponds to keyboard input or another input source specified by
* the host environment or user.
*/
public final static InputStream in = null;

/**
* The "standard" output stream. This stream is already
* open and ready to accept output data. Typically this stream
* corresponds to display output or another output destination
* specified by the host environment or user.
* <p>
* For simple stand-alone Java applications, a typical way to write
* a line of output data is:
* <blockquote><pre>
* System.out.println(data)
* </pre></blockquote>
* <p>
* See the <code>println</code> methods in class <code>PrintStream</code>.
*
* @see java.io.PrintStream#println()
* @see java.io.PrintStream#println(boolean)
* @see java.io.PrintStream#println(char)
* @see java.io.PrintStream#println(char[])
* @see java.io.PrintStream#println(double)
* @see java.io.PrintStream#println(float)
* @see java.io.PrintStream#println(int)
* @see java.io.PrintStream#println(long)
* @see java.io.PrintStream#println(java.lang.Object)
* @see java.io.PrintStream#println(java.lang.String)
*/
public final static PrintStream out = null;

/**
* The "standard" error output stream. This stream is already
* open and ready to accept output data.
* <p>
* Typically this stream corresponds to display output or another
* output destination specified by the host environment or user. By
* convention, this output stream is used to display error messages
* or other information that should come to the immediate attention
* of a user even if the principal output stream, the value of the
* variable <code>out</code>, has been redirected to a file or other
* destination that is typically not continuously monitored.
*/
public final static PrintStream err = null;

/* The security manager for the system.
*/
private static volatile SecurityManager security = null;

/**
* Reassigns the "standard" input stream.
*
* <p>First, if there is a security manager, its <code>checkPermission</code>
* method is called with a <code>RuntimePermission("setIO")</code> permission
* to see if it's ok to reassign the "standard" input stream.
* <p>
*
* @param in the new standard input stream.
*
* @throws SecurityException
* if a security manager exists and its
* <code>checkPermission</code> method doesn't allow
* reassigning of the standard input stream.
*
* @see SecurityManager#checkPermission
* @see java.lang.RuntimePermission
*
* @since JDK1.1
*/
public static void setIn(InputStream in) {
checkIO();
setIn0(in);
}

/**
* Reassigns the "standard" output stream.
*
* <p>First, if there is a security manager, its <code>checkPermission</code>
* method is called with a <code>RuntimePermission("setIO")</code> permission
* to see if it's ok to reassign the "standard" output stream.
*
* @param out the new standard output stream
*
* @throws SecurityException
* if a security manager exists and its
* <code>checkPermission</code> method doesn't allow
* reassigning of the standard output stream.
*
* @see SecurityManager#checkPermission
* @see java.lang.RuntimePermission
*
* @since JDK1.1
*/
public static void setOut(PrintStream out) {
checkIO();
setOut0(out);
}

/**
* Reassigns the "standard" error output stream.
*
* <p>First, if there is a security manager, its <code>checkPermission</code>
* method is called with a <code>RuntimePermission("setIO")</code> permission
* to see if it's ok to reassign the "standard" error output stream.
*
* @param err the new standard error output stream.
*
* @throws SecurityException
* if a security manager exists and its
* <code>checkPermission</code> method doesn't allow
* reassigning of the standard error output stream.
*
* @see SecurityManager#checkPermission
* @see java.lang.RuntimePermission
*
* @since JDK1.1
*/
public static void setErr(PrintStream err) {
checkIO();
setErr0(err);
}

private static volatile Console cons = null;
/**
* Returns the unique {@link java.io.Console Console} object associated
* with the current Java virtual machine, if any.
*
* @return The system console, if any, otherwise <tt>null</tt>.
*
* @since 1.6
*/
public static Console console() {
if (cons == null) {
synchronized (System.class) {
cons = sun.misc.SharedSecrets.getJavaIOAccess().console();
}
}
return cons;
}

/**
* Returns the channel inherited from the entity that created this
* Java virtual machine.
*
* <p> This method returns the channel obtained by invoking the
* {@link java.nio.channels.spi.SelectorProvider#inheritedChannel
* inheritedChannel} method of the system-wide default
* {@link java.nio.channels.spi.SelectorProvider} object. </p>
*
* <p> In addition to the network-oriented channels described in
* {@link java.nio.channels.spi.SelectorProvider#inheritedChannel
* inheritedChannel}, this method may return other kinds of
* channels in the future.
*
* @return The inherited channel, if any, otherwise <tt>null</tt>.
*
* @throws IOException
* If an I/O error occurs
*
* @throws SecurityException
* If a security manager is present and it does not
* permit access to the channel.
*
* @since 1.5
*/
public static Channel inheritedChannel() throws IOException {
return SelectorProvider.provider().inheritedChannel();
}

private static void checkIO() {
SecurityManager sm = getSecurityManager();
if (sm != null) {
sm.checkPermission(new RuntimePermission("setIO"));
}
}

private static native void setIn0(InputStream in);
private static native void setOut0(PrintStream out);
private static native void setErr0(PrintStream err);

/**
* Sets the System security.
*
* <p> If there is a security manager already installed, this method first
* calls the security manager's <code>checkPermission</code> method
* with a <code>RuntimePermission("setSecurityManager")</code>
* permission to ensure it's ok to replace the existing
* security manager.
* This may result in throwing a <code>SecurityException</code>.
*
* <p> Otherwise, the argument is established as the current
* security manager. If the argument is <code>null</code> and no
* security manager has been established, then no action is taken and
* the method simply returns.
*
* @param s the security manager.
* @exception SecurityException if the security manager has already
* been set and its <code>checkPermission</code> method
* doesn't allow it to be replaced.
* @see #getSecurityManager
* @see SecurityManager#checkPermission
* @see java.lang.RuntimePermission
*/
public static
void setSecurityManager(final SecurityManager s) {
try {
s.checkPackageAccess("java.lang");
} catch (Exception e) {
// no-op
}
setSecurityManager0(s);
}

private static synchronized
void setSecurityManager0(final SecurityManager s) {
SecurityManager sm = getSecurityManager();
if (sm != null) {
// ask the currently installed security manager if we
// can replace it.
sm.checkPermission(new RuntimePermission
("setSecurityManager"));
}

if ((s != null) && (s.getClass().getClassLoader() != null)) {
// New security manager class is not on bootstrap classpath.
// Cause policy to get initialized before we install the new
// security manager, in order to prevent infinite loops when
// trying to initialize the policy (which usually involves
// accessing some security and/or system properties, which in turn
// calls the installed security manager's checkPermission method
// which will loop infinitely if there is a non-system class
// (in this case: the new security manager class) on the stack).
AccessController.doPrivileged(new PrivilegedAction<Object>() {
public Object run() {
s.getClass().getProtectionDomain().implies
(SecurityConstants.ALL_PERMISSION);
return null;
}
});
}

security = s;
}

/**
* Gets the system security interface.
*
* @return if a security manager has already been established for the
* current application, then that security manager is returned;
* otherwise, <code>null</code> is returned.
* @see #setSecurityManager
*/
public static SecurityManager getSecurityManager() {
return security;
}

/**
* Returns the current time in milliseconds. Note that
* while the unit of time of the return value is a millisecond,
* the granularity of the value depends on the underlying
* operating system and may be larger. For example, many
* operating systems measure time in units of tens of
* milliseconds.
*
* <p> See the description of the class <code>Date</code> for
* a discussion of slight discrepancies that may arise between
* "computer time" and coordinated universal time (UTC).
*
* @return the difference, measured in milliseconds, between
* the current time and midnight, January 1, 1970 UTC.
* @see java.util.Date
*/
public static native long currentTimeMillis();

/**
* Returns the current value of the running Java Virtual Machine's
* high-resolution time source, in nanoseconds.
*
* <p>This method can only be used to measure elapsed time and is
* not related to any other notion of system or wall-clock time.
* The value returned represents nanoseconds since some fixed but
* arbitrary <i>origin</i> time (perhaps in the future, so values
* may be negative). The same origin is used by all invocations of
* this method in an instance of a Java virtual machine; other
* virtual machine instances are likely to use a different origin.
*
* <p>This method provides nanosecond precision, but not necessarily
* nanosecond resolution (that is, how frequently the value changes)
* - no guarantees are made except that the resolution is at least as
* good as that of {@link #currentTimeMillis()}.
*
* <p>Differences in successive calls that span greater than
* approximately 292 years (2<sup>63</sup> nanoseconds) will not
* correctly compute elapsed time due to numerical overflow.
*
* <p>The values returned by this method become meaningful only when
* the difference between two such values, obtained within the same
* instance of a Java virtual machine, is computed.
*
* <p> For example, to measure how long some code takes to execute:
* <pre> {@code
* long startTime = System.nanoTime();
* // ... the code being measured ...
* long estimatedTime = System.nanoTime() - startTime;}</pre>
*
* <p>To compare two nanoTime values
* <pre> {@code
* long t0 = System.nanoTime();
* ...
* long t1 = System.nanoTime();}</pre>
*
* one should use {@code t1 - t0 < 0}, not {@code t1 < t0},
* because of the possibility of numerical overflow.
*
* @return the current value of the running Java Virtual Machine's
* high-resolution time source, in nanoseconds
* @since 1.5
*/
public static native long nanoTime();

/**
* Copies an array from the specified source array, beginning at the
* specified position, to the specified position of the destination array.
* A subsequence of array components are copied from the source
* array referenced by <code>src</code> to the destination array
* referenced by <code>dest</code>. The number of components copied is
* equal to the <code>length</code> argument. The components at
* positions <code>srcPos</code> through
* <code>srcPos+length-1</code> in the source array are copied into
* positions <code>destPos</code> through
* <code>destPos+length-1</code>, respectively, of the destination
* array.
* <p>
* If the <code>src</code> and <code>dest</code> arguments refer to the
* same array object, then the copying is performed as if the
* components at positions <code>srcPos</code> through
* <code>srcPos+length-1</code> were first copied to a temporary
* array with <code>length</code> components and then the contents of
* the temporary array were copied into positions
* <code>destPos</code> through <code>destPos+length-1</code> of the
* destination array.
* <p>
* If <code>dest</code> is <code>null</code>, then a
* <code>NullPointerException</code> is thrown.
* <p>
* If <code>src</code> is <code>null</code>, then a
* <code>NullPointerException</code> is thrown and the destination
* array is not modified.
* <p>
* Otherwise, if any of the following is true, an
* <code>ArrayStoreException</code> is thrown and the destination is
* not modified:
* <ul>
* <li>The <code>src</code> argument refers to an object that is not an
* array.
* <li>The <code>dest</code> argument refers to an object that is not an
* array.
* <li>The <code>src</code> argument and <code>dest</code> argument refer
* to arrays whose component types are different primitive types.
* <li>The <code>src</code> argument refers to an array with a primitive
* component type and the <code>dest</code> argument refers to an array
* with a reference component type.
* <li>The <code>src</code> argument refers to an array with a reference
* component type and the <code>dest</code> argument refers to an array
* with a primitive component type.
* </ul>
* <p>
* Otherwise, if any of the following is true, an
* <code>IndexOutOfBoundsException</code> is
* thrown and the destination is not modified:
* <ul>
* <li>The <code>srcPos</code> argument is negative.
* <li>The <code>destPos</code> argument is negative.
* <li>The <code>length</code> argument is negative.
* <li><code>srcPos+length</code> is greater than
* <code>src.length</code>, the length of the source array.
* <li><code>destPos+length</code> is greater than
* <code>dest.length</code>, the length of the destination array.
* </ul>
* <p>
* Otherwise, if any actual component of the source array from
* position <code>srcPos</code> through
* <code>srcPos+length-1</code> cannot be converted to the component
* type of the destination array by assignment conversion, an
* <code>ArrayStoreException</code> is thrown. In this case, let
* <b><i>k</i></b> be the smallest nonnegative integer less than
* length such that <code>src[srcPos+</code><i>k</i><code>]</code>
* cannot be converted to the component type of the destination
* array; when the exception is thrown, source array components from
* positions <code>srcPos</code> through
* <code>srcPos+</code><i>k</i><code>-1</code>
* will already have been copied to destination array positions
* <code>destPos</code> through
* <code>destPos+</code><i>k</I><code>-1</code> and no other
* positions of the destination array will have been modified.
* (Because of the restrictions already itemized, this
* paragraph effectively applies only to the situation where both
* arrays have component types that are reference types.)
*
* @param src the source array.
* @param srcPos starting position in the source array.
* @param dest the destination array.
* @param destPos starting position in the destination data.
* @param length the number of array elements to be copied.
* @exception IndexOutOfBoundsException if copying would cause
* access of data outside array bounds.
* @exception ArrayStoreException if an element in the <code>src</code>
* array could not be stored into the <code>dest</code> array
* because of a type mismatch.
* @exception NullPointerException if either <code>src</code> or
* <code>dest</code> is <code>null</code>.
*/
public static native void arraycopy(Object src, int srcPos,
Object dest, int destPos,
int length);

/**
* Returns the same hash code for the given object as
* would be returned by the default method hashCode(),
* whether or not the given object's class overrides
* hashCode().
* The hash code for the null reference is zero.
*
* @param x object for which the hashCode is to be calculated
* @return the hashCode
* @since JDK1.1
*/
public static native int identityHashCode(Object x);

/**
* System properties. The following properties are guaranteed to be defined:
* <dl>
* <dt>java.version <dd>Java version number
* <dt>java.vendor <dd>Java vendor specific string
* <dt>java.vendor.url <dd>Java vendor URL
* <dt>java.home <dd>Java installation directory
* <dt>java.class.version <dd>Java class version number
* <dt>java.class.path <dd>Java classpath
* <dt>os.name <dd>Operating System Name
* <dt>os.arch <dd>Operating System Architecture
* <dt>os.version <dd>Operating System Version
* <dt>file.separator <dd>File separator ("/" on Unix)
* <dt>path.separator <dd>Path separator (":" on Unix)
* <dt>line.separator <dd>Line separator ("\n" on Unix)
* <dt>user.name <dd>User account name
* <dt>user.home <dd>User home directory
* <dt>user.dir <dd>User's current working directory
* </dl>
*/

private static Properties props;
private static native Properties initProperties(Properties props);

/**
* Determines the current system properties.
* <p>
* First, if there is a security manager, its
* <code>checkPropertiesAccess</code> method is called with no
* arguments. This may result in a security exception.
* <p>
* The current set of system properties for use by the
* {@link #getProperty(String)} method is returned as a
* <code>Properties</code> object. If there is no current set of
* system properties, a set of system properties is first created and
* initialized. This set of system properties always includes values
* for the following keys:
* <table summary="Shows property keys and associated values">
* <tr><th>Key</th>
* <th>Description of Associated Value</th></tr>
* <tr><td><code>java.version</code></td>
* <td>Java Runtime Environment version</td></tr>
* <tr><td><code>java.vendor</code></td>
* <td>Java Runtime Environment vendor</td></tr>
* <tr><td><code>java.vendor.url</code></td>
* <td>Java vendor URL</td></tr>
* <tr><td><code>java.home</code></td>
* <td>Java installation directory</td></tr>
* <tr><td><code>java.vm.specification.version</code></td>
* <td>Java Virtual Machine specification version</td></tr>
* <tr><td><code>java.vm.specification.vendor</code></td>
* <td>Java Virtual Machine specification vendor</td></tr>
* <tr><td><code>java.vm.specification.name</code></td>
* <td>Java Virtual Machine specification name</td></tr>
* <tr><td><code>java.vm.version</code></td>
* <td>Java Virtual Machine implementation version</td></tr>
* <tr><td><code>java.vm.vendor</code></td>
* <td>Java Virtual Machine implementation vendor</td></tr>
* <tr><td><code>java.vm.name</code></td>
* <td>Java Virtual Machine implementation name</td></tr>
* <tr><td><code>java.specification.version</code></td>
* <td>Java Runtime Environment specification version</td></tr>
* <tr><td><code>java.specification.vendor</code></td>
* <td>Java Runtime Environment specification vendor</td></tr>
* <tr><td><code>java.specification.name</code></td>
* <td>Java Runtime Environment specification name</td></tr>
* <tr><td><code>java.class.version</code></td>
* <td>Java class format version number</td></tr>
* <tr><td><code>java.class.path</code></td>
* <td>Java class path</td></tr>
* <tr><td><code>java.library.path</code></td>
* <td>List of paths to search when loading libraries</td></tr>
* <tr><td><code>java.io.tmpdir</code></td>
* <td>Default temp file path</td></tr>
* <tr><td><code>java.compiler</code></td>
* <td>Name of JIT compiler to use</td></tr>
* <tr><td><code>java.ext.dirs</code></td>
* <td>Path of extension directory or directories
* <b>Deprecated.</b> <i>This property, and the mechanism
* which implements it, may be removed in a future
* release.</i> </td></tr>
* <tr><td><code>os.name</code></td>
* <td>Operating system name</td></tr>
* <tr><td><code>os.arch</code></td>
* <td>Operating system architecture</td></tr>
* <tr><td><code>os.version</code></td>
* <td>Operating system version</td></tr>
* <tr><td><code>file.separator</code></td>
* <td>File separator ("/" on UNIX)</td></tr>
* <tr><td><code>path.separator</code></td>
* <td>Path separator (":" on UNIX)</td></tr>
* <tr><td><code>line.separator</code></td>
* <td>Line separator ("\n" on UNIX)</td></tr>
* <tr><td><code>user.name</code></td>
* <td>User's account name</td></tr>
* <tr><td><code>user.home</code></td>
* <td>User's home directory</td></tr>
* <tr><td><code>user.dir</code></td>
* <td>User's current working directory</td></tr>
* </table>
* <p>
* Multiple paths in a system property value are separated by the path
* separator character of the platform.
* <p>
* Note that even if the security manager does not permit the
* <code>getProperties</code> operation, it may choose to permit the
* {@link #getProperty(String)} operation.
*
* @return the system properties
* @exception SecurityException if a security manager exists and its
* <code>checkPropertiesAccess</code> method doesn't allow access
* to the system properties.
* @see #setProperties
* @see java.lang.SecurityException
* @see java.lang.SecurityManager#checkPropertiesAccess()
* @see java.util.Properties
*/
public static Properties getProperties() {
SecurityManager sm = getSecurityManager();
if (sm != null) {
sm.checkPropertiesAccess();
}

return props;
}

/**
* Returns the system-dependent line separator string. It always
* returns the same value - the initial value of the {@linkplain
* #getProperty(String) system property} {@code line.separator}.
*
* <p>On UNIX systems, it returns {@code "\n"}; on Microsoft
* Windows systems it returns {@code "\r\n"}.
*
* @return the system-dependent line separator string
* @since 1.7
*/
public static String lineSeparator() {
return lineSeparator;
}

private static String lineSeparator;

/**
* Sets the system properties to the <code>Properties</code>
* argument.
* <p>
* First, if there is a security manager, its
* <code>checkPropertiesAccess</code> method is called with no
* arguments. This may result in a security exception.
* <p>
* The argument becomes the current set of system properties for use
* by the {@link #getProperty(String)} method. If the argument is
* <code>null</code>, then the current set of system properties is
* forgotten.
*
* @param props the new system properties.
* @exception SecurityException if a security manager exists and its
* <code>checkPropertiesAccess</code> method doesn't allow access
* to the system properties.
* @see #getProperties
* @see java.util.Properties
* @see java.lang.SecurityException
* @see java.lang.SecurityManager#checkPropertiesAccess()
*/
public static void setProperties(Properties props) {
SecurityManager sm = getSecurityManager();
if (sm != null) {
sm.checkPropertiesAccess();
}
if (props == null) {
props = new Properties();
initProperties(props);
}
System.props = props;
}

/**
* Gets the system property indicated by the specified key.
* <p>
* First, if there is a security manager, its
* <code>checkPropertyAccess</code> method is called with the key as
* its argument. This may result in a SecurityException.
* <p>
* If there is no current set of system properties, a set of system
* properties is first created and initialized in the same manner as
* for the <code>getProperties</code> method.
*
* @param key the name of the system property.
* @return the string value of the system property,
* or <code>null</code> if there is no property with that key.
*
* @exception SecurityException if a security manager exists and its
* <code>checkPropertyAccess</code> method doesn't allow
* access to the specified system property.
* @exception NullPointerException if <code>key</code> is
* <code>null</code>.
* @exception IllegalArgumentException if <code>key</code> is empty.
* @see #setProperty
* @see java.lang.SecurityException
* @see java.lang.SecurityManager#checkPropertyAccess(java.lang.String)
* @see java.lang.System#getProperties()
*/
public static String getProperty(String key) {
checkKey(key);
SecurityManager sm = getSecurityManager();
if (sm != null) {
sm.checkPropertyAccess(key);
}

return props.getProperty(key);
}

/**
* Gets the system property indicated by the specified key.
* <p>
* First, if there is a security manager, its
* <code>checkPropertyAccess</code> method is called with the
* <code>key</code> as its argument.
* <p>
* If there is no current set of system properties, a set of system
* properties is first created and initialized in the same manner as
* for the <code>getProperties</code> method.
*
* @param key the name of the system property.
* @param def a default value.
* @return the string value of the system property,
* or the default value if there is no property with that key.
*
* @exception SecurityException if a security manager exists and its
* <code>checkPropertyAccess</code> method doesn't allow
* access to the specified system property.
* @exception NullPointerException if <code>key</code> is
* <code>null</code>.
* @exception IllegalArgumentException if <code>key</code> is empty.
* @see #setProperty
* @see java.lang.SecurityManager#checkPropertyAccess(java.lang.String)
* @see java.lang.System#getProperties()
*/
public static String getProperty(String key, String def) {
checkKey(key);
SecurityManager sm = getSecurityManager();
if (sm != null) {
sm.checkPropertyAccess(key);
}

return props.getProperty(key, def);
}

/**
* Sets the system property indicated by the specified key.
* <p>
* First, if a security manager exists, its
* <code>SecurityManager.checkPermission</code> method
* is called with a <code>PropertyPermission(key, "write")</code>
* permission. This may result in a SecurityException being thrown.
* If no exception is thrown, the specified property is set to the given
* value.
* <p>
*
* @param key the name of the system property.
* @param value the value of the system property.
* @return the previous value of the system property,
* or <code>null</code> if it did not have one.
*
* @exception SecurityException if a security manager exists and its
* <code>checkPermission</code> method doesn't allow
* setting of the specified property.
* @exception NullPointerException if <code>key</code> or
* <code>value</code> is <code>null</code>.
* @exception IllegalArgumentException if <code>key</code> is empty.
* @see #getProperty
* @see java.lang.System#getProperty(java.lang.String)
* @see java.lang.System#getProperty(java.lang.String, java.lang.String)
* @see java.util.PropertyPermission
* @see SecurityManager#checkPermission
* @since 1.2
*/
public static String setProperty(String key, String value) {
checkKey(key);
SecurityManager sm = getSecurityManager();
if (sm != null) {
sm.checkPermission(new PropertyPermission(key,
SecurityConstants.PROPERTY_WRITE_ACTION));
}

return (String) props.setProperty(key, value);
}

/**
* Removes the system property indicated by the specified key.
* <p>
* First, if a security manager exists, its
* <code>SecurityManager.checkPermission</code> method
* is called with a <code>PropertyPermission(key, "write")</code>
* permission. This may result in a SecurityException being thrown.
* If no exception is thrown, the specified property is removed.
* <p>
*
* @param key the name of the system property to be removed.
* @return the previous string value of the system property,
* or <code>null</code> if there was no property with that key.
*
* @exception SecurityException if a security manager exists and its
* <code>checkPropertyAccess</code> method doesn't allow
* access to the specified system property.
* @exception NullPointerException if <code>key</code> is
* <code>null</code>.
* @exception IllegalArgumentException if <code>key</code> is empty.
* @see #getProperty
* @see #setProperty
* @see java.util.Properties
* @see java.lang.SecurityException
* @see java.lang.SecurityManager#checkPropertiesAccess()
* @since 1.5
*/
public static String clearProperty(String key) {
checkKey(key);
SecurityManager sm = getSecurityManager();
if (sm != null) {
sm.checkPermission(new PropertyPermission(key, "write"));
}

return (String) props.remove(key);
}

private static void checkKey(String key) {
if (key == null) {
throw new NullPointerException("key can't be null");
}
if (key.equals("")) {
throw new IllegalArgumentException("key can't be empty");
}
}

/**
* Gets the value of the specified environment variable. An
* environment variable is a system-dependent external named
* value.
*
* <p>If a security manager exists, its
* {@link SecurityManager#checkPermission checkPermission}
* method is called with a
* <code>{@link RuntimePermission}("getenv."+name)</code>
* permission. This may result in a {@link SecurityException}
* being thrown. If no exception is thrown the value of the
* variable <code>name</code> is returned.
*
* <p><a name="EnvironmentVSSystemProperties"><i>System
* properties</i> and <i>environment variables</i></a> are both
* conceptually mappings between names and values. Both
* mechanisms can be used to pass user-defined information to a
* Java process. Environment variables have a more global effect,
* because they are visible to all descendants of the process
* which defines them, not just the immediate Java subprocess.
* They can have subtly different semantics, such as case
* insensitivity, on different operating systems. For these
* reasons, environment variables are more likely to have
* unintended side effects. It is best to use system properties
* where possible. Environment variables should be used when a
* global effect is desired, or when an external system interface
* requires an environment variable (such as <code>PATH</code>).
*
* <p>On UNIX systems the alphabetic case of <code>name</code> is
* typically significant, while on Microsoft Windows systems it is
* typically not. For example, the expression
* <code>System.getenv("FOO").equals(System.getenv("foo"))</code>
* is likely to be true on Microsoft Windows.
*
* @param name the name of the environment variable
* @return the string value of the variable, or <code>null</code>
* if the variable is not defined in the system environment
* @throws NullPointerException if <code>name</code> is <code>null</code>
* @throws SecurityException
* if a security manager exists and its
* {@link SecurityManager#checkPermission checkPermission}
* method doesn't allow access to the environment variable
* <code>name</code>
* @see #getenv()
* @see ProcessBuilder#environment()
*/
public static String getenv(String name) {
SecurityManager sm = getSecurityManager();
if (sm != null) {
sm.checkPermission(new RuntimePermission("getenv."+name));
}

return ProcessEnvironment.getenv(name);
}


/**
* Returns an unmodifiable string map view of the current system environment.
* The environment is a system-dependent mapping from names to
* values which is passed from parent to child processes.
*
* <p>If the system does not support environment variables, an
* empty map is returned.
*
* <p>The returned map will never contain null keys or values.
* Attempting to query the presence of a null key or value will
* throw a {@link NullPointerException}. Attempting to query
* the presence of a key or value which is not of type
* {@link String} will throw a {@link ClassCastException}.
*
* <p>The returned map and its collection views may not obey the
* general contract of the {@link Object#equals} and
* {@link Object#hashCode} methods.
*
* <p>The returned map is typically case-sensitive on all platforms.
*
* <p>If a security manager exists, its
* {@link SecurityManager#checkPermission checkPermission}
* method is called with a
* <code>{@link RuntimePermission}("getenv.*")</code>
* permission. This may result in a {@link SecurityException} being
* thrown.
*
* <p>When passing information to a Java subprocess,
* <a href=#EnvironmentVSSystemProperties>system properties</a>
* are generally preferred over environment variables.
*
* @return the environment as a map of variable names to values
* @throws SecurityException
* if a security manager exists and its
* {@link SecurityManager#checkPermission checkPermission}
* method doesn't allow access to the process environment
* @see #getenv(String)
* @see ProcessBuilder#environment()
* @since 1.5
*/
public static java.util.Map<String,String> getenv() {
SecurityManager sm = getSecurityManager();
if (sm != null) {
sm.checkPermission(new RuntimePermission("getenv.*"));
}

return ProcessEnvironment.getenv();
}

/**
* Terminates the currently running Java Virtual Machine. The
* argument serves as a status code; by convention, a nonzero status
* code indicates abnormal termination.
* <p>
* This method calls the <code>exit</code> method in class
* <code>Runtime</code>. This method never returns normally.
* <p>
* The call <code>System.exit(n)</code> is effectively equivalent to
* the call:
* <blockquote><pre>
* Runtime.getRuntime().exit(n)
* </pre></blockquote>
*
* @param status exit status.
* @throws SecurityException
* if a security manager exists and its <code>checkExit</code>
* method doesn't allow exit with the specified status.
* @see java.lang.Runtime#exit(int)
*/
public static void exit(int status) {
Runtime.getRuntime().exit(status);
}

/**
* Runs the garbage collector.
* <p>
* Calling the <code>gc</code> method suggests that the Java Virtual
* Machine expend effort toward recycling unused objects in order to
* make the memory they currently occupy available for quick reuse.
* When control returns from the method call, the Java Virtual
* Machine has made a best effort to reclaim space from all discarded
* objects.
* <p>
* The call <code>System.gc()</code> is effectively equivalent to the
* call:
* <blockquote><pre>
* Runtime.getRuntime().gc()
* </pre></blockquote>
*
* @see java.lang.Runtime#gc()
*/
public static void gc() {
Runtime.getRuntime().gc();
}

/**
* Runs the finalization methods of any objects pending finalization.
* <p>
* Calling this method suggests that the Java Virtual Machine expend
* effort toward running the <code>finalize</code> methods of objects
* that have been found to be discarded but whose <code>finalize</code>
* methods have not yet been run. When control returns from the
* method call, the Java Virtual Machine has made a best effort to
* complete all outstanding finalizations.
* <p>
* The call <code>System.runFinalization()</code> is effectively
* equivalent to the call:
* <blockquote><pre>
* Runtime.getRuntime().runFinalization()
* </pre></blockquote>
*
* @see java.lang.Runtime#runFinalization()
*/
public static void runFinalization() {
Runtime.getRuntime().runFinalization();
}

/**
* Enable or disable finalization on exit; doing so specifies that the
* finalizers of all objects that have finalizers that have not yet been
* automatically invoked are to be run before the Java runtime exits.
* By default, finalization on exit is disabled.
*
* <p>If there is a security manager,
* its <code>checkExit</code> method is first called
* with 0 as its argument to ensure the exit is allowed.
* This could result in a SecurityException.
*
* @deprecated This method is inherently unsafe. It may result in
* finalizers being called on live objects while other threads are
* concurrently manipulating those objects, resulting in erratic
* behavior or deadlock.
* @param value indicating enabling or disabling of finalization
* @throws SecurityException
* if a security manager exists and its <code>checkExit</code>
* method doesn't allow the exit.
*
* @see java.lang.Runtime#exit(int)
* @see java.lang.Runtime#gc()
* @see java.lang.SecurityManager#checkExit(int)
* @since JDK1.1
*/
@Deprecated
public static void runFinalizersOnExit(boolean value) {
Runtime.runFinalizersOnExit(value);
}

/**
* Loads the native library specified by the filename argument. The filename
* argument must be an absolute path name.
*
* If the filename argument, when stripped of any platform-specific library
* prefix, path, and file extension, indicates a library whose name is,
* for example, L, and a native library called L is statically linked
* with the VM, then the JNI_OnLoad_L function exported by the library
* is invoked rather than attempting to load a dynamic library.
* A filename matching the argument does not have to exist in the
* file system.
* See the JNI Specification for more details.
*
* Otherwise, the filename argument is mapped to a native library image in
* an implementation-dependent manner.
*
* <p>
* The call <code>System.load(name)</code> is effectively equivalent
* to the call:
* <blockquote><pre>
* Runtime.getRuntime().load(name)
* </pre></blockquote>
*
* @param filename the file to load.
* @exception SecurityException if a security manager exists and its
* <code>checkLink</code> method doesn't allow
* loading of the specified dynamic library
* @exception UnsatisfiedLinkError if either the filename is not an
* absolute path name, the native library is not statically
* linked with the VM, or the library cannot be mapped to
* a native library image by the host system.
* @exception NullPointerException if <code>filename</code> is
* <code>null</code>
* @see java.lang.Runtime#load(java.lang.String)
* @see java.lang.SecurityManager#checkLink(java.lang.String)
*/
@CallerSensitive
public static void load(String filename) {
Runtime.getRuntime().load0(Reflection.getCallerClass(), filename);
}

/**
* Loads the native library specified by the <code>libname</code>
* argument. The <code>libname</code> argument must not contain any platform
* specific prefix, file extension or path. If a native library
* called <code>libname</code> is statically linked with the VM, then the
* JNI_OnLoad_<code>libname</code> function exported by the library is invoked.
* See the JNI Specification for more details.
*
* Otherwise, the libname argument is loaded from a system library
* location and mapped to a native library image in an implementation-
* dependent manner.
* <p>
* The call <code>System.loadLibrary(name)</code> is effectively
* equivalent to the call
* <blockquote><pre>
* Runtime.getRuntime().loadLibrary(name)
* </pre></blockquote>
*
* @param libname the name of the library.
* @exception SecurityException if a security manager exists and its
* <code>checkLink</code> method doesn't allow
* loading of the specified dynamic library
* @exception UnsatisfiedLinkError if either the libname argument
* contains a file path, the native library is not statically
* linked with the VM, or the library cannot be mapped to a
* native library image by the host system.
* @exception NullPointerException if <code>libname</code> is
* <code>null</code>
* @see java.lang.Runtime#loadLibrary(java.lang.String)
* @see java.lang.SecurityManager#checkLink(java.lang.String)
*/
@CallerSensitive
public static void loadLibrary(String libname) {
Runtime.getRuntime().loadLibrary0(Reflection.getCallerClass(), libname);
}

/**
* Maps a library name into a platform-specific string representing
* a native library.
*
* @param libname the name of the library.
* @return a platform-dependent native library name.
* @exception NullPointerException if <code>libname</code> is
* <code>null</code>
* @see java.lang.System#loadLibrary(java.lang.String)
* @see java.lang.ClassLoader#findLibrary(java.lang.String)
* @since 1.2
*/
public static native String mapLibraryName(String libname);

/**
* Create PrintStream for stdout/err based on encoding.
*/
private static PrintStream newPrintStream(FileOutputStream fos, String enc) {
if (enc != null) {
try {
return new PrintStream(new BufferedOutputStream(fos, 128), true, enc);
} catch (UnsupportedEncodingException uee) {}
}
return new PrintStream(new BufferedOutputStream(fos, 128), true);
}


/**
* Initialize the system class. Called after thread initialization.
*/
private static void initializeSystemClass() {

// VM might invoke JNU_NewStringPlatform() to set those encoding
// sensitive properties (user.home, user.name, boot.class.path, etc.)
// during "props" initialization, in which it may need access, via
// System.getProperty(), to the related system encoding property that
// have been initialized (put into "props") at early stage of the
// initialization. So make sure the "props" is available at the
// very beginning of the initialization and all system properties to
// be put into it directly.
props = new Properties();
initProperties(props); // initialized by the VM

// There are certain system configurations that may be controlled by
// VM options such as the maximum amount of direct memory and
// Integer cache size used to support the object identity semantics
// of autoboxing. Typically, the library will obtain these values
// from the properties set by the VM. If the properties are for
// internal implementation use only, these properties should be
// removed from the system properties.
//
// See java.lang.Integer.IntegerCache and the
// sun.misc.VM.saveAndRemoveProperties method for example.
//
// Save a private copy of the system properties object that
// can only be accessed by the internal implementation. Remove
// certain system properties that are not intended for public access.
sun.misc.VM.saveAndRemoveProperties(props);


lineSeparator = props.getProperty("line.separator");
sun.misc.Version.init();

FileInputStream fdIn = new FileInputStream(FileDescriptor.in);
FileOutputStream fdOut = new FileOutputStream(FileDescriptor.out);
FileOutputStream fdErr = new FileOutputStream(FileDescriptor.err);
setIn0(new BufferedInputStream(fdIn));
setOut0(newPrintStream(fdOut, props.getProperty("sun.stdout.encoding")));
setErr0(newPrintStream(fdErr, props.getProperty("sun.stderr.encoding")));

// Load the zip library now in order to keep java.util.zip.ZipFile
// from trying to use itself to load this library later.
loadLibrary("zip");

// Setup Java signal handlers for HUP, TERM, and INT (where available).
Terminator.setup();

// Initialize any miscellenous operating system settings that need to be
// set for the class libraries. Currently this is no-op everywhere except
// for Windows where the process-wide error mode is set before the java.io
// classes are used.
sun.misc.VM.initializeOSEnvironment();

// The main thread is not added to its thread group in the same
// way as other threads; we must do it ourselves here.
Thread current = Thread.currentThread();
current.getThreadGroup().add(current);

// register shared secrets
setJavaLangAccess();

// Subsystems that are invoked during initialization can invoke
// sun.misc.VM.isBooted() in order to avoid doing things that should
// wait until the application class loader has been set up.
// IMPORTANT: Ensure that this remains the last initialization action!
sun.misc.VM.booted();
}

private static void setJavaLangAccess() {
// Allow privileged classes outside of java.lang
sun.misc.SharedSecrets.setJavaLangAccess(new sun.misc.JavaLangAccess(){
public sun.reflect.ConstantPool getConstantPool(Class<?> klass) {
return klass.getConstantPool();
}
public boolean casAnnotationType(Class<?> klass, AnnotationType oldType, AnnotationType newType) {
return klass.casAnnotationType(oldType, newType);
}
public AnnotationType getAnnotationType(Class<?> klass) {
return klass.getAnnotationType();
}
public Map<Class<? extends Annotation>, Annotation> getDeclaredAnnotationMap(Class<?> klass) {
return klass.getDeclaredAnnotationMap();
}
public byte[] getRawClassAnnotations(Class<?> klass) {
return klass.getRawAnnotations();
}
public byte[] getRawClassTypeAnnotations(Class<?> klass) {
return klass.getRawTypeAnnotations();
}
public byte[] getRawExecutableTypeAnnotations(Executable executable) {
return Class.getExecutableTypeAnnotationBytes(executable);
}
public <E extends Enum<E>>
E[] getEnumConstantsShared(Class<E> klass) {
return klass.getEnumConstantsShared();
}
public void blockedOn(Thread t, Interruptible b) {
t.blockedOn(b);
}
public void registerShutdownHook(int slot, boolean registerShutdownInProgress, Runnable hook) {
Shutdown.add(slot, registerShutdownInProgress, hook);
}
public int getStackTraceDepth(Throwable t) {
return t.getStackTraceDepth();
}
public StackTraceElement getStackTraceElement(Throwable t, int i) {
return t.getStackTraceElement(i);
}
public String newStringUnsafe(char[] chars) {
return new String(chars, true);
}
public Thread newThreadWithAcc(Runnable target, AccessControlContext acc) {
return new Thread(target, acc);
}
public void invokeFinalize(Object o) throws Throwable {
o.finalize();
}
});
}
}
Your browser is out-of-date!

Update your browser to view this website correctly. Update my browser now

×